 CloudEdge App Docs
COOAU G1 PRO 4G LTE Camera
Setup and usage guide for the COOAU G1 PRO 4G LTE Cellular Wireless Security Camera with the CloudEdge app — SIM card selection, power-on, adding the camera, APN settings, app functions, charging, installation and PIR detection.
This guide covers the COOAU G1 PRO 4G LTE Cellular Wireless Security Camera and the CloudEdge app, including SIM card selection, power-on, adding the camera, APN configuration, app functions, charging, installation and PIR motion detection.
This camera works with the COOAU Cam app and is also compatible with the CloudEdge app. For more help, see the 4G Camera FAQs. If you have tried every step and still have no luck, send your order and your problem to [email protected] (US) or [email protected] (EU).
1. After-Sale Support
Dear Customer,
Thank you for your support and trust in the COOAU security camera. Customer service is our top priority. If you have any problems or suggestions, please feel free to contact us by Amazon message or send e-mails to our official mailbox, and we will provide you with technical support within 24 hours.
COOAU Official Mailbox:
- [email protected] (EU)
- [email protected] (US)
Sincerely, COOAU Service Team
1.1 Important Instructions Before Using
- Although every effort has been made to make the manuals complete and accurate, some discrepancies may occur due to product or app updates.
- Please insert or pull out the SIM card only when the camera is turned off.
- To ensure that the camera can obtain a good mobile network, it is recommended that you use the SIM card that comes with the camera.
- The SIM card that comes with the camera only provides 100M of data for free. Please add the data plan in the app in time after adding the camera successfully.
- To ensure the continued use of the camera, please ensure that the SIM card has sufficient data, and continue to supplement the data plan for the SIM card.
- The camera is specially designed for motion detection recording and does not support 24/7 video streaming and recording.
- To ensure battery life, it is not recommended to point the camera directly at the road or in a place with a lot of people/vehicles.
2. What's Included
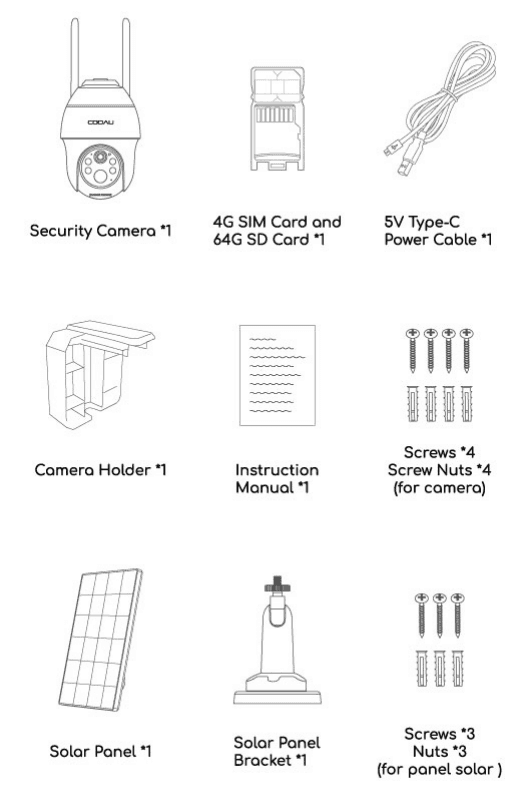
- Security Camera × 1
- 4G SIM Card and 64G SD Card × 1
- 5V Type-C Power Cable × 1
- Camera Holder × 1
- Instruction Manual × 1
- Screws × 4 / Screw Nuts × 4 (for camera)
- Solar Panel × 1
- Solar Panel Bracket × 1
- Screws × 3 / Nuts × 3 (for solar panel)
2.1 Important: Select SIM Card
The camera comes with a SIM card in the box that supports the major carrier networks in your country. This included SIM card has the advantages of easy installation and use, unlimited traffic, quick and convenient traffic recharge, strong network compatibility, strong 4G signal, strong compatibility with cameras, and no need to sign an agreement with the operator. It is recommended that you use it.
This SIM card is only for this camera; do not insert it into smartphones or other electronic products.
- Some SIM cards are marked with a PIN code. Please note that this camera is prohibited from using such a SIM card with a PIN code. In addition, because the camera is not compatible, please do not choose to use IOT or M2M SIM cards.
- Cameras purchased in this country cannot be used in other countries because of different 4G frequency bands, so please pay attention to ensure that the purchased SIM card is supported for use in your country. (The SIM card that comes with this camera is universal in Europe.)
3. Camera Introduction
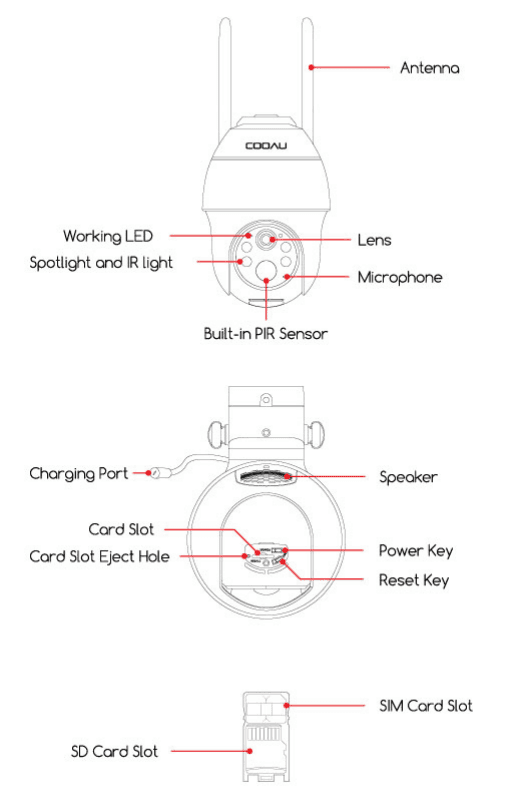
- Antenna
- Working LED
- Lens
- Spotlight and IR light
- Microphone
- Built-in PIR Sensor
- Charging Port
- Speaker
- Card Slot / Card Slot Eject Hole
- Power Key / Reset Key
- SIM Card Slot / SD Card Slot
| Part | Description |
|---|---|
| Power Key | Press and hold the power button for 5 seconds to turn on the camera. |
| Reset Key | Press and hold the RESET key for 5 seconds to reset the device. (If you have modified the settings, they will revert to the factory default settings.) |
| SD Card Slot | Support local SD card storage (up to 128G). |
| SIM Card Slot | Insert SIM card here to provide network. |
| PIR Sensor | Detect moving objects up to about 10 meters. |
| Card Slot Eject Hole | Use the card pin in the accessory to poke this hole firmly, and the card slot will pop out. |
| Working Status Light | Red light continuously on: camera network abnormal. Red light flashing: waiting for network connection. Red and blue lights flash alternately: SIM card recognition failed. Blue light flashing slowly: SIM card recognition is successful. |
| Charge Port | Use a 5V/2A power supply to charge the camera. |
4. Download and Register the App
4.1 Download the "COOAU Cam" App
Search for "COOAU Cam" in the App Store or Google Play, or scan the QR code in the manual to download and install it on your smartphone. (PS: This camera is also compatible with the CloudEdge app.)
Due to version updates, the app page may be different. Please refer to the actual situation. If you have any questions, please feel free to contact us: [email protected] (US) / [email protected] (EU).
4.2 App Permission Settings
When using the application for the first time, please turn on the following 2 permissions.
- Allow "COOAU Cam" to access mobile cellular data and WLAN, otherwise you will not be able to add devices.
- Allow "COOAU Cam" to receive messages, otherwise the phone will not receive alert push notifications when motion detection or audible alerts are triggered.
4.3 Register Account
New users must register by email. The concrete steps are as follows:
Tips:
- Please use the correct e-mail.
- Please select the correct country code.
- When registering for a new account, please select the region where you are actually located. (Cameras cannot be shared between different registration regions.)
- Please note that you cannot add a camera with an account registered in a country other than Europe.
5. How to Insert the SIM Card
The included SIM card and SD card are pre-installed in the camera. If you need to replace them with other brands, please refer to this section for replacement. The SIM card slot is located in the rubber cover under the camera lens; please remove the rubber cover first.
Please install the SIM card (or SD card) according to the placement method of the reference picture.
When choosing a SIM card to insert into the SIM card slot, please remember: the color side is facing up, then you need to push the correct side into the SIM slot and press it in completely.
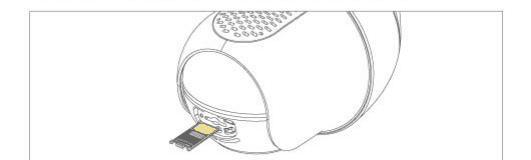
If it is difficult to operate, please use small tweezers to assist in pressing.
Do not insert the SIM card into the card slot backward. It will cause the SIM card not to be recognized, and the SIM card will be stuck inside and cannot be pulled out.
6. Power On the Camera
After inserting the SIM card, press and hold the power button of the camera for 5 seconds until the working indicator on the side of the lens lights up in red (if it can't be powered on, please plug in a DC 5V 2A power adapter to charge the camera for 15 min first), then start the connection.
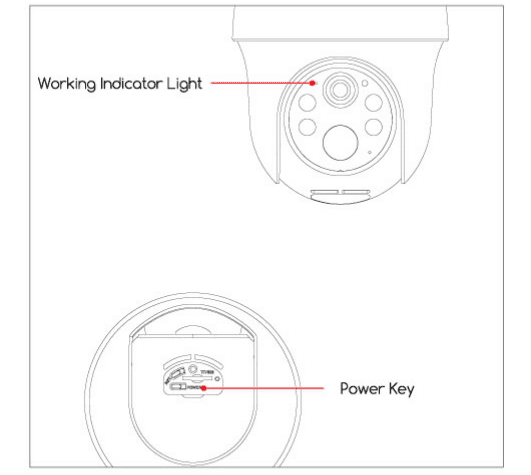
Wait for about 30 seconds until the working indicator turns to flashing blue light, and you will hear the voice prompt, which means the camera has successfully connected to the 4G network, and the next step is to add the camera in the app.
7. Add the Camera on the Phone
7.1 Connect Quickly
You can choose to scan the camera's QR code to connect the camera quickly as follows:
7.2 Normal Method
Notice:
- If you want to use other SD card storage, please pay attention to format the SD card as FAT32 or exFat, otherwise the camera will not be able to recognize the SD card.
- Press and hold the "Power" button for 5 seconds until the working status light turns red.
- Open the app and follow the steps to complete the connection. Please note: before proceeding to step 6, please observe whether the working light turns into a flashing blue light. If not, please wait patiently for the camera to connect to the network. After successful network matching (you will hear a prompt tone), you can use the camera to scan the code to connect.
7.3 Add Failed? Please Refer to the Following to Resolve the Issues
| Camera voice prompt | Working light status | Camera status | Solutions |
|---|---|---|---|
| Wait for the connection timeout | Indicator light off | If the network is not configured for a long time, the device will automatically sleep | Press the power button to restart |
| The SIM card not found | The red and blue lights flash alternately and then turn off | The camera does not recognize this SIM card | 1. Check whether the SIM card is inserted in the correct direction. 2. Check whether the SIM card is not fully inserted, and reinsert it. 3. Whether to format the SD card inserted together (if there is an SD card for storage). |
| The SIM card cannot be used | Red and blue lights flash alternately | The camera cannot be registered to the carrier network | 1. Check whether the SIM card has a PIN code; if marked on the card, please use another card without a PIN code (do not insert the camera's own SIM card into the mobile phone). 2. Check whether your SIM card has been activated; if not, please contact our COOAU service team for help. 3. Check if your SIM card data is sufficient. 4. The signal may be weak at the current location, please move the camera to a position with a better signal. |
| No LTE signal | The red light keeps flashing | SIM card has no data plan or 4G signal difference | 1. Please check if your SIM card's data plan is available. 2. The current 4G signal is weak, please move the camera to a better signal location, or replace the SIM card. |
| APN not matched | Red and blue lights flash alternately | The camera is not compatible with the APN of the SIM card | Please import the APN of the SIM card into the camera in the app (see APN Settings below for details). |
If you try to add a camera several times but it still fails, please message your order and problem to [email protected] (US) or [email protected] (EU).
8. APN Settings
When using the local SIM card, there may be a probability that the APN cannot be recognized. You need to manually import APN information to the camera.
9. App Function Introduction
9.1 App Settings
| No. | Function | Description |
|---|---|---|
| 1 | Family management | You can manage the current family structure, create a new family and join a family. |
| 2 | Add a Camera | Add a new camera to your account. |
| 3 | List management | Tap here to edit this camera list or manage your room. |
| 4 | Subscribe to the cloud | You can click here to subscribe to cloud storage according to your needs. |
| 5 | Hide current view or not | — |
| 6 | Go to the monitor details page | — |
| 7 | Reading history | — |
| 8 | Camera name | — |
| 9 | Quick settings | Notifications, device sharing, alerts, cloud, help, discovery settings. |
| 10 | Home page | — |
| 11 | Message History | — |
| 12 | My account | — |
Message page:
| No. | Function | Description |
|---|---|---|
| 1 | Alarm messages | Notifications about motion detection history. |
| 2 | Share | Check shared device history. |
| 3 | Delete | Delete unnecessary historical detection alarm notifications. |
| 4 | Monitoring records | View monitoring records. |
My account page:
| No. | Function | Description |
|---|---|---|
| 1 | Account | Edit account details, check QR code, reset password, log out of app. |
| 2 | Subscribe to the cloud | You can click here to subscribe to cloud storage according to your needs. |
| 3 | AI Intelligent Analysis | — |
| 4 | My Service | View cloud storage subscription data here. |
| 5 | Family management | Camera classification. |
| 6 | Share | Sharing camera and sharing history on this account. |
| 7 | Album | Checking images/videos stored on your smartphone. |
| 8 | Help | FAQ, feedback message. |
| 9 | About us | You can see the Official Website of COOAU and the Official Customer Service Mailbox. |
| 10 | Settings | In-app alert sound, app version confirmation, clear cache, deactivate account. |
9.2 Camera Usage Settings
| No. | Function | Description |
|---|---|---|
| 1 | Detailed settings page | You can make various detailed settings for the camera. |
| 2 | Current date and time | — |
| 3 | Camera speaker on/off | When this function is activated, you can listen to the audio from the camera side. |
| 4 | Full screen option | Tap to enable full screen view. |
| 5 | Battery status | — |
| 6 | Network Bit Rate and 4G Signal Strength | — |
| 7 | 4G Management | You can check 4G traffic and purchase a 4G data plan. |
| 8 | Adjusting video clarity | You can choose the video/image quality. |
| 9 | Live mode | Basic Function Buttons. |
| 10 | History | SD card video playback. |
| 11 | Cloud | Cloud storage video playback. |
| 12 | Photo | You can capture live video as a still image and save it to your phone. |
| 13 | Intercom | Press and hold the button while talking and hear a voice coming from the camera. |
| 14 | Recording | You can manually record the video you want at any time. It will be saved to your phone. |
| 15 | Motion detection | Turn motion detection on or off. |
| 16 | PTZ remote control | The pan/tilt angle can be adjusted. |
| 17 | Light | Turn the light on or off manually. |
| 18 | Siren | Turn the siren on or off manually. |
| 19 | Alert with sound and light | Tap to go to the sound and light alarm setting page. |
| 20 | Full color mode | Tap to go to night vision settings page. |
| 21 | Album | Manually captured screenshots and video files that are stored on your phone. |
History page:
| No. | Function | Description |
|---|---|---|
| 1 | Video timeline and zoom button | Drag to select the date on a 24-hour timeline. Tap the zoom button and slide up or down to change the time range of the timeline. |
| 2 | Calendar | Select and play recorded video based on date. |
| 3 | Alarm | Watch the video of the alarm message. |
| 4 | Photo | Video snapshot. |
| 5 | Record | Manually record a video. |
| 6 | Download | — |
| 7 | Delete | Delete unnecessary history records. |
| 8 | Album | Save screenshots and manually recorded video files. |
9.3 Camera Settings
| No. | Function | Description |
|---|---|---|
| 1 | Rename / parameters | Rename your camera and check the parameters of this camera. |
| 2 | Receive Alert Notifications | Alarm notification received or not. |
| 3 | Alarm management | Manage motion detection here, adjust detection sensitivity or select detection areas, etc. |
| 4 | Image Settings | Manage night vision mode, screen switching and frequency here. |
| 5 | Device Share | Share this camera with others. |
| 6 | Installation Guide | Instructions for exact camera installation. |
| 7 | Data Plan | Purchase the required data package, view current usage progress or order history here. |
| 8 | Location Management | Change this camera to another camera list. |
| 9 | Work Indicator (LED status) | Turn on/off the work indicator. |
| 10 | Time Setting | Change the time display to a 12-hour system. |
| 11 | Sound Settings | You can turn "Microphone, Sound Recording, Speaker" on or off and adjust the speaker volume. |
| 12 | Video Encryption | Set a password for your video. |
| 13 | Battery Management | Here you can set the power supply mode and current battery performance. |
| 14 | Recording Management | Set recording time; check SD card capacity. |
| 15 | Amazon Echo | Check out the guide on how to connect to ALEXA. |
| 16 | Check New Version | — |
| 17 | Reset Device | — |
| 18 | Delete Device | — |
9.4 Function Introduction
9.4.1 4G Data Usage Management
| Nation | Payment Method | Unlimited Data / 3-Day Trial | Unlimited Data / Month | Unlimited Data / Quarter | Unlimited Data / Year |
|---|---|---|---|---|---|
| USA | PayPal Payment | Free 100MB | $15.99 | $43.99 | $159.99 |
| USA | Google / Apple Pay | Free 100MB | $20.99 | $57.99 | $209.99 |
| Europe | PayPal Payment | Free 100MB | $12.99 | $35.99 | $129.99 |
| Europe | Google / Apple Pay | Free 100MB | $16.99 | $46.99 | $169.99 |
*The package rates vary depending on the payment method selected.
You can check the data usage of the SIM card we provide in the camera system settings (we provide 100m data for free). You can purchase corresponding unlimited streaming data packages as needed to maintain the daily traffic usage of your camera (you can click "My Orders" to view your purchase history).
When will the camera consume data?
- When you watch the real-time image of the camera remotely, data traffic will be consumed.
- When the camera detects and records, data traffic will be consumed.
- When you use cloud storage instead of SD card storage, additional traffic will be consumed because the detection and recording content still needs to be uploaded to the cloud.
- When you set up the camera in the app, a small amount of data will be consumed.
Notice:
- Using cloud storage will consume a lot of your data traffic, because in addition to the data traffic consumed by recording videos, uploading videos to the cloud will also consume a certain amount of data traffic.
- The amount of traffic consumed depends on the clarity of your video, the length of the video, the real-time viewing time, etc.
9.4.2 Night Vision Setting
Setting Path: Camera Setting → Image Settings → Full Color Mode
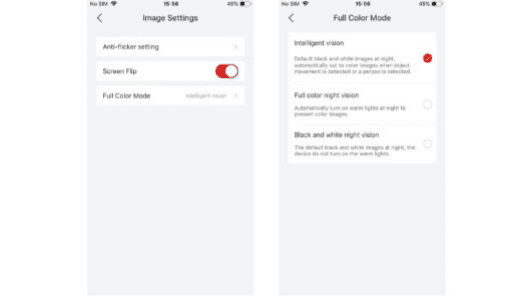
- Intelligent Vision: The default is black and white night vision at night (when you view the real-time video in the app); the white light will only turn on when a moving object or person is detected, and record a colorful night video.
- Full Color Night Vision: The white light will stay on at night, so whenever you view live video in the app, it will be a colorful night video.
- Black and White Night Vision: If you don't want the white light to be on, please note that when switching to black and white night vision, you must first turn off the sound and light alarm or only choose to turn on the sound alarm, otherwise it will be affected by the sound and light alarm. When there are people, the camera will still turn on the white light.
9.4.3 Video Encryption Setting
Setting Path: Camera Setting → Video Encryption
You can set another password protection here. After setting the password, you need to enter the password to play back the video in the app and the video in the cloud storage, so that only you can watch your video.
Note: Since the SD card storage way is limited by the type of SD card, the current password cannot guarantee that the video in the SD card is also protected by the password.
9.4.4 Alarm Management
Setting Path: Camera Setting → Alarm Management
| No. | Function | Description |
|---|---|---|
| 1 | Motion Detection | Activate/deactivate motion detection. |
| 2 | Detection Sensitivity | You can set the detection sensitivity according to your needs. |
| 3 | Humanoid Detection | Set the time period for human detection (divided into day and night) and sensitivity. |
| 4 | Working Mode | You can choose the working mode of this camera. |
| 5 | Recording Time | Set the recording time: 10S, 20S, 30S or Auto. |
| 6 | Alarm Interval | Set the alarm interval: 2 min, 5 min, 10 min or Turn-off. |
| 7 | Alert Plan | You can customize the length of time you need an alarm notification. |
| 8 | Alarm Area | You can select a detection area that is important to you, thus filtering out other invalid alarms. |
| 9 | Audio warning and strobe light | Turn on the sound and light alarm. You can choose one of three options depending on your night protection needs. |
| 10 | Sound and Light Alarm Plan | Set the Sound and Light Alarm Plan. |
Custom Mode of the Working Mode
Here you can choose to adjust the following:
- Humanoid detection: Choose to turn on or off humanoid detection (day and night can be set separately).
- Sensitivity adjustment: You can choose to adjust the sensitivity of humanoid detection.
- Recording Time: You can choose how long the camera will record when a person is detected. (10s–30s)
- Recording interval: When you set a recording interval (for example, two minutes), then after you detected and recorded once, the camera will not record in the next two minutes even if people are continuously detected, so please choose the recording interval carefully.
PIR Sensor Detection Range
The PIR detection range can be customized to meet your specific needs. You may refer to the following table to set it up in Device Settings via COOAU Cam app.
| Sensitivity | Detection Distance (for moving and living objects) |
|---|---|
| Level 1-3 (Low) | Up to 3-5 meters |
| Level 4-7 (Med) | Up to 5-7 meters |
| Level 8-10 (High) | Up to 7-10 meters |
10. Charge the Camera
It is recommended to charge 6-8 hours to fully charge the camera battery before using it for the first time.
- Charge the camera with a standard and high-quality 5V power adapter (not included).
- Use the solar panel to charge the camera continuously.
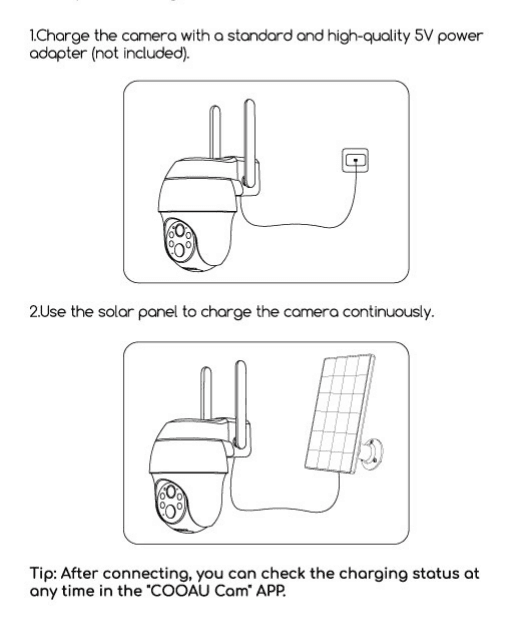
Tip: After connecting, you can check the charging status at any time in the "COOAU Cam" app.
11. Install the Camera
11.1 Notes Before Installation
- Install the camera 2-3 meters (7-10 ft) above ground. The detection range of the motion sensor would be maximized at such a height.
- For effective motion detection, please install the camera angularly.
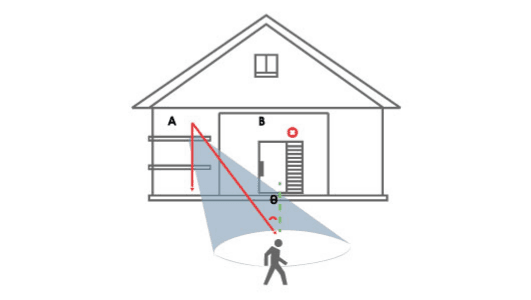
NOTE: If a moving object approaches the PIR sensor vertically, the camera may fail to detect motion.
11.2 How to Install It
Note: The battery of our camera is located where the bracket is attached to the camera; please do not nail it inwards from the outside as this will damage the battery causing it to burn.
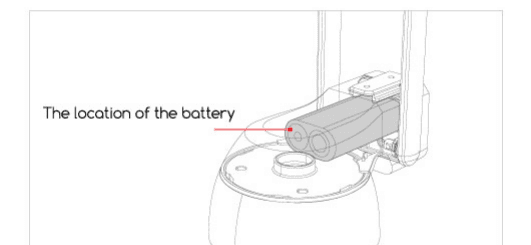
Mounting options:
- Ceiling Mounting — Only need 2 screws to secure the top of the bracket.
- Wall Mounting — Only need 3 screws to secure the side of the bracket.
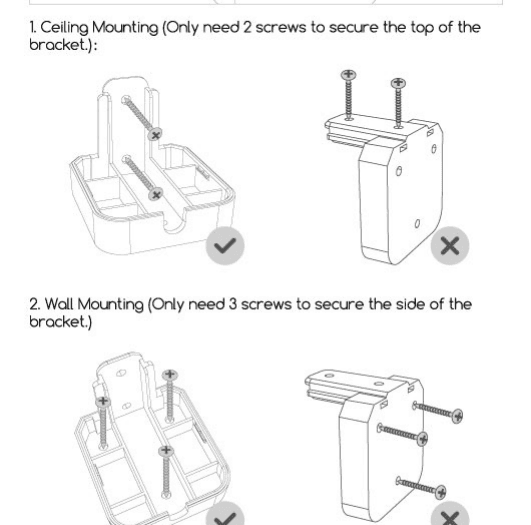
12. FAQs
For more detailed FAQs, please log in to the app: "Me" → "Help" → "4G Camera".
Q: The camera cannot be turned on?
A:
- Make sure the camera is fully charged. Please use the 5V power adapter to fully charge the camera before turning it on.
- If the camera is faulty or water has entered, please contact the customer service staff of the brand manufacturer for help.
Q: Failed to add the camera?
A: Please refer to the "Add Failed?" table above to find solutions, or contact the customer service personnel of the brand for help.
Q: After the first use for a period of time, the camera fails to connect to the internet?
A:
- If you use the SIM card that comes with the camera, only a 100M data plan will be given for free. To avoid running out of data, please replenish the data plan in the app in time.
- Please check whether the SIM card data plan is normal, such as arrears, excessive data usage, etc., and regularly supplement the data plan for the SIM card.
- Please check whether the 4G network signal around the camera is good, and avoid signal interference around.
- Check whether the SIM card is loose.
Q: The camera drops frequently and cannot be connected?
A:
- Please check whether the 4G network signal around the camera is good, and avoid signal interference around.
- Check whether the SIM card is loose.
- Check whether the 4G network of your SIM card operator covers the installation location of the camera. It is recommended to try the SIM card that comes with the camera.
Q: The mobile phone cannot receive alarm push messages?
A:
- Check whether the message push permission of the app has been enabled in the system settings of the mobile phone.
- Restart the phone, and the Android phone will try to clear the cache.
- Check whether the camera has the motion detection function enabled.
- Check whether the network of the camera and mobile phone is good.
- Check whether the camera is online, and check whether the SIM card data plan is normal, such as arrears, excessive data usage, etc.
Q: Motion detection missed alarm?
A:
- Increase the motion detection sensitivity of the camera.
- Please install the camera correctly to prevent intruders from walking vertically to the camera. (For the solution, please refer to "Install the Camera".)
- If you need to detect vehicles or animals, please turn off the "AI humanoid detection" function.
Q: Can the camera connect to Wi-Fi?
A: Wi-Fi is not supported; only a 4G network is supported.
Q: How much data does the camera consume per month?
A: The traffic consumed by the camera depends on the resolution you select when viewing. The higher the resolution, the greater the traffic consumption. The longer the preview video and video playback time, the greater the data consumption. The more times the PIR sensor is triggered, the greater the flow consumption. We recommend that you subscribe to a 2-4G/month data plan package.
Q: The subscription data plan package does not take effect, or do I need to transfer the package and refund the fee?
A:
- Regardless of whether you use the SIM card that comes with the camera or a compatible SIM card that you purchased yourself, if you encounter such problems, please contact us to find out the reason and provide professional technical support to ensure that you will not have a redundant invalid fee.
- Contact email: [email protected] (US) or [email protected] (EU).
If the above problems are still not resolved, or you have encountered other problems that cannot be solved, please message your order and problem to [email protected] (US) or [email protected] (EU).
BOIFUN 4G LTE Security Camera
Setup and usage guide for the BOIFUN 4G LTE security camera with the CloudEdge app — SIM card selection, power-on, APN settings, charging, installation, PIR detection and battery tips.
CloudEdge Baby Monitor
User manual for the CloudEdge pan/tilt baby monitor with a dedicated handheld display and a 2.4 GHz Wi-Fi camera, covering what's in the box, hardware overview, installation, pairing the camera to the display, connecting to the CloudEdge app, on-screen functions, app functions, and FAQs.