 CloudEdge App Docs
BOIFUN 4G LTE Security Camera
Setup and usage guide for the BOIFUN 4G LTE security camera with the CloudEdge app — SIM card selection, power-on, APN settings, charging, installation, PIR detection and battery tips.
This guide covers the BOIFUN 4G LTE Security Camera and the CloudEdge app, including SIM card selection, power-on, APN configuration, charging, installation and PIR motion detection.
For more help, see the 4G Camera FAQs. If you have tried every step and still have no luck, send your order and your problem to [email protected].
Important Instructions Before Use
- Although every effort has been made to make the manuals complete and accurate, deviations may occur due to product updates.
- Please only insert or remove the SIM card when the camera is switched off.
- To ensure the camera can get a good mobile network, it is recommended to use the SIM card supplied with the camera.
- The SIM card supplied with the camera only offers 100 MB of free data. Please add a data plan in the app in good time after you have successfully added the camera.
- To ensure continuous use of the camera, please make sure the SIM card has sufficient data and keep topping up the data plan for the SIM card.
- The camera was specially developed for motion detection and does not support 24/7 video streaming and recording.
- To preserve battery life, it is recommended not to point the camera directly at the street or at a place with many people/vehicles.
1. What Is in the Box?
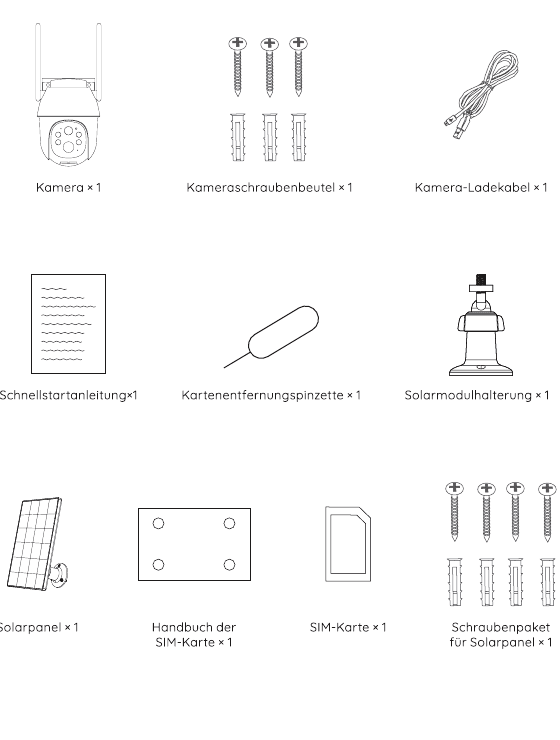
- Camera × 1
- Camera screw bag × 1
- Camera charging cable × 1
- Quick start guide × 1
- Card removal tweezers × 1
- Solar panel bracket × 1
- Solar panel × 1
- SIM card manual × 1
- SIM card × 1
- Screw package for solar panel × 1
2. Camera Introduction
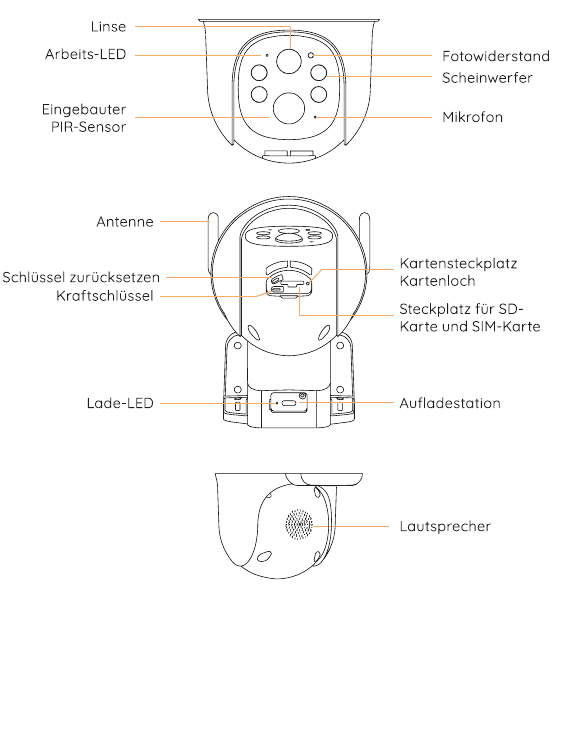
Front: Lens, Working LED, Built-in PIR sensor, Photoresistor, Spotlight, Microphone.
Back: Antenna, Reset key, Power key, Card slot / card hole, SD-card and SIM-card slot, Charging LED, Charging port.
Bottom: Speaker.
| Part | Description |
|---|---|
| Reset key | Hold RESET for 5 seconds to reset the device (if you have changed the settings, they will be reset to the factory defaults). |
| SD-card slot | Supports local SD-card storage (up to 128 GB). |
| SIM-card slot | Supports Nano-SIM card. |
| Lens | Supports FHD 2K resolution. |
| Power light | Red means charging is in progress. Blue means charging is complete. |
| Microphone | Records audio for your videos. |
| PIR sensor | Can detect moving objects up to a distance of 10 meters. |
| Working status light | Red light steady on: camera network abnormal. Red light flashing: waiting for network connection. Red and blue lights flashing alternately: SIM card detection failed. Blue light flashing slowly: SIM card detection successful. |
| Speaker | Audio output for two-way voice calls. |
| Charging port | Use a 5 V / 2 A power adapter to charge the camera. |
| Knurled screw | For securing the camera and the base. |
| Antenna | Dedicated 4G signal antenna. |
3. Download the App and Register
Download the "CloudEdge" App
Search the App Store or Google Play for "CloudEdge", or scan the QR code in the app store to download and install it on your smartphone.
Existing users, please update the app to the latest version. See the CloudEdge app.
App Permission Settings
When you use the application for the first time, please enable the following 2 permissions:
- Allow "CloudEdge" access to mobile data and Wi-Fi, otherwise you cannot add devices.
- Allow "CloudEdge" to receive notifications, otherwise the phone will not get alarm push notifications when motion detection or sound alarms are triggered.
The screenshots above show the iOS phone operation; the method for opening Android phone permissions is basically the same.
Register an Account
New users must register by email. The specific steps are:
Tips:
- Please use the correct email address.
- Please select the correct country code.
- When registering a new account, please select the region where you are actually located. (Cameras cannot be shared between different registration regions.)
4. Selecting the SIM Card
A SIM card is included in the camera packaging and this card supports the major network operators in your country. It has the advantages of easy installation and use, fast and convenient data top-up, strong network compatibility, a strong 4G signal, strong compatibility with the camera, no need to sign an agreement with the operator, etc. You are recommended to use it.
This SIM card is only compatible with this camera; please do not insert it into a smartphone or other electronic products.
If you need to configure a SIM card from a local operator, please choose from the following list:
| Country | Recommended carriers | 3/4G frequency bands supported by the camera |
|---|---|---|
| United States | Verizon / AT&T / T-Mobile | LTE-FDD: B2/B4/B5/B12/B13/B14/B66/B71; WCDMA: B2/B4/B5 |
| United Kingdom | O2 / Vodafone / EE / Three | LTE-FDD: B1/B3/B5/B7/B8/B20/B28; LTE-TDD: B38/B40; WCDMA: B1/B5/B8 |
| Germany | Telekom / Vodafone / Telefónica | LTE-FDD: B1/B3/B5/B7/B8/B20/B28; LTE-TDD: B38/B40; WCDMA: B1/B5/B8 |
| France | Orange / Bouygues / SFR / Free | LTE-FDD: B1/B3/B5/B7/B8/B20/B28; LTE-TDD: B38/B40; WCDMA: B1/B5/B8 |
| Spain | Vodafone / Orange / Movistar | LTE-FDD: B1/B3/B5/B7/B8/B20/B28; LTE-TDD: B38/B40; WCDMA: B1/B5/B8 |
| Italy | Vodafone / TIM / WindTre / Iliad | LTE-FDD: B1/B3/B5/B7/B8/B20/B28; LTE-TDD: B38/B40; WCDMA: B1/B5/B8 |
| Other European countries | Choose from local mainstream operators | LTE-FDD: B1/B3/B5/B7/B8/B20/B28; LTE-TDD: B38/B40; WCDMA: B1/B5/B8 |
- The camera does not guarantee compatibility with SIM cards from providers other than those listed above; please choose carefully. The camera only uses data and no services such as calls/SMS.
- Some cards have a PIN code that you must first deactivate with your smartphone. Do not insert an IoT or M2M SIM card into your smartphone.
- Cameras bought in one country may not be usable in other countries due to different 4G frequency bands. Cameras bought in Europe are supported in the countries listed in the SIM card manual.
5. Insert the SIM Card
The SIM card slot is located in the rubber cover under the camera lens; please remove the rubber cover. First insert the SIM card into Position 1 and the SD card into Position 2. When choosing the Nano-SIM card and SD card to insert into the card slot, note that the side with the gold contacts faces down, and you must slide the cut notch into the SIM card slot and push it all the way in. If operation is difficult, please use the SIM card tweezers in the camera packaging.
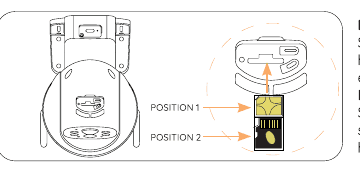
Do not insert the SIM card the wrong way round into the card slot. Otherwise the SIM card will not be recognized, the SIM card will get stuck inside and cannot be pulled out.
6. Switch On the Camera
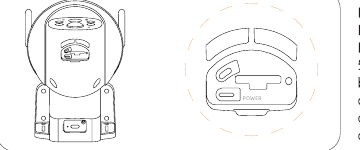
After inserting the SIM card, hold the camera's power button for 5 seconds until the power indicator on the side of the lens lights up red, then release it.
Wait about 30 seconds until the working indicator flashes blue and you hear the prompt tone "Waiting for connection", which means the camera has successfully connected to the 4G network. The next step is to add the camera to the app.
Adding Failed? Please Note the Following to Solve the Problems
| Camera voice prompt | Working light status | Camera status | Solutions |
|---|---|---|---|
| Waiting for the connection timeout | Indicator light off | If the network is not configured for a long time, the device automatically enters sleep mode. | Press the power button to restart. |
| SIM card not found | The red and blue lights flash alternately and then go out. | The camera does not recognize this SIM card. | Check that the SIM card is inserted the right way round. Check that the SIM card is not fully inserted, and reinsert it. |
| SIM card cannot be used | Red and blue lights flash alternately. | The camera cannot register with the network operator. | 1. Check whether the SIM card has a PIN code, insert it into the mobile phone and deactivate the PIN (do not insert the camera's own SIM card into the phone). 2. Check whether your SIM card has been activated; if not, contact the operator to activate the SIM card (the camera is supplied with a SIM card — contact the brand's customer service). 3. Check whether your SIM card data is sufficient. 4. The signal at the current location may be weak; please move the camera to a position with a better signal. |
| No LTE signal | Red light keeps flashing. | The SIM card has no data plan or 4G signal difference. | 1. Please check whether the data plan of your SIM card is available. 2. The current 4G signal is weak; place the camera in a location with a better signal or replace the SIM card. |
| APN not matched | Red and blue lights flash alternately. | The camera is not compatible with the APN of the SIM card. | Please import the APN of the SIM card into the camera in the app (see the following content for details). |
If you try to add a camera several times and it still fails, please contact the brand's customer service for help. Please send your order and your problem to [email protected].
7. APN Settings
Only when using a local SIM card is there a possibility that the APN is not recognized. You must import the APN information manually into the camera.
When the camera reads out the voice of "Unrecognized APN", add a "4G Camera" page in the app, tap "Flashing red and blue lights" → choose "Enter the APN information of the current SIM card" to open the APN settings page.
Simply enter the corresponding information into the first three columns "MCC", "MNC" and "APN". If you do not know the APN information of the SIM card, please contact the card operator. Or insert the SIM card into the smartphone and get the APN information in the phone settings.
After you have successfully imported the APN, please add the 4G camera again.
8. Charge the Camera
It is recommended to fully charge the camera battery before you install the camera outdoors.
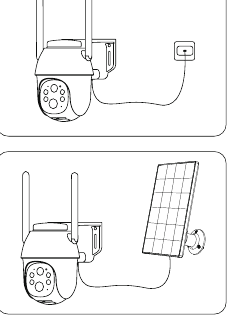
- Charge the camera with a commercially available, high-quality 5 V power adapter (not included).
- Use the solar panel to charge the camera.
Charging indicator (top left of the lens): Red LED — charging in progress. Blue LED — charging complete.
For better weatherproofing, insert the charging port of the solar panel into the rubber plug, and the rubber plug fully covers the charging port.
To charge the camera, do not use anything other than a 5 V power adapter and do not charge it near fire or heaters. If the battery gives off smell, heat, deformation or other abnormal conditions during charging, please stop charging or use it immediately.
9. Install the Camera
Notes Before Installation
- To ensure the camera gets a good network signal, install the camera in a location with good signal and without signal interference.
- To avoid frequent alarms and quick battery consumption, do not point the camera directly at the street or at busy places.
- Make sure there are no reflections within 1.5 meters (5 feet) of the PIR sensor, as this otherwise impairs the normal function of the sensor.
- For outdoor use, the camera must be installed front-facing for better waterproofing and better efficiency of the PIR motion sensor.
- For better waterproofing, after installation make sure all rubber plugs on the surface of the camera are covered.
- To better connect the 4G network, it is recommended to install the antenna upwards or horizontally.
- Install the camera 2-3 meters (7-10 feet) above the ground. This height maximizes the detection range of the PIR motion sensor.
- Do not place the camera exactly in the direction of movement of the intruder. The angle formed by the connection between the PIR sensor and the intruder and the path of the intruder must be greater than 20 degrees.
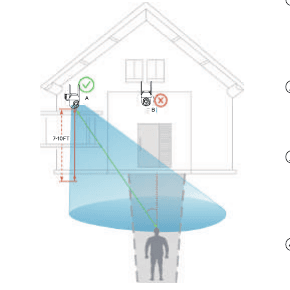
As shown in the image, the red dotted line is the usual intruder path; then point A is the best installation location for the camera. If it is installed at point B, a missed alarm can occur.
Installation Steps
Step 1: Use an electric drill to drive two nuts into the wall. 7-10 feet (2-3 meters) above the ground is recommended.
Step 2: Guide the screw through the screw position of the camera base and align it with the nut, tighten the fixed position and the installation is complete.
The camera can be attached to a tree by tying the rope through this point. (No rope included.)
10. Install the Solar Panel
Please use the plastic brackets and screws included to install the solar panel.
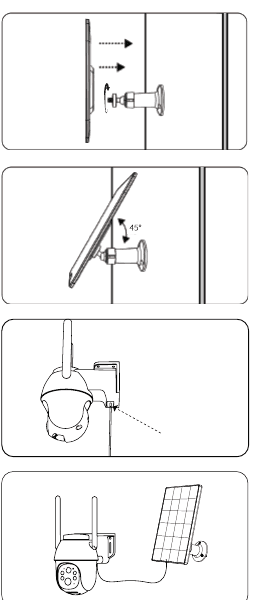
Step 1: Fix the plastic bracket of the solar panel to the wall with the drill and the screws.
Step 2: Align the screw cap of the bracket with the screw hole on the back of the solar panel and turn it clockwise to fix it.
Step 3: Adjust the angle of the solar panel according to the actual environment and make sure the front of the panel faces upward (a 45° angle is the best tilt angle).
Step 4: Pull off the rubber plug on the surface of the camera charging port, push the charging head of the solar panel through the hole on the rubber plug and then insert it correctly into the camera charging port.
Step 5: For better waterproof performance, please cover the charging port completely with the rubber plug.
- To ensure the best charging efficiency, the solar panel must be installed in a location with sufficient sunlight (it is recommended that there is no light shading), and the daily light time can be guaranteed to be more than 4 hours.
- To ensure the charging efficiency of the solar panel, please clean the panel surface regularly.
- On rainy days and in cold winters, the charging efficiency of the solar panel is very low. If the camera battery runs out, please remove the camera, bring it indoors and use the 5 V power adapter to fully charge it, then reinstall it.
11. How Do Others Use the Camera?
To ensure the security of the camera, the camera can only be added to one account. If others need to access the camera at the same time, they can use the "Device Share" function.
Sharing Steps
Others first download and install the camera app, register a new account and log in (the country selected during registration must match your choice).
In the app, tap "Device share", watch the operation video first and follow the video steps to complete the sharing.
They receive a push message in their app; tap "Accept" to complete the sharing.
Tip: When sharing, you must select the permissions of the camera; please select them according to actual needs.
12. Video Management
The camera needs a Micro-SD card (not included) to store video files. Insert the Micro-SD card correctly into the camera's SD card slot.
Requirements for the SD card:
- We recommend using brand cards such as SanDisk, Samsung, etc.
- Supports 2-128 GB capacity.
- We recommend using standard Class 10 SD cards.
- Only the FAT32 format is supported (you can select FAT32 to format the SD card after inserting it into the computer).
When the camera detects an intruder, it automatically saves the video file to the SD card.
How do I download SD card videos to a mobile phone or computer?
- When playing the historical video in the app, select the video clip you want to download and tap Download.
- After inserting the SD card into the computer or the mobile phone, look for the required video files. The video file is in MP4 format and you can play it directly with a player.
13. PIR Detection and Message Push
To receive the push function for alarm messages, please enable the push permission for the app in the mobile phone system.
The camera has a wealth of setting options for motion detection, including "Motion detection sensitivity", "Working mode", "Alarm plan", "Alarm area setting", "AI humanoid detection" and other functions.
Open the application, select the device and open "Parameter settings" → "Alarm management" to flexibly set the alarm detection function of the camera.
Introduction to the PIR Motion Detection Sensitivity

- 1-3 — low sensitivity, motion detection distance of 3-5 meters.
- 4-7 — medium sensitivity, motion detection distance of 5-7 meters.
- 8-10 — high sensitivity, motion detection distance of 7-10 meters.
Introduction to the AI Humanoid Detection Function
Under "Alarm management" → "Custom mode" there are two options: "Detection of humanoids by day" and "Detection of humanoids by night", and the camera is switched on by default. After the humanoid detection function has been switched on, the camera triggers an alarm only when humanoids move, and vehicles/animals are not detected. If you need the camera to detect vehicles and animals normally, please turn off the person detection.
The Following Situations Can Occur
| Problems and faults | Solutions |
|---|---|
| The phone receives frequent alarm messages | 1. Reduce the sensitivity of motion detection. 2. Activate the humanoid detection function. 3. Set the alarm area. 4. Avoid pointing the camera at the roadside or crowded places. |
| There are no moving objects in the alarm image | 1. Reduce the sensitivity of motion detection. 2. Activate the humanoid detection function. |
| Someone passed by without an alarm | 1. Check whether push permission for messages is activated. 2. Increase the sensitivity of motion detection. 3. Prevent intruders from walking perpendicular to the camera. |
| Frequent leakage alarms at night | 1. Make sure the image quality at night is normal. 2. Deactivate "Night Humanoid Check". |
| Mobile alarm is not in time, obviously delayed | 1. Increase the sensitivity of motion detection. 2. Avoid intruders walking perpendicular to the camera. 3. Check whether the network of the camera and the mobile phone is good. |
14. Battery Life and Safety Instructions
This camera is not designed for 24/7 operation and 24/7 recording, but for recording sporadic events that can be viewed remotely only when needed.
| Reasons for short battery life | Solutions to improve battery life |
|---|---|
| The PIR sensor is triggered frequently and repeatedly wakes the camera to work. | 1. Reduce the sensitivity of motion detection. 2. Activate the humanoid detection function. 3. Set the alarm area. 4. Avoid pointing the camera at the roadside or busy places. |
| Frequent and long-term remote viewing of videos on mobile phones. | Reduce the frequency and time of remote video playback. |
| The network is very poor, which causes the camera to search the network frequently and automatically. | Check whether the 4G network signal around the camera is poor, avoid objects that interfere with the signal, and move the camera to a position with a better signal. |
| At low temperatures and in cold weather, battery performance is reduced and solar charging efficiency drops. | In cold weather, reduce the sensitivity of motion detection, switch on the humanoid detection function, set the alarm area and reduce the working time of the camera. |
| Inefficient or no charging from solar panels. | 1. Make sure the solar panel receives enough sunlight. 2. Check whether the solar panel is defective. 3. Clean the surface of the panel regularly. 4. Check whether the charging port has a bad contact or is defective. |
| The camera consumes power faster than the solar charging efficiency. | See solution above. |
Reminder: If the above attempts still cannot solve the problem of short battery life, please contact the brand manufacturer's customer service for help.
Battery Safety Instructions
- When the camera battery is almost empty, please remove the camera, bring it indoors and use the 5 V power adapter to fully charge it, then reinstall it.
- Do not damage the battery violently with sharp tools, as this can lead to battery failure.
- Keep the camera's charging port dry and clean and protect the charging port with a rubber plug when it is fully charged.
- Please use a standard, high-quality 5 V power adapter to charge the camera. Do not use a non-5 V power adapter to charge the camera.
- Do not charge, use or place the camera near fire and heaters. If the battery emits unusual conditions such as smell, heat, deformation, etc., please stop charging or use it immediately.
15. FAQs
For more detailed FAQs, please log in to the app and go to "Me" - "Help" - "4G Camera". You can also browse the online 4G Camera FAQs.
Q: The camera cannot be switched on.
- Make sure the camera is fully charged. Please use the 5 V power adapter to fully charge the camera before you switch it on.
- If the camera is defective or water has got in, please contact the brand manufacturer's customer service.
Q: The camera could not be added.
Please go back to Section 6 ("Switch On the Camera") to find solutions, or contact the brand's customer service personnel for help.
Q: After using it for a certain period of time, the camera cannot connect to the Internet.
- If you use the SIM card supplied with the camera, only a 100 MB data plan is offered free of charge. To avoid running out of data, top up the data plan in the app in good time.
- Please check that the SIM card data plan is normal, e.g. payment arrears, excessive data usage, etc., and top up the data plan for the SIM card regularly.
- Please check that the 4G network signal around the camera is good and avoid signal interference in the surroundings.
- Check whether the SIM card is loose.
Q: The camera often drops out and cannot be connected.
- Please check that the 4G network signal around the camera is good and avoid signal interference in the surroundings.
- Check whether the SIM card is loose.
- Check whether the 4G network of your SIM card operator covers the installation location of the camera. It is recommended to try the SIM card supplied with the camera.
Q: The phone cannot receive the alarm push message.
- Check whether the message push permission of the app is enabled in the phone's system settings.
- Restart the phone, and on the Android phone try to clear the cache.
- Check whether the camera's motion detection function is activated.
- Check whether the network of the camera and the mobile phone is good.
- Check whether the camera is online, and check whether the SIM card data plan is normal, e.g. payment arrears, excessive data usage, etc.
Q: Missed alarm from motion detection.
- Increase the camera's motion detection sensitivity.
- Install the camera correctly to prevent intruders from walking perpendicular to the camera. (The solution can be found in the "Install the Camera" section of the manual.)
- If you need to detect vehicles and animals, please turn off the "AI Humanoid Detection" function.
Q: Can the camera connect to Wi-Fi?
Wi-Fi is not supported, only 4G networks are supported.
Q: How much data does the camera use per month?
The data traffic used by the camera depends on the resolution you choose when viewing. The higher the resolution, the greater the data consumption. The longer the preview video and the video playback time, the higher the data consumption. The more often the PIR sensor is triggered, the greater the data consumption. We recommend subscribing to a 2-4G/month data plan.
Q: The subscription data plan does not take effect, or do I have to transfer the plan and refund the fee?
- If you use the camera's own SIM card, please contact the customer service of the camera brand manufacturer for help.
- If you use a local SIM card, please contact the operator for support.
If you have tried all the steps but still have no luck, please send your order and your problem to [email protected].
CloudEdge Wireless Security Bulb Camera
User manual for the CloudEdge Wireless Security Bulb Camera, covering the packing list, product structure, indicator-light status, app download, QR-code and AP pairing, troubleshooting, sharing, and the live-view functions.
COOAU G1 PRO 4G LTE Camera
Setup and usage guide for the COOAU G1 PRO 4G LTE Cellular Wireless Security Camera with the CloudEdge app — SIM card selection, power-on, adding the camera, APN settings, app functions, charging, installation and PIR detection.