 CloudEdge App Docs
BondFree Bulb Camera Quick Installation Guide
Quick installation guide for the BondFree indoor bulb security camera with the CloudEdge app, covering the packing list, appearance, LED status, app setup, Wi-Fi pairing, recording, playback, sharing, alarms, installation and troubleshooting.
This quick installation guide explains how to set up and use the BondFree indoor bulb security camera with the CloudEdge app, covering the packing list, appearance, LED status, account registration, Wi-Fi pairing, recording and playback, camera sharing, alarm management, installation and troubleshooting.
Need more help? See the Bulb Camera FAQs. After-sales E-Mail: [email protected]
Thank you for choosing our security camera. Please read the quick installation guide carefully before using and keep it in good conditions.
I. Product Packing List
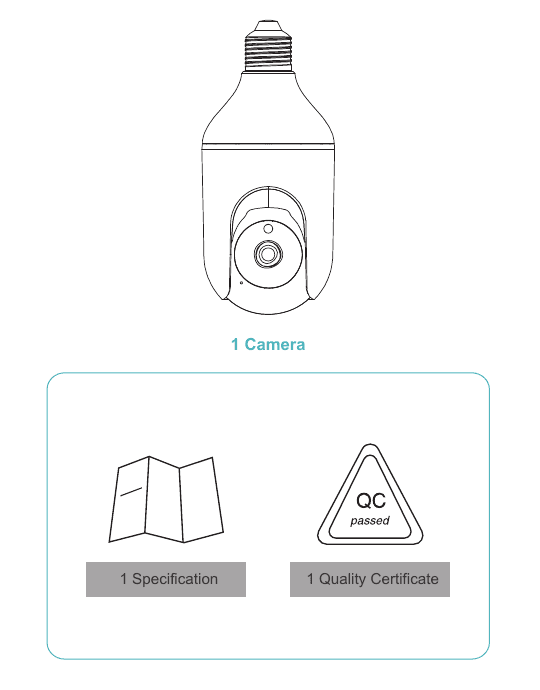
- Camera ×1
- Specification ×1
- Quality Certificate ×1
II. Appearance Brief
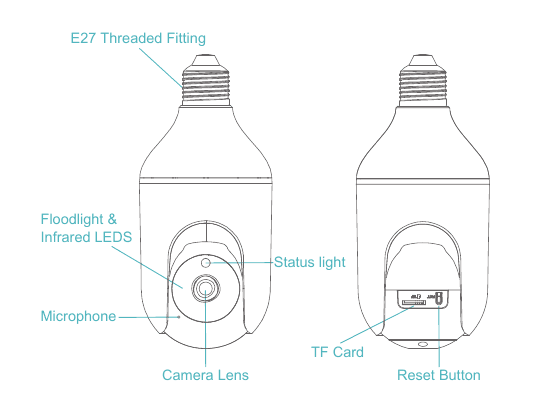
- E27 Threaded Fitting
- Floodlight & Infrared LEDS
- Status light
- Microphone
- Camera Lens
- TF Card
- Reset Button
| Item | Description |
|---|---|
| Power port | AC 100V~240V |
| Status light | Solid red light on: The camera is turning on or malfunctional. Red Light Blinking: Awaiting WiFi connection (Slowly Blinking); Connecting the WiFi (Quickly Blinking). Blue Light Blinking: It is in connecting. Solid Blue Light On: The camera runs correctly. |
| SD card slot | Support local SD card storage (Max.128G). |
| Reset | Press and hold on for 5 seconds to reset the camera. |
III. Product Instructions
1.1 APP Download and Installation
CloudEdge is available for both iOS and Android OS. Search the name 'CloudEdge' in App Store or Google Play, or scan the QR-Code to download the CloudEdge app.
1.2 APP Permission Settings
Please turn on 2 permissions below when use this APP at the first time. Otherwise, add IP camera fails.
- Allow "CloudEdge" APP to access mobile cellular data and wireless LAN, or it will be failed to add IP camera.
- Allow "CloudEdge" APP to receive pushed message, or the cellphone will not receive alarm push when motion detection or audible alarm is triggered.
2. Accounts Registration
Registration process:
Open the App. Click "Sign up now" to register. If you already have an account, click "Log in".
Input a legal Email address and tick the privacy agreement. Then enter the nickname and password.
Notes:
- Please tick "Agree" the "User Agreement and Privacy Policy".
- If the verification code is sent out over time due to network problems, please try again later.
- If register with mailbox, please check the verification code in spam mailbox if you didn't receive.
3. Device Adding
Before you start to pair the camera to the WiFi, please make sure your smart phone is in WiFi Signal. The device can be networked regardless of 2.4G or 5G networks, so select a network with a strong signal in order to distribute the network at the location where the camera is installed.
Check out the 2.4G or 5G network options with higher signal strength at the location where you need to install the camera.
Click "Add Device" or "+", and then select the corresponding camera icon to add.
Select the WiFi network and input the password, and then click "Next".
Note: The number of bits in the ssid and passwords of the router should not exceed 24 digits.
View the operation instructions of scanning, and then click "Next". Scan the QR code in your phone with the camera and click "Next", when the camera comes out the prompt tone. And you can complete the configuration about 30s.
When connecting, you should make sure your router, mobile, and camera are as close as possible.
All done. You have added the camera successfully to your phone. Begin to monitor your home.
In live view interface, click the settings icon, and then you can set up the camera common functions.
4. How to Store Recordings
1. Stored By Manual — Go to live video, manually record the video by clicking 'Record' button to start or end, existing the live view will automatically stop recording.
2. Memory Card — The camera supports micro SD card (NOT INCLUDED), up to 128GB.
3. Cloud Storage Plan
It is no necessary to input any code to active the cloud. The cloud will be on auto after the payment is done. If you choose wrong cloud, please contact us on the APP "Help" to get a solution.
5. Video Playback
1. Video Playback in SD Card
- Go to the main interface, click "History-Alert" icon, you will see today's motion detected events. Tap any of these videos to playback.
- Open the 'Calendar' to trace back and playback early recorded videos.
2. Video Playback in Cloud
Go to the main interface, click "Cloud-Alert" icon, you will see today's motion detected events. Tap any of these videos to playback.
6. Camera Sharing
If you need to view the camera with other family members or friends, you can use this device sharing function. Only the administrator whose account is bound with the camera for the first time can share and set the device. Other members can only view the live or playbacks of the device.
Note: Please make sure the registered regions of all shared accounts are same with the administrator's account.
Click 'Device Share' on setting page.
Click 'Scan QR Code'.
Scan the QR code of the shared account and you will receive the confirmation notification after success. The sharing will be completed after you agree. If you choose 'enter account', you could search the account you would like to add.
7. Alarm Management
Content on alarm management:
- You can adjust the motion detection sensitivity, as well as set the alarm plan and alarm areas.
- Turn on and can adjust the noise detection sensitivity.
- Enable sound and light alarm and can adjust the alarm volume.
IV. Installation Instructions
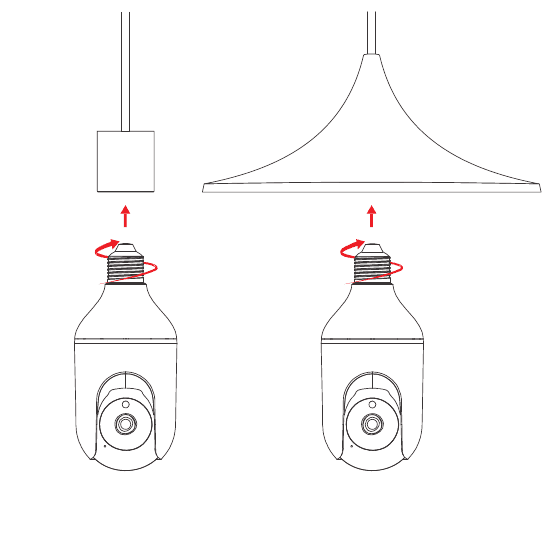
Please pay attention to the safety of electricity: screw the camera on while ensuring that the E27 lamp holder is powered off, and then power on the camera and wait for the camera's red blinking startup to complete.
V. Troubleshooting
1. APP can't be registered successfully
- Please check if the network of the mobile phone is normal.
- Please tick the software service agreement and privacy policy.
- Please check if the verification code is in the spam mail.
- Please use WIFI to register if mobile network cannot be registered. If the mobile network and WIFI prompts cannot obtain the server address, please check if other software can be used normally.
- During installation, please allow the app to obtain your location and all permissions, the system will automatically arrange the best server.
- If above solutions still can't be effective, we recommend you to uninstall and install the app again, the current location and all permissions are allowed during the installation.
2. Unable to connect to the network
2.1 Unable to connect to WiFi:
- Please enable the DHCP of the router.
- Please make sure the camera is not in the blacklist in MAC settings of the router.
- Make sure the network of your mobile devices are under the same network router of the camera.
- After the network is normal, reset the camera and reconnect.
2.2 Wifi password reason
- Check the WiFi password connected of the camera is same as the WiFi password of the connected router.
- Check if the entered WiFi password has space or special characters (@,#,%,&).
3. Camera match the wifi successfully, but can't hear the voice of camera
- Reset the camera, then power off and reconnect the camera (Because only reset can remove local data).
- Put the phone as close as possible to the camera and router when it is connecting.
4. No pop-up message for motion detection alarm
- Open permission setting in the system settings of mobile device to allow APP to receive message push notification.
- Some Android phones can not receive the alarm push information.
- Please turn on the motion detection in APP.
- SMS and email reminders are not supported at this time.
5. Motion detection messages prompt frequently
- If motion detection sensitivity is too high, light changes also can cause alarm.
- Reduce sensitivity of alarms (recommended low level).
6. After inserting SD, it displays damaged
- Before inserting the SD card, Disconnect the power. Connect the power to start after plugging in the card.
- The SD card must be formatted on the computer before using the SD card.
- When choosing SD, please choose genuine.
7. Watch videos with the same camera on different devices
- The master account can share the video to other account without limit quantity, but the shared accounts only have the rights to watch, snapshot and record video.
- The App name and password of the main account also could be logged in on other devices to view the video and use any function.
8. The scenarios for the reset key
- Reset wifi information.
- Wifi exception before connecting to the camera.
- wifi password error.
- wifi drop.
- replace new wifi.
9. How to view camera on web browser?
Visit https://web.meari.com.cn/ Choose your location, input your account and password to view it from web browser.
Notification of Compliance
FCC Compliance Statement
This device complies with Part 15 of the FCC Rules. Operation is subject to the following two conditions: (1) this device may not cause harmful interference, and (2) this device must accept any interference received, including interference that may cause undesired operation.
Changes or modifications not expressly approved by the party responsible for compliance could void the user's authority to operate the equipment.
NOTE: This equipment has been tested and found to comply with the limits for a Class B digital device, pursuant to Part 15 of the FCC Rules. These limits are designed to provide reasonable protection against harmful interference in residential installation.
This equipment generates, uses and can radiate radio frequency energy and, if not installed and used in accordance with the instructions, may cause harmful interference to radio communications. However, there is no guarantee that interference will not occur in a particular installation. If this equipment does cause harmful interference to radio or television reception, which can be determined by turning the equipment off and on, the user is encouraged to try to correct the interference by one or more of the following measures:
- Reorient or relocate the receiving antenna.
- Increase the separation between the equipment and receiver.
- Connect the equipment into an outlet on a circuit different from that to which the receiver is connected.
- Consult the dealer or an experienced radio/TV technician for help.
FCC RF warning statement: The device has been evaluated to meet general RF exposure requirement. The device can be used in portable exposure condition without restriction.
NGTeco NG-C2500 Indoor Camera User Manual
Setup and usage guide for the NGTeco NG-C2500 indoor camera with the CloudEdge app, covering box contents, product layout, LED status, Wi-Fi pairing, installation, and the main app features.
CloudEdge Wireless Security Bulb Camera
User manual for the CloudEdge Wireless Security Bulb Camera, covering the packing list, product structure, indicator-light status, app download, QR-code and AP pairing, troubleshooting, sharing, and the live-view functions.