 CloudEdge App Docs
NGTeco NG-C2500 Indoor Camera User Manual
Setup and usage guide for the NGTeco NG-C2500 indoor camera with the CloudEdge app, covering box contents, product layout, LED status, Wi-Fi pairing, installation, and the main app features.
This guide explains how to set up and use the NGTeco NG-C2500 indoor camera with the CloudEdge app, covering the box contents, product layout, LED indicator status, Wi-Fi pairing, installation, and the main in-app features. (Model: NG-C2500, Version 1.0.)
Need more help? See the Camera app FAQs. After-sales email: [email protected]
Important Notes
- If you run into any problems, please read this manual carefully or contact customer service.
- The device can only connect to 2.4 GHz Wi-Fi networks. If you have a dual-band router with separate 2.4 GHz and 5 GHz networks, make sure your phone is connected to the 2.4 GHz network.
- Fully charge the battery before mounting the device on the wall for the first time. Make sure the charger uses a DC 5V/1A output.
- Because applications and products are updated regularly, we cannot guarantee exact consistency between the actual product and the information shown in this manual.
1. Box Contents
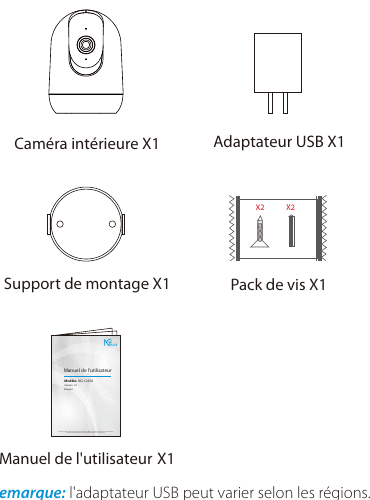
- Indoor Camera ×1
- USB Adapter ×1
- Mounting Bracket ×1
- Screw Pack ×1
- User Manual ×1
Note: the USB adapter may vary depending on your region.
2. Product Overview
Front
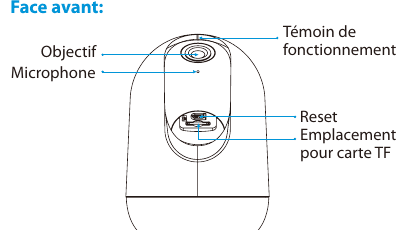
- Lens
- Microphone
- Operating indicator
- Reset
- TF card slot
Back
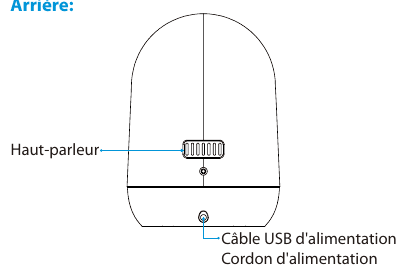
- Speaker
- USB power cable / Power cord
3. Indicator Status
| LED STATUS | INDICATION |
|---|---|
| Red light steady on | The camera or the Internet has a problem. |
| Red light flashing | Waiting for Wi-Fi connection (flashing slowly); Wi-Fi connected (flashing quickly). |
| Green light flashing | The camera is connecting to a network. |
| Green light steady on | The camera is online and you can view the video. |
- Reset: press "Reset" for about 3 to 5 seconds to restore the factory settings.
- TF card slot: supports local storage via a TF card (128 GB maximum). Please format the TF card in the CloudEdge app before using it.
4. Connecting to the CloudEdge App
Step 1: Download the App and Register an Account
Search for "CloudEdge" in the App Store or Google Play Store, then download and install the app. You can also use the CloudEdge app directly.
Open the CloudEdge app and sign in to your account. If you don't have an account, create one with your email address.
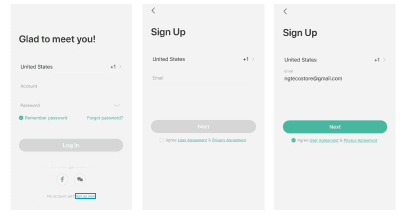
- Sign up: select your country to register an account with your email.
- Enter the email address and the password you want to use to sign in. Then tap OK to finish registration and automatically sign in to the app interface.
- Sign in: select your country, then sign in with the credentials and password of your existing account.
Step 2: Add a Device
Open the app and tap the "+" button on the home page to open the device selection page. Select the smart camera and complete the device setup by following the instructions.
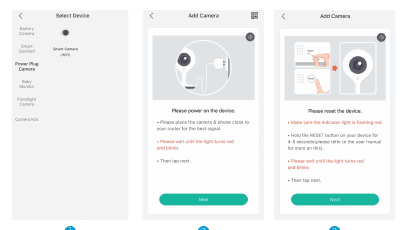
Select the camera from the device list.
Power on the device. Place the camera close to your router for the best signal. Wait until the indicator light turns red and blinks, then tap Next.
Reset the device. Make sure the indicator light is flashing red. Hold the RESET button for 4 to 5 seconds (refer to the user manual for more details). Wait until the indicator light turns red and blinks, then tap Next.
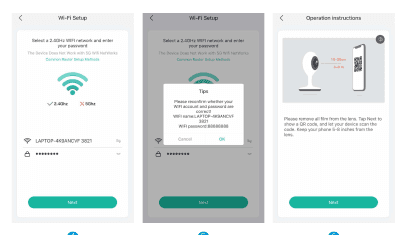
Select a 2.4 GHz Wi-Fi network and enter your password. (The device only works on 2.4 GHz Wi-Fi networks; common router setup methods are supported.)
Confirm your Wi-Fi account and password are correct, then tap OK.
Operation instructions: remove the film from the lens. Tap Next to display a QR code, and let your device scan the code. Keep your phone 6 to 8 inches from the lens.
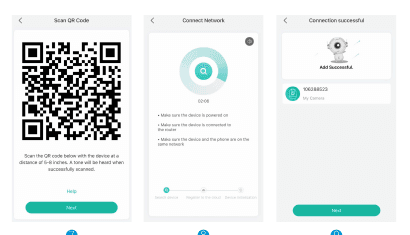
Scan QR Code: show the QR code to the device at a distance of 6 to 8 inches. A tone is heard when the scan is successful, then tap Next.
Connect Network: make sure the device is powered on, connected to the router, and that the device and the phone are on the same network.
Connection successful: the device has been added. Tap Next to continue.
- Make sure the phone Wi-Fi is 2.4 GHz and that the network is in good condition (the 5 GHz network is not supported).
- Wait until the red light on the device flashes (if not, press the Reset button for 3 to 5 seconds until the device emits a "BUGU" sound), then wait for the device to restart and add it to the camera.
- Open the CloudEdge app and tap the "+" icon in the top-right corner to add the camera.
- Select Power Plug Camera, then go to the camera list screen.
- Follow the in-app instructions, tap Next, and enter the Wi-Fi password your mobile phone is connected to.
- Tap Next, then place the QR code 10 to 15 cm from the camera, wait for the camera to emit a "BUGU" sound. Then tap "Next", and the app will automatically search for the device.
Step 3: Install the Device and View the Live Video
When you connect the device, the app automatically guides you to check the current network environment and tells you whether it is appropriate to install the camera.
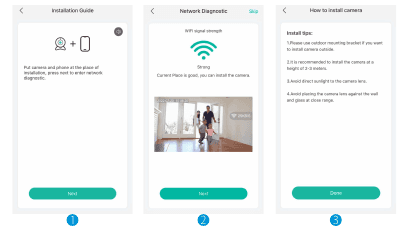
Install tips:
- Please use the outdoor mounting bracket if you want to install the camera outside.
- It is recommended to install the camera at a height of 2 to 3 meters.
- Avoid direct sunlight to the camera lens.
- Avoid placing the camera too far against the wall and glass at close range.
If the network setup is successful, you can change the device name or select the room location.
Tap the device to open the camera control panel. The interface displays the live stream and allows full-screen playback.
5. Main Features Overview
When you tap the control panel, you can choose between three views.
Live
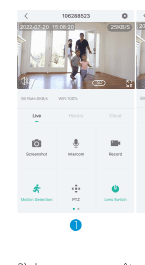
In the Live interface you can select:
- Screenshot
- Intercom
- Record
- Motion Detection
- PTZ method
- Lens switch
- Album
History
In the History interface you can select:
- Calendar
- Alert
- Screenshot
- Record
- Album
Cloud
In the Cloud interface you can select a free trial or purchase the cloud storage service.
Settings
If you need more settings, you can show the desired function by tapping the symbol indicated by the arrow.
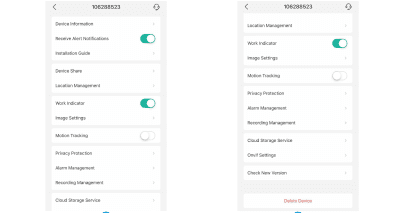
Night Vision Mode
You can change the night vision mode, which has three options: Automatic / Day Mode / Night Mode.
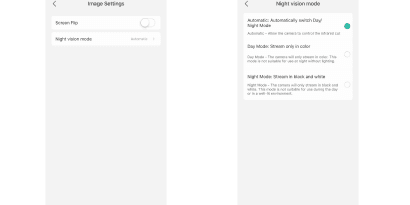
- Automatic: automatically switches Day/Night Mode. Lets the camera control the infrared cut.
- Day Mode: stream only in color. The camera will only stream in color. This mode is not suitable for use at night without lighting.
- Night Mode: stream in black and white. The camera will only stream in black and white. This mode is not suitable for use during the day or in a well-lit environment.
Privacy, Recording, and Alarm
In addition, you can choose privacy protection, manage recordings, and adjust alarms.
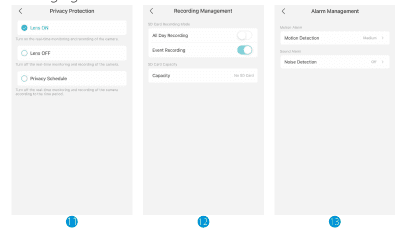
- Privacy Protection: Lens ON, Lens OFF, or Privacy Schedule.
- Recording Management: All Day Recording, Event Recording, and SD card capacity.
- Alarm Management: Motion Detection and Noise Detection.
6. FAQ
Q: Unable to add a device during network setup? A: Make sure your phone is connected to a router on the 2.4 GHz band and that the Wi-Fi password is correct.
Q: Adding the device always fails after scanning? A: Restart the device, or turn it off after the search fails, then try to add it again.
Q: The device cannot perform normal live view? A: Check whether the network signal is too weak; place the device close to the router. If live view is still impossible, reset the device and add it again.
Q: After resetting the device, why is the camera still in the device list? A: Resetting the device only resets the camera's network setup; it does not change the app's setup. To remove the camera, you must sign in to the app and delete it.
Q: How do I move the camera's network to another router? A: Start by deleting and resetting the device in the app, then set up the device's network again through the app.
Q: Why doesn't the device recognize the TF card? A: Insert and remove the TF card after turning the device off. Make sure the TF card works normally and is formatted as FAT32. If the mobile phone or the device is on an unstable network, the app may also tell you that the TF card cannot be recognized.
ieGeek ZS-GX7S Indoor Camera
Quick start guide for the ieGeek ZS-GX7S wire-free indoor camera, covering camera parts, app setup, adding the camera, charging, installation, PIR motion settings, and FAQs.
BondFree Bulb Camera Quick Installation Guide
Quick installation guide for the BondFree indoor bulb security camera with the CloudEdge app, covering the packing list, appearance, LED status, app setup, Wi-Fi pairing, recording, playback, sharing, alarms, installation and troubleshooting.