 CloudEdge App Docs
ieGeek ZS-GX7S Indoor Camera
Quick start guide for the ieGeek ZS-GX7S wire-free indoor camera, covering camera parts, app setup, adding the camera, charging, installation, PIR motion settings, and FAQs.
This quick start guide explains how to set up and use the ieGeek ZS-GX7S wire-free indoor camera with the CloudEdge app (also published as the "ieGeek Cam" app).
For more help, log in to the app and search "Me" - "FAQ" - "Help Document" - "Battery Camera", or browse the Battery Camera FAQs.
Warming Tips:
- Before connecting this camera to Wi-Fi, please ensure the Wi-Fi signal strength is over 75% to keep a good Wi-Fi signal.
- This wireless camera supports events recording when Wi-Fi is disconnected.
1. Camera Introduction
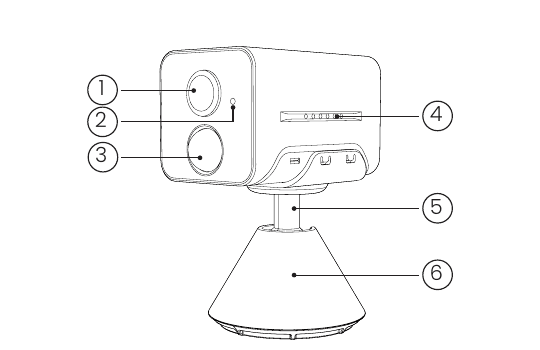
- 1. Lens
- 2. Microphone
- 3. PIR
- 4. Speaker Holes
- 5. Bracket
- 6. Base
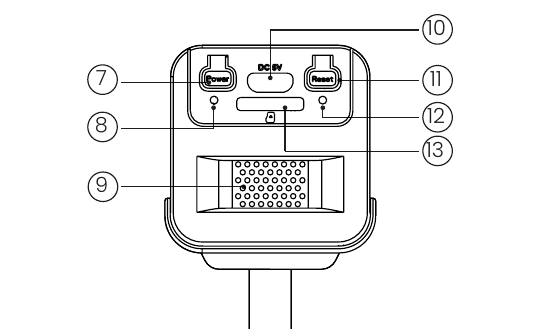
- 7. Power Key
- 8. Charging Indicator
- 9. Ventilation Holes
- 10. USB Port
- 11. Reset
- 12. Working Status Indicator
- 13. SD Card Slot
Buttons, Slots & Indicators
| Item | Description |
|---|---|
| Power Button | Press and hold for 5s for power on/off the camera |
| Reset | Press and hold for 5s until hearing 'Boogu' to reset or restore to factory setting |
| SD Card Slot | Support local SD card storage (up to 128G) |
| Charging Indicator | Red means charging, blue means fully charged |
Working Status Light
| Indicator | Meaning |
|---|---|
| Solid on red | Network is abnormal |
| Slow flickering red | Awaiting Wi-Fi connection and start adding devices |
| Wi-Fi fast flickering red | Wi-Fi connecting |
| Solid on blue | Wi-Fi connected successfully, the camera running normally |
2. APP Installation and Account Registration
Download the "ieGeek Cam" App
- Method 1: Download the "ieGeek Cam" or "CloudEdge" app from the App Store (iOS and Android).
- Method 2: Scan the "ieGeek Cam" app QR code to download it.
Tips: Please turn on the 2 below permissions while using this app for the first time.
- Allow the "ieGeek Cam" app to access mobile cellular data and wireless LAN or it will fail to add IP camera.
- Allow the "ieGeek Cam" app to receive pushed message or the phone will not receive alarm push when motion detection or audible alarm is triggered.
Register an Account
New users need to register by email. The concrete steps are as following:
Note:
- When registering a new account, please choose the region which you are actually in and correct country code. (Different registered regions can't share the camera.)
- Please choose to register by e-mail.
3. How to Add a Camera to APP
Before Using:
- Please insert the Micro SD card before power on, otherwise, the SD card cannot be detected.
- Put the camera and smart phone 1-3 ft (30-100 cm) away from the router to set Wi-Fi.
- Make sure that the camera is using 2.4GHz Wi-Fi.
Wi-Fi Connection Steps
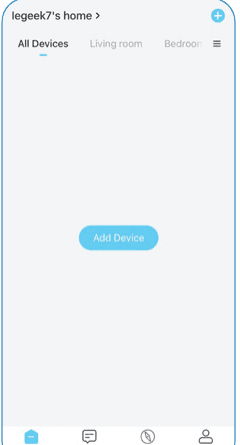
Tap "+" to Add Device
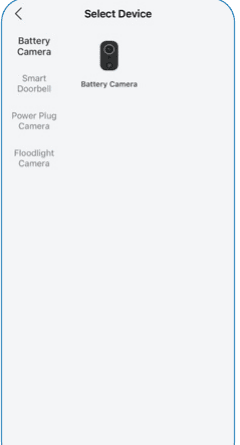
Select Battery Camera
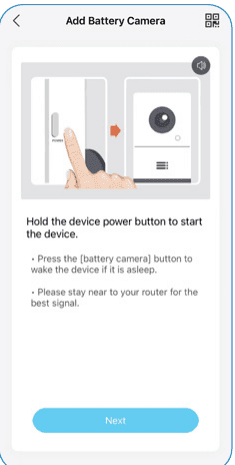
Power on Camera — Hold the device power button to start the device. Press the [battery camera] button to wake the device if it is asleep. Please stay near to your router for the best signal.
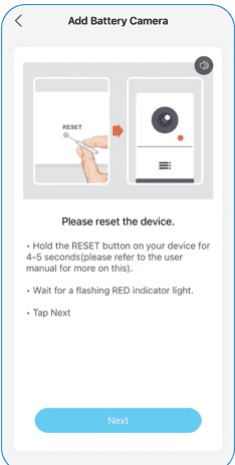
Reset Device — Please reset the device. Hold the RESET button on your device for 4-5 seconds (please refer to the user manual for more on this). Wait for a flashing RED indicator light. Tap Next.
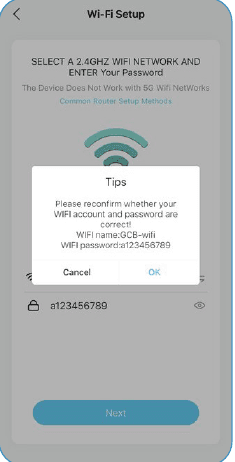
Input Wi-Fi Password — Select a 2.4GHz Wi-Fi network and enter your password. The device does not work with 5G Wi-Fi networks. Please reconfirm whether your Wi-Fi account and password are correct.
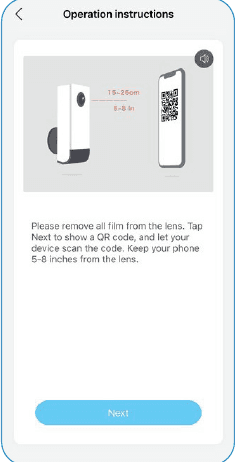
Scan QR Code — Please remove all film from the lens. Tap Next to show a QR code, and let your device scan the code. Keep your phone 5-8 inches from the lens.
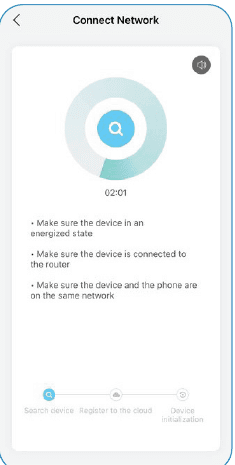
Wait for Connection — Make sure the device is in an energized state, the device is connected to the router, and the device and the phone are on the same network.
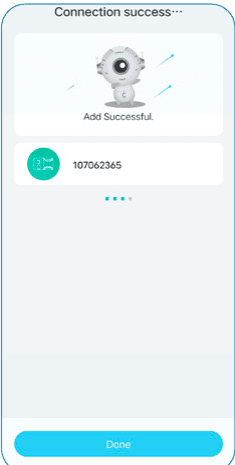
Device Added — Connection success. Add Successful.
Note: If it can't be powered on, please plug in a DC 5V 2A power adapter to charge the camera for 15min first.
My camera fails to connect Wi-Fi?
- Please make sure the Wi-Fi the camera connected is 2.4GHz.
- Make sure the password correction of the Wi-Fi. (Note: the password of the Wi-Fi cannot include single quote, underline, space and virgule (/).)
- Once the devices that your router connected exceed its max limit numbers, other devices will cannot connect the router.
- Make sure the QR code on the phone screen is normal and the distance between the phone and the camera lens is 10-15cm (3.9-5.9inch) during the scanning process.
- If the camera cannot connect the Wi-Fi, please try to re-download the APP, reset the camera and restart the router, and then add the camera again.
- If you tried all steps, but still no luck, please message your order and problem to [email protected].
4. Charge the Battery
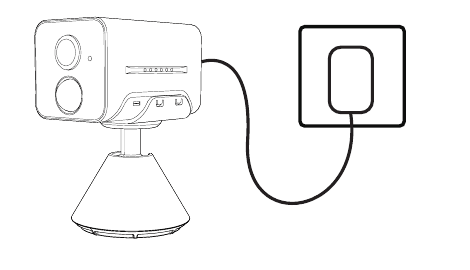
Charge the battery with a 5V 2A power adapter.
- The battery is a built-in battery and cannot be removed.
Charging Indicator:
| LED | Status |
|---|---|
| Red LED | Charging |
| Blue LED | Fully Charged |
5. Installation Guides
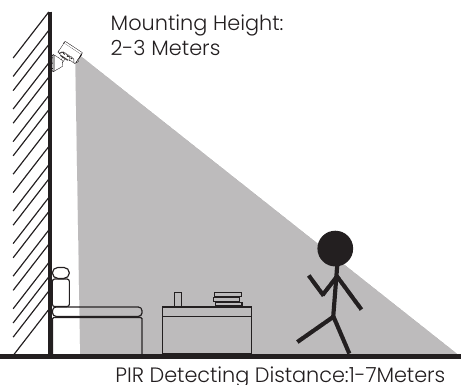
- Mounting Height: 2-3 Meters
- PIR Detecting Distance: 1-7 Meters
Notes:
- GX7S is only for indoor use, please install it indoors according to the instructions and keep away from water sources.
- It's recommended to select the location before installation. Once the 3M glue is attached, it will not be easy to remove (to avoid damage to the wall).
- Install the camera 2-3 meters (7-10 ft) above ground. The detection range of the motion sensor would be maximized at such a height.
- For effective motion detection, please install the camera angularly.
NOTE: If a moving object approaches the PIR sensor vertically, the camera may fail to detect motion.
6. Notes on PIR Motion Sensor
PIR Sensor Detection Range
The PIR detection range can be customized to meet your specific needs. You may refer to the following table to set it up in Device Settings via the ieGeek Cam app.
| Sensitivity | Detection Distance (For moving and living objects) |
|---|---|
| Level 1-3 (Low) | Up to 1-3 meters |
| Level 4-7 (Med) | Up to 3-5 meters |
| Level 8-10 (High) | Up to 5-7 meters |
Installation Cautions
- Do not face the camera towards any objects with bright lights, including sunshine, bright lamp lights, etc.
- Do not place the camera near any outlets, including the air conditioner vents, humidifier outlets, the heat transfer vents of projectors, etc.
- Do not install the camera at places with strong wind.
- Do not face the camera towards a mirror.
- Keep the camera at least 1 meter away from any wireless devices, including WiFi routers and phones in order to avoid wireless interference.
7. FAQs
For more detailed FAQs, please log in to the app, search "Me" - "FAQ" - "Help Document" - "Battery Camera".
The device prompts offline?
- Check whether the equipment is in the power-on state, and observe whether the working light of the equipment is on normally.
- Confirm that the current location has good wifi coverage and the network is stable, make sure that the wifi signal is above 75%.
- You can try to use the third-party wifi analysis tool "wifi analyzer" to analyze the current wifi signal coverage and interference status. If the coverage is poor and the interference is large, it is recommended to replace the camera installation position or adjust the router position or use a second-stage router.
- Avoid using wifi extenders.
Update router or Wi-Fi password?
Delete the camera from your CloudEdge account. After resetting the device, use the new Wi-Fi and password to add it again.
Will not connect to WiFi?
- The wifi currently connected to the mobile phone is a 2.4Ghz network; The current location has good wifi coverage and a stable network (wifi signal is greater than 75%).
- Avoid using wifi extender.
- Check whether the wifi password is entered correctly.
It cannot be ruled out that in the rare case of special network incompatibility, the app and the camera cannot be connected correctly. In this case, our camera is not compatible, please contact the after-sales service first ([email protected]).
Fast power consumption?
- In the case of poor wifi coverage (such as signal is below 75%), which will increase power consumption.
- The PIR trigger frequency is high, and the power consumption will increase when infrared light/white light is on at night.
- The mobile phone often accesses the camera remotely, which will increase the power consumption.
- For the first use, it's recommended to use the power to 10%, and then charge it to 100%, which is helpful for the health of the lithium battery.
Camera not detecting movement?
- In the case of unstable network, the message may not be pushed in time after the PIR is trigged. In this case, you can first confirm the network status and remove the camera to verify and confirm in an environment with good network coverage.
- Inappropriate installation position will result in PIR not triggering and not detecting. If the position is too high, the object is too far away, or the object is too small, the camera will not trigger, try to adjust the installation position according to the trigger requirements for many times.
SD card not recognized?
- Support capacity is 16-128GB micro SD card.
- Before use, make sure to format the micro SD card as FAT32 or exFAT file system on the computer, then insert it into the camera, and finally perform the format memory card operation on the camera again.
- If the micro SD card is not recognized during use, it is generally a quality problem of the micro SD card, and it is necessary to replace the memory card with more stable reading and writing.
ulofy Smart WiFi HD Camera (PTcam) Quick Start Guide
Quick start guide for the ulofy PTcam Smart WiFi HD camera, covering what's included, product overview, CloudEdge app setup, mounting, account registration, step-by-step WiFi pairing, and safety information.
NGTeco NG-C2500 Indoor Camera User Manual
Setup and usage guide for the NGTeco NG-C2500 indoor camera with the CloudEdge app, covering box contents, product layout, LED status, Wi-Fi pairing, installation, and the main app features.