 CloudEdge App Docs
ANRAN Solar Camera Quick Start Guide
Quick start guide for the ANRAN C3 solar-powered wireless security camera, covering hardware overview, app setup, Wi-Fi pairing, PIR motion settings, specifications, installation, and FAQs.
This guide explains how to set up and use the ANRAN C3 solar-powered wireless security camera with the ANRAN app. For other devices managed in CloudEdge, see the CloudEdge app documentation.
For battery-camera troubleshooting and tips, see the Battery Camera FAQs.
1. Product Introduction
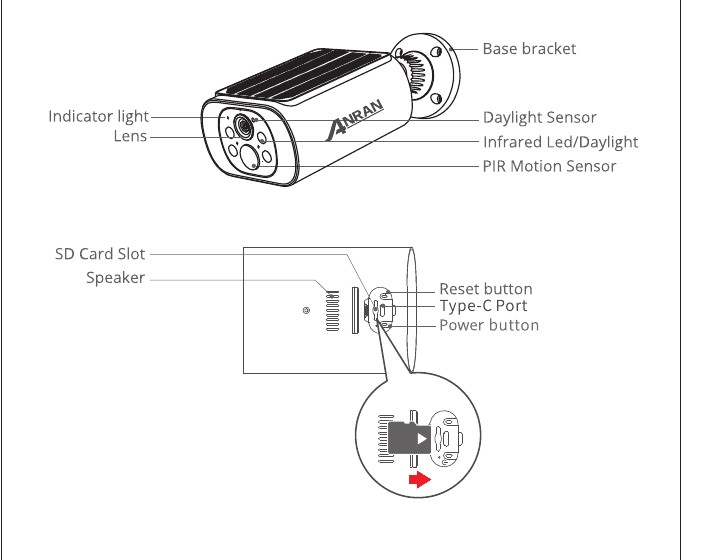
- Indicator light
- Lens
- Base bracket
- Daylight Sensor
- Infrared Led/Daylight
- PIR Motion Sensor
- SD Card Slot
- Speaker
- Reset button
- Type-C Port
- Power button
Please insert the Micro SD Card according to the direction shown in the diagram. Micro SD Card might JAM if inserted incorrectly and device could be damaged.
- SD Card Port — Support micro SD card for local storage (Max 128GB).
- Reset button — Used to restore the camera to factory settings (Press and hold on 5-8s).
- Card capacity requirements — 8-128GB.
- Read and write speed requirements — class10 level.
- File format — FAT32.
2. APP Installation and Account Registration
2.1 Download "ANRAN" APP
- Method 1: Download "ANRAN" APP from APP Store (iOS) or Play Store (Android).
- Method 2: Scan "ANRAN" APP QR code to download it.
Please turn on 2 permissions below when use this APP at the first time:
- Allow "ANRAN" APP to access mobile cellular data and wireless LAN, or it will be failed to add IP camera.
- Allow "ANRAN" APP to receive pushed message, or the cellphone will not receive alarm push when motion detection or audible alarm is triggered.
2.2 Register Account
New users need to register by e-mail, click "Register", and follow the steps to complete the registration of the account, then log in.
When registering a new account, please choose the region which you are actually in. (Different registered regions can't share the camera.) Please choose to register by e-mail.
3. How to Add Camera to APP
Please insert the Micro SD card before power on, otherwise, the SD card can not be detected.
3.1 Power on Camera
- Please long press the power button for 5s to power the camera.
- The indicator with red light blinking slowly means the camera is started successfully.
3.2 Connect the Camera
Put the camera and smart phone 1 to 3 feet (30 to 100 cm) away from the router to set Wi-Fi.
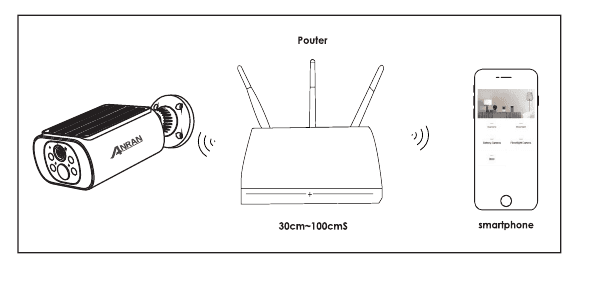
Warning Tip:
- The camera only supports 2.4GHz Wi-Fi, and doesn't support 5GHz WIFI.
- Please ensure that the Wi-Fi signal strength is to be over than 85%; if the camera is far away from the signal source, it won't be connected successfully for the first time.
Wi-Fi Connection Steps
On the home page, tap Add Device, then on the Select Device screen choose Battery Camera and select the C3 model.
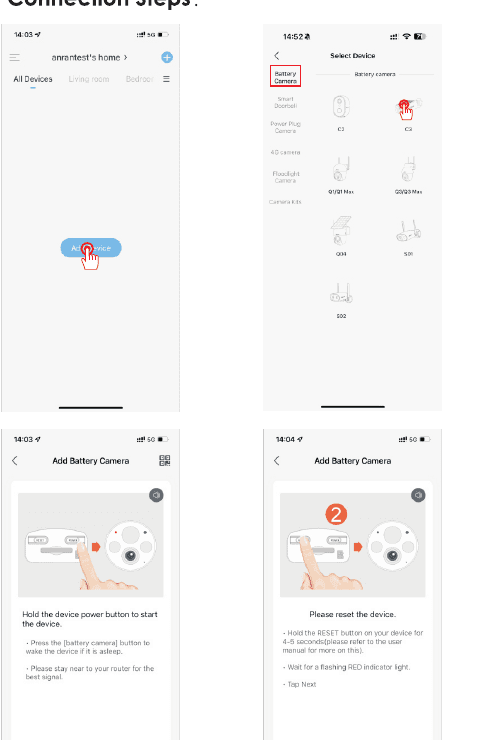
Hold the device power button to start the device. Press the [battery camera] button to wake the device if it is asleep, and stay near to your router for the best signal.
Please reset the device: hold the RESET button on your device for 4-5 seconds, wait for a flashing RED indicator light, then tap Next.
On the Wi-Fi Setup screen, select a 2.4GHz Wi-Fi network and enter your password, then tap Next.
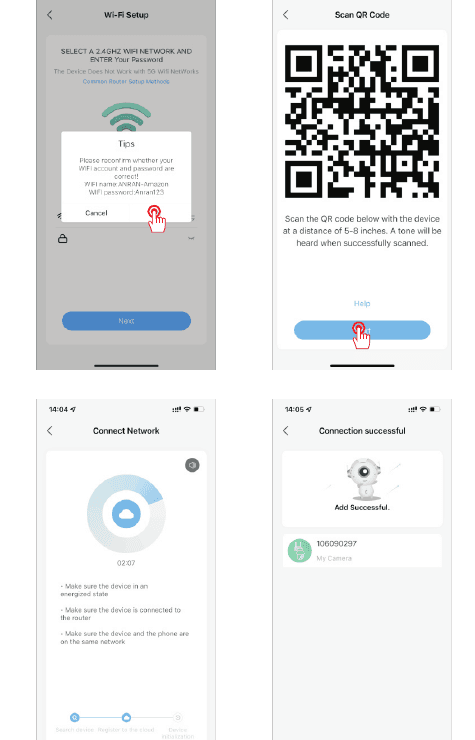
Show the QR code to the camera at a distance of 5-8 inches. A tone will be heard when successfully scanned. The app then connects the network and shows Connection successful / Add Successful when the camera is added.
4. PIR Motion Detection Settings
Enter the application - "Parameter Setting" - "Motion Detection" interface.
| Sensitivity | Detecting Distance (For moving objects) |
|---|---|
| Level 1-3 (Low) | Up to 4-5 meters |
| Level 4-7 (Med) | Up to 5-8 meters |
| Level 8-10 (High) | Up to 8-13 meters |
Warm Tips:
- When you encounter the missed or delayed alarm frequently in using this camera, you can adjust the motion detection sensitivity to solve them.
- If you notice the poor performance of motion detection in the night environment, try to turn off "Night Detection".
5. Product Specification
| Item | Specification |
|---|---|
| Resolution | 3MP/5MP @ 12-15fps |
| Storage | TF Card (max. 128GB), Cloud Storage |
| Wi-Fi | Only 2.4GHz |
| Infrared LEDs | 850nm |
| Waterproof | IP66 |
| OS | iOS (>8); Android (>4.2) |
| Wi-Fi Standards | IEEE 802.11b/g/n |
| Power | 5V 1A |
| Working Temp & Humidity | -20°C - 50°C (-4°F - 122°F), <90% (no condensation) |
6. Installation
What is required: Power Drill (not provided) and 15/64"(6mm) Drill Bit.
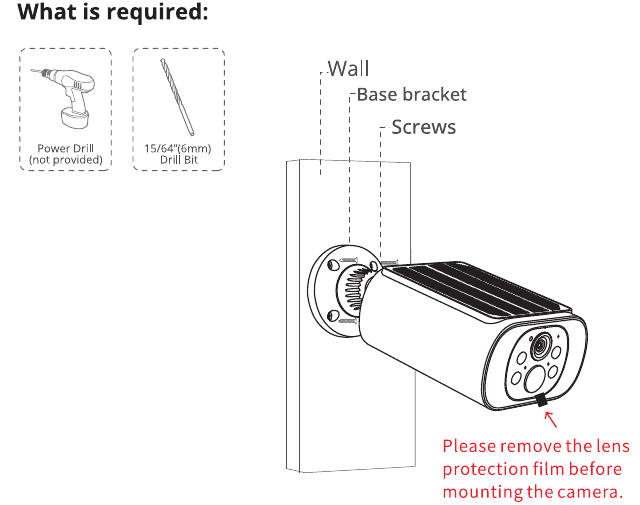
Please remove the lens protection film before mounting the camera.
If your camera will be installed in an environment where there is no sunlight or it will be blocked by other objects, you can contact us and we will send you a free solar panel.
7. FAQs
1) The device prompts offline?
- Check whether the equipment is in the power-on state, and observe whether the working light of the equipment is on normally.
- Check whether the Wi-Fi network is in good condition and restart the router.
- If the device is located far away from the router, which results in the inability to obtain a good Wi-Fi signal, it is recommended to move the router to a closer place or add a Wi-Fi amplifier to improve the Wi-Fi performance of the home.
- Delete the camera from your ANRAN account and add it again after resetting the device.
- Check whether the device firmware and application program are the latest version.
2) Update router or Wi-Fi password?
Delete the camera from your ANRAN account. After resetting the device, use the new Wi-Fi and password to add it again.
3) Can't play historical video?
- Check the status of the SD card in "Settings" to ensure that the SD card has been successfully recognized.
- Reinsert the SD card.
- In the application, format the SD card.
- Try another new SD card.
4) Why doesn't the device identify the SD card?
- Please insert the Micro SD card before power on.
- It is recommended to use San Disk, Samsung and other brand cards.
- It is recommended to use a standard class 10 TF card.
- Only FAT32 format is supported.
- TF card can't be identified when the internet environment is not good.
5) Why the battery life of my device is poor?
- Please check whether the number of alarms is too frequent. Because the working time of the device determines the battery life. The more frequent PIR wake-ups, the faster the battery consume due to the longer working time. It is recommended to appropriately lower the motion detection sensitivity of the device and set the alarm interval and alarm time plan. (Note: Outdoor air conditioning units, moving cars and the passing pedestrians will cause frequent alarms. Please adjust the angle of the device to avoid these objects.)
- In cold weather, the battery capacity will be reduced, which will affect the endurance of the device.
6) The phone cannot receive the alarm push?
- Turn on all the push permissions of the "ANRAN" application in the system settings of your mobile phone.
- Make sure that the device's motion detection function is successfully turned on.
- Restart the phone, and clear the cache on Android phones.
- Check whether the network is good.
7) How to judge whether the charging is successful?
The device's charging indicator light is red, which means it is charging. A blue light means that charging is complete. It will take approximately 10 hours or more to fully charge.
8) What should I do if the charge fails?
- Determine whether the power adapter is good, try another one.
- Determine whether the Type-C charging cable is good, try another one.
- The charging indicator may be defective, please check the charging condition in the phone APP.
- Determine whether the charging port of the device is not in good contact with the Type-C charging cable.
- The device has a low temperature charging protection module, please don't charge the device at low temperatures.
ANRAN Q1/Q1 Max Solar Powered Wireless Security Camera Quick Start Guide
Quick start guide for the ANRAN Q1/Q1 Max solar powered wireless security camera, covering the product layout, ANRAN app installation and account registration, WiFi pairing, PIR motion detection settings, specifications, and FAQs.
BOIFUN C10 Solar Camera
User manual for the BOIFUN C10 wire-free solar battery camera, covering hardware overview, app setup, charging, installation, PIR motion settings, and FAQs.