 CloudEdge App Docs
Solar Camera Quick Start Guide
Quick start guide for the wireless, solar-powered battery security camera, covering the hardware overview, CloudEdge app setup, Wi-Fi pairing, camera and solar panel installation, motion detection, recording storage, playback, sharing, charging, and FAQs.
This guide explains how to set up and use the wireless battery powered solar camera with the CloudEdge app.
For more battery-camera troubleshooting and tips, see the Battery Camera FAQs.
1. Package List

- Power Button
- Reset
- SD Card Slot
- Micro USB
- Charging Indicator
- Speaker
- Antenna
- PIR
- Microphone
- IR LED
- Status Light
- LENS
- Floodlight LEDS
2. Product Overview

- Camera
- Solar Panel
- Micro-USB Charging Cable
- User Manual
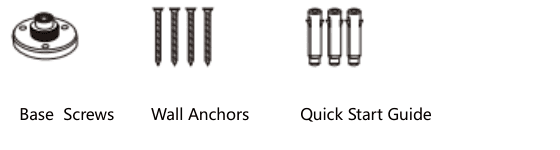
- Screw Package
Specifications
| Item | Description |
|---|---|
| Power port | DC5V±10% |
| Power on/off | Press power button for 3 seconds to turn on/off the camera |
| Status light | • Solid red light on: the camera is turning on or is malfunctional • Blinking red light: awaiting Wi-Fi connection (slowly blinking) connecting the Wi-Fi (quickly blinking) • Blinking blue light: currently connecting • Solid blue light on: the camera runs correctly |
| SD card slot | Support local SD card storage (Max.128G) |
| Reset | Press and hold on for 5 seconds to reset the camera |
| Charging indicator | • Solid red indicator on: battery is charging • Solid blue indicator on: charging completed |
| Battery | Built-in rechargeable batteries |
3. How to Set the Camera
3.1 App Downloading and Installation
Downloading 'CloudEdge' APP from App store or on Google play. You could also scan the QR code to download it.
3.2 Account Registration and Login
Open 'CloudEdge' APP, choose your country/region, register an account with a valid e-mail address at your first time use, then log in.
3.3 Network Configuration
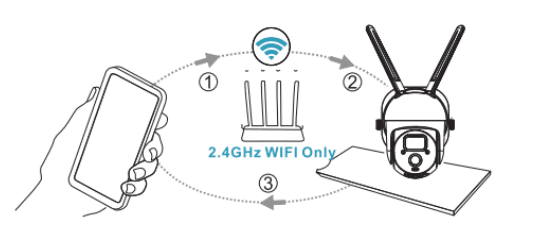
- The camera only support 2.4Ghz Wi-Fi, does not support 5Ghz Wi-Fi. Please check your router to confirm that the network is under 2.4Ghz frequency.
- Make sure that the Wi-Fi password doesn't include special characters like
&*%#@^. - For a successful connection, please place the camera and phone near to the router, which should speed up the network configuration process.
3.4 Connect Camera to APP
Important to Know:
- Before adding the device, make sure that your camera has enough power. You can use 5V,1.5A charging adapter to charge it (power adapter is not included).
- Long press the 'Power button' for 3-5s to power on/off the device, you will hear a beeping sound after turning it on.
- If you have successfully pair the camera with you phone, the 'Status Light' will flash blue. If not, it will show red light. Please reset the camera by pressing 'Reset' button for 3-5s.
Run 'CloudEdge' APP, click 'Add Device'.

Select your Wi-Fi, and input the right password, and click 'Next'.
Show QR code to the camera at distance of 5-8 inches. A tone will be heard when successfully scanned.

You can name your camera and add it in a monitor location.
4. Camera Installation
4.1 Install the bracket and solar panel
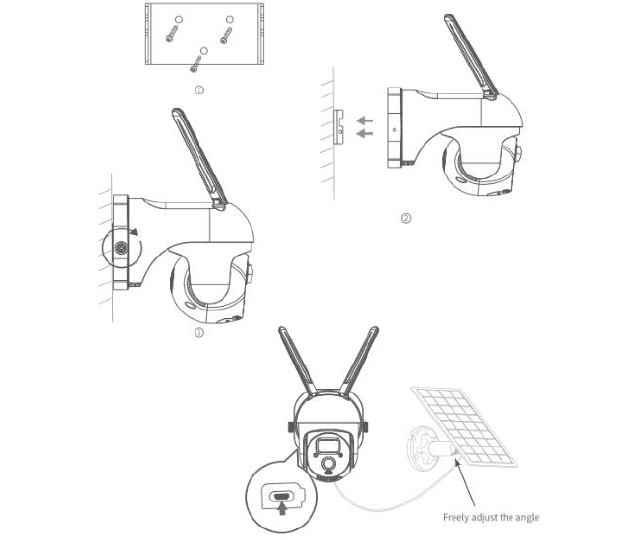
Use a drilling tool to make holes on the wall according to the hole distance of the base. It is recommended to mark the holes on the wall with a pencil before drilling. Screw the expansion nut into the holes on the wall, and then connect the bracket to the expansion nut with screws to complete the fixing.
4.2 Select a good spot for your camera
Please install the camera in a position where it's view is not blocked and ensure that it is within the coverage of the Wi-Fi network.
We recommend installing the camera about 8ft height. You can adjust the height/camera angle according to the real time view on your phone.

5. Solar Panel Installation
Components of solar panels

INSTALLATION
Place Solar Panel in an area with consistent sunlight through out the year. It only needs a few hours of direct sunlight each day to keep your camera powered.
The amount of energy that the solar panel produces is affected by weather conditions, seasonal changes, geographic location, etc.
Fix the base to your mounting location using the included screws. If the installation surface is soft or unstable, first use a φ6.0 drill bit to drill a hole in the wall, then insert the anchor nail into the hole, and fix the base with screws.

Install the locking screw cap into the universal joint and then screw the circular socket nut into the universal joint.

Screw the universal joint into the back of the solar panel. Tighten it firmly with the attached nut.

Screw the locking screw cap into the base. Make sure that the universal joint is angled upward.

When adjusting the solar panel left or right, loosen the locking screw cap, turn the sleeve rod, and tighten the locking screw cap when the panel is in position.

Solar panel's angle can be adjusted up and down up to 90°.

Tip: After the installation is complete, please check that all locking mechanisms are tightly secured.

HOW TO POSITION YOUR SOLAR PANEL
- Find the area that gets the most direct sunlight throughout the day
- Angle the solar panel upward 30°
- Point it south if in the northern hemisphere and north if in the southern hemisphere
IMPORTANT
- Wipe the face of the solar panel with a soft, damp cloth regularly to clear any dust or debris.
- Be sure to update the firmware version of the camera to the latest version
BASIC PARAMETERS
| Parameter | Value |
|---|---|
| Cable length | 3m |
| Operating voltage | 5V DC |
| Operating temperature | -20.5°C to 48.5°C (-5°F to 120°F) |
6. Function Overview
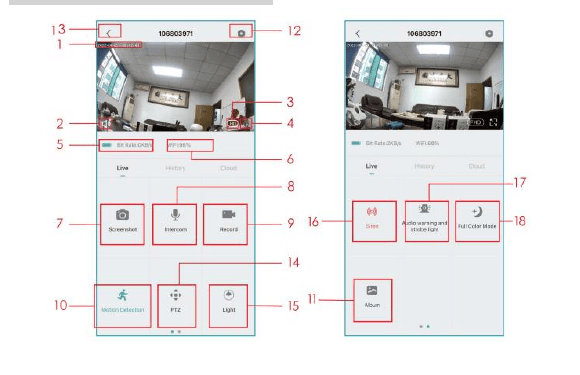
| No. | Function | No. | Function |
|---|---|---|---|
| 1 | Time Stamp | 10 | ON/OFF Motion Detection |
| 2 | Mute Button | 11 | Find your Video or Screenshot |
| 3 | Resolution Button | 12 | Setting Button |
| 4 | Full Screen | 13 | Return to Homepage |
| 5 | Network Speed | 14 | PTZ Control |
| 6 | Wi-Fi Signal Strength | 15 | Light Control |
| 7 | Take a Screenshot | 16 | Siren Control |
| 8 | Microphone | 17 | Audio warning and strobe light setting |
| 9 | Record a Video | 18 | Full color Mode setting |
7. Motion Detection Setting
The camera not support 24/7 recording. Once the PIR sensor detects a movement, the camera will start to record videos. The videos clips will be saved to local SD card or Cloud.

- Turn on/off motion detection: if you disable motion detection, the camera will not record videos, and you will not receive motion triggered events.
- Change detection sensitivity: Sensitivity level from 1-10. It is suggested to set a more high level (6-10) to receive more detailed event at first. If you feel disturbed by the notifications, you could choose to decrease unnecessary notification and reduce false alarms.
- Click 'Alarm Working Mode':
- Recording time - allow you to record a long video (10-30s);
- Alarm Interval - select trigger frequency of motion detection.
- Alert Plan: Set a time period to open the motion detection if you need.
8. How to Store Recordings
1. Stored By Manual
Go to live video, manually record the video by clicking 'Record' button to start or end, existing the live view will automatically stop recording.
2. Memory Card
The camera supports micro SD card (NOT INCLUDED), up to 128GB.
3. Cloud Storage Plan
With a cloud subscription, you can record and save all video clips to the cloud and view them in your CloudEdge APP. You could choose Monthly VIP, Season VIP, Annual VIP (A newly registered account has 7 days free trial.)
9. Video Playback
1. Video Playback in SD Card
- Go to the main interface, click "History-Alert" icon, you will see today's motion detected events. Tap any of these videos to playback.
- Open the 'Calendar' to trace back and playback early recorded videos.
2. Video Playback in Cloud
Go to the main interface, click "Cloud-Alert" icon, you will see today's motion detected events. Tap any of these videos to playback.

10. Camera Sharing
When you need to view the camera with other family members or friends, you can use this function. Only the administrator whose account is bound with the camera for the first time can share and set the device. Other members can only view the live or playbacks of the device.
NOTE: You can not share account in different registered regions.
Click 'Device Share' on setting page.
Click 'Scan QR Code'.
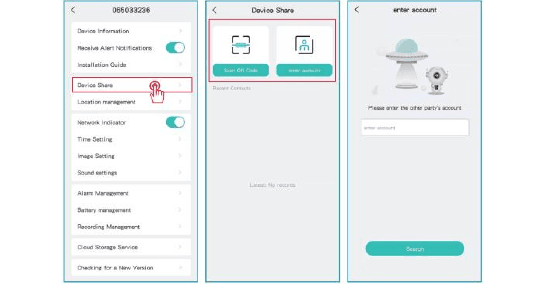
Scan the QR code for the mobile you want to add and you will receive the confirmation notification after success. The sharing will be completed after you agree. If you choose 'enter account', you could search the account you would like to add.
11. Charging the Camera
1. Way of Charging
The APP will remind you to charge your camera when the battery is low. Please use the Micro USB cable to plug into the 5V/1.5A charging adapter to charge the camera. During charging, the camera's indicator is red, and when the camera is fully charged, the indicator light will turn into solid blue. It will take about 8 hours to fully charge.
You could use the solar panel to charge the camera.
Note: The accurate battery level can be view in the CloudEdge app.
2. About Battery
This camera adopts innovative low-power technology and has different power consumption in different scenarios, giving it a more durable standby capability. When there is no motion detection, the camera will enter sleep mode with the lowest power consumption. When a motion is detected, the camera will be woken up immediately and start recording video.
Notes
- If the camera is pointed to a busy street, it will be woken up frequently and detect massive movements, as a result, the battery power will be consumed quickly.
- The battery consumption and standby time are closely related to the number of detected motions a day. The more detected motions, the faster battery consumption and the shorter battery standby time.
- The typical estimated life of a Lithium-ion battery is about two to three years or 300 to 500 charge cycles whichever occurs first. One charge cycle is a period of use from fully charged, to fully discharged.
- The recommended operation environment for the camera is 4°F~140°F (20°C-60°C). For lower temperatures, it may slow down the battery performance.
12. FAQ
Q: Will the camera show red lights when night vision is activated?
A: The built-in infrared lamp beads make the camera only show some dim red lights when night vision is activated, but the image quality is still clear under no light environment.
Q: When I want to enter the live view, the circle keeps spinning, and the live view cannot be opened.
A: Depending on the your network speed, you can instantly access or sometimes it takes 1 second or longer to access the live view. If it takes too long, you can exit the live view and enter it again. Or please check the Wi-Fi signal and network speed of your phone. Choosing the standard-definition (SD) instead of full high-definition (FHD) can also help.
Q: I have selected 2.4GHz Wi-Fi and input the Wi-Fi password correctly, why does the camera still not connect to Wi-Fi?
A:
- Please make sure the network you used in your camera and the phone are the same one.
- Please make sure your router opens the DHCP, you can log in the router setting and find the DHCP to check if it is closed or opened. If it is closed, then it will not distribute the IP address to this IP camera and it will fail.
- Please make sure the network you used is 2.4GHz, not 5GHz. Meanwhile, please set the Wi-Fi authentication method to wpa2-psk or other lower level of security method. A password is required.
- This camera does not accept the special characters
&*%##@A(including network name and password). - If your Wi-Fi has an admin password and guest password, please use the admin password to connect the camera.
- Please access the camera's setting to confirm its Wi-Fi signal, please make sure the Wi-Fi signal is strong.
- If your camera can't connect well but your network is good, please take out your SD card and try again, it may be that the SD card is incompatible.
- If the device connected to Wi-Fi is excessive it will cause the IP address conflict and fail to connect to Wi-Fi.
- Please keep the camera at least 1 meter away from any wireless devices or metal in order to avoid wireless interference, including Wi-Fi routers and phones.
- If you want to change Wi-Fi to connect the camera, please reset the camera by clicking 'Reset' button (network configuration) until you hear a short sound of music, the indicator light will flash in red, then reconnect the camera to the app. If camera successfully connected, the indicator light will show blue.
Q: How far should the camera be placed from the router?
A: After testing, the Wi-Fi connection distance can normally reach up to 150 meters in the open area. However, the actual situation depends on the strength of Wi-Fi and its surrounding environment (thick walls, electromagnetic devices, large metal objects will all cause interference to the Wi-Fi signals). If the camera connection signal is weak or unstable, please place the camera as close to the router as possible.
Q: What is the maximum length of recording time?
A: You can choose the recording time in the app. The camera can record for a fixed time 10-30s.
Q: Why can't I receive push notifications to my phone?
A: Firstly, please make sure that 'Receive Alert Notifications' is turned on in your APP. Secondly, check your phone settings, and allow the APP to send push notifications to your phone. Thirdly, please make sure the app is running the background to receive notifications (Android system).
Q: Why I can't hear any sounds from my camera?
A: The camera will record sound automatically, please turn on the sound icon if you want to hear sound sat live viewing. If you want to get a two-way audio function, please remember to turn on two-way talk from camera setting.
Q: Does my phone have to connect to the same Wi-Fi as cameras? Or do I need to connect to Wi-Fi to view the camera?
A: No, it doesn't. As long as the camera is well connected with your home, you can use WLAN or Cellular data.
Q: How can I differentiate the 2.4GHz and 5GHz Wi-Fi?
A: You could check the user manual of the router and try to contact the operator for help. Or if you use dual band router. You could try to confirm it yourself.
Find the router website on your computer/laptop. Or if you have connected your Wi-Fi on your phone, click your Wi-Fi for router information.

Sign in your router account, Rename your Wi-Fi with 2.4G and 5G respectively for easy distinction. (Do not use 5G preferred, 2.4Ghz & 5Ghz will mix together if you open it, You don't know whether you have connected to 2.4Ghz Wi-Fi or 5Ghz Wi-Fi)

Rebluum RB-3PT1 Solar Camera
Quick start guide for the Rebluum RB-3PT1 Solar Battery wireless security camera, covering what's included, product layout, mounting, solar panel installation, CloudEdge app setup, Wi-Fi pairing, alarm settings, sharing, and FAQs.
TWUFY Solar Camera
User manual for the TWUFY wireless solar security camera, covering product layout, status lights, CloudEdge app setup, Wi-Fi pairing, installation, and FAQs.