 CloudEdge App Docs
BondFree Solar Camera (Outdoor Battery)
User manual for the BondFree solar-powered outdoor battery surveillance camera (Cloud Series), covering package contents, product layout, status lights, CloudEdge app setup, Wi-Fi pairing, charging, installation, recording, and FAQs.
This guide explains how to install and use the BondFree Solar-Powered Outdoor Surveillance Camera (Cloud Series) with the CloudEdge app, including the package contents, product layout, status indicators, account registration, Wi-Fi pairing, charging, mounting, recording, and troubleshooting.
For more help, see the Battery Camera FAQs. After-sales E-Mail: [email protected].
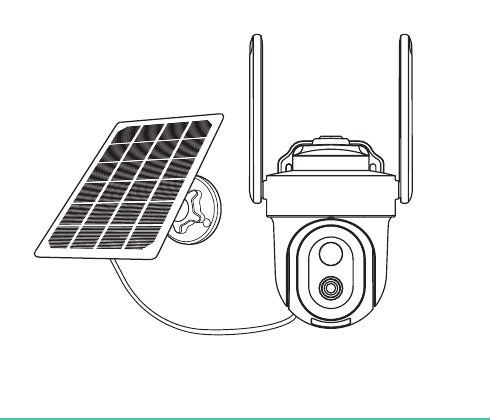
1. Package List
The package includes the camera, the screw pack for the camera, the manual, the solar panel, and a Micro-USB charging cable.
Solar charger includes:
| Item | Qty | Item | Qty |
|---|---|---|---|
| Solar panel | x1 | Base | x1 |
| Gimbal | x1 | Screws | x4 |
| Half-round nut | x1 | Wall anchor | x3 |
| Sealing cap | x1 | Manual | x1 |
2. Product Overview
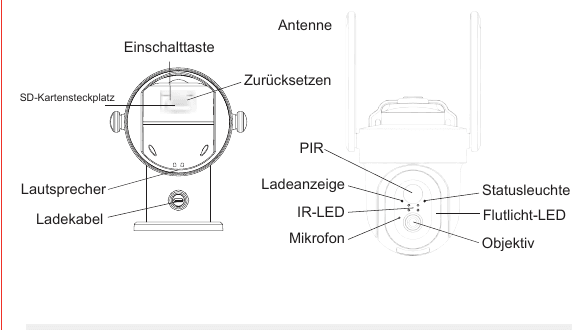
- Power button (Einschalttaste)
- Reset (Zurücksetzen)
- Antenna (Antenne)
- SD card slot (SD-Kartensteckplatz)
- Speaker (Lautsprecher)
- Charging cable (Ladekabel)
- PIR
- Charging indicator (Ladeanzeige)
- IR-LED
- Microphone (Mikrofon)
- Status light (Statusleuchte)
- Floodlight LED (Flutlicht-LED)
- Lens (Objektiv)
| Part | Description |
|---|---|
| Power connection | DC 5V ±10% |
| On/Off | Press the power button for 3-5 seconds to turn the camera on or off. |
| SD card slot | Supports local SD card storage (max. 128G). |
| Reset | Press and hold the button for 5 seconds to reset the camera. |
| Battery | Built-in rechargeable batteries. |
Status Indicator (Blinking Red Light)
| Indicator | Meaning |
|---|---|
| Solid red light | The camera is starting up or has a malfunction. |
| Slow blinking | Waiting for a Wi-Fi connection. |
| Fast blinking | Wi-Fi connection established. |
| Blue light blinks | Connection is being established. |
| Solid blue light | The camera is working properly. |
Charging Indicator
| Indicator | Meaning |
|---|---|
| Charging (Aufladen) | Solid red indicator: battery is charging. |
| Indicator (Anzeige) | Solid blue indicator: charging completed. |
1. Product-Related Instructions
1.1 Download and Install the App
CloudEdge is available for both iOS and Android OS. Search for the name "CloudEdge" in the App Store or on Google Play, or scan the QR code to download the app. Supported: iPad, iOS, Android.
1.2 App Permission Settings
When using this app for the first time, please enable the following 2 permissions. Otherwise you cannot add the IP camera.
- Allow the "CloudEdge" app to access mobile data and WLAN; otherwise the IP camera cannot be added.
- Allow the "CloudEdge" app to receive push notifications, or the phone will not receive an alarm push when motion detection or the acoustic alarm is triggered.
2. Account Registration
Open the app and sign up. Open the app and tap "Sign up now" to register. If you already have an account, tap "Sign in".
Enter your details. Enter a valid e-mail address and tick the privacy agreement. Then enter your nickname and password.
Notes:
- Please tick "Agree" for the "Terms of Use and Privacy Policy".
- If the verification code is delayed due to network problems, please try again later.
- If you register with a mailbox and do not receive the verification code, please check your spam mailbox.
Wi-Fi Requirement
Before pairing the camera with Wi-Fi, please make sure your smartphone is connected to a 2.4G Wi-Fi signal.
If you cannot see the 2.4G signal in your WLAN settings, you can enable it via your router. All routers, whether 5G or dual-channel, also provide a 2.4G signal. Please refer to the Q&A in this manual for instructions.
3. Add Device
3.1 First Configuration Mode
Add the camera. Tap "Add device" or "+", then select the corresponding camera icon to add it.
Select Wi-Fi. Select the Wi-Fi network and enter the password, then tap "Next".
All routers that include a 5G router also provide a 2.4G signal — you only need to select the 2.4G signal during configuration. No problem switching back to the 5G signal on your smartphone after pairing the camera with the app. If you do not know how to enable the 2.4G signal of your router, please read the FAQs.
Scan the QR code. Review the scanning instructions and tap "Next". Scan the QR code on your phone with the camera and tap "Next" when the camera issues the prompt. You can complete the configuration after about 30 seconds.
Keep devices close. When establishing a connection, make sure your router, phone and camera are as close together as possible.
Done. You have successfully added the camera to your phone. Start monitoring your home.
Open camera settings. In the live view interface, tap the settings (gear) icon to set up the general camera functions.
Notes:
- The camera only supports 2.4GHz Wi-Fi networks.
- The number of characters in the router's SSID and password should not exceed 24 characters.
3.2 Second Configuration Mode
Scan device QR code. Tap "+", select "Scan code" and then scan the QR code on your device.
Enter configuration. Select "Enter configuration". Review the operating instructions for scanning and tap "Next".
Connect to the device hotspot. Connect to the device hotspot "STRN_******" and return to the "CloudEdge" app. Select the WLAN network, enter the password and tap "Next".
All routers that include a 5G router (supplied with the package) also provide a 2.4G signal. You only need to select the 2.4G signal during configuration. If you wish, there is no problem switching back to the 5G signal on your phone after pairing the camera with the app.
Keep devices close. When establishing a connection, make sure your router, phone and camera are as close together as possible.
Charge the Camera
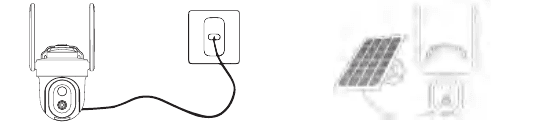
It is recommended to fully charge the battery before mounting the camera outdoors.
- Charge with a power adapter (not included).
- Charge with the solar panel.
Charging indicator:
| Indicator | Meaning |
|---|---|
| Red LED | Charging |
| Blue LED | Fully charged |
Tip: To ensure better rain protection, when charging with a solar panel, tightly fasten the interface that connects the solar panel and the camera.
Camera Installation
A. Install the Bracket and the Camera
- Mounting on the ceiling (Montage an der Decke).
- Mounting on a mast (Montage am Mast) — mounting straps are not included and must be purchased separately.
- Installation on the wall (Installation an der Wand).
B. Choose a Good Location for Your Camera
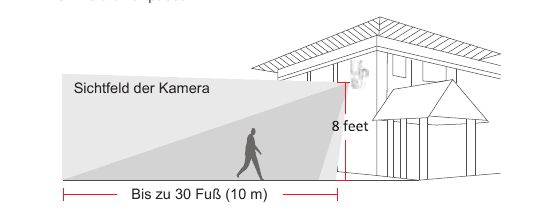
We recommend installing the camera at a height of about 8 feet. You can adjust the height/camera angle accordingly using the real-time view on your phone.
- Camera field of view (Sichtfeld der Kamera)
- Mounting height — 8 feet
- Coverage — up to 30 feet (10 m)
Installing the Solar Module
Please choose a location for your solar panel that receives the most sunlight throughout the year. The solar panel only needs a few hours of direct sunlight each day to supply your camera with power. The amount of energy the solar panel can produce is influenced by weather conditions, seasonal changes, geographic locations, etc.
Important to Know
- Make sure the solar panel is not blocked. Energy harvesting efficiency drops drastically even if only a small part of the solar panel is blocked.
- Do not install the solar panel completely horizontal. Otherwise, dust and other deposits can easily collect on the solar panel. It is recommended to install the solar panel at an angle to receive as much direct sunlight as possible. Wipe the solar panel regularly to remove dust and dirt.
- Please charge the batteries at a temperature between -20.5 °C and 48.5 °C (-59 °F and 120 °F).
- At temperatures below -20.5 °C, the solar panel does not charge the camera.
To achieve high charging efficiency, do NOT install the solar panel vertically, in the shade of a tree, or without direct sunlight.
Troubleshooting (Solar Charging)
Stop charging the battery-powered cameras. If your solar panel can no longer charge the camera, try the following solutions:
- Unplug the charging cable and plug it back in. Please make sure the connection between the solar panel and the camera is stable.
- Make sure your solar panel faces the sun and is not shaded by trees, buildings or other objects.
- Make sure your camera is not charged at temperatures below -20.5 °C (-59 °F) or above 48.5 °C (120 °F).
Solar Panel Assembly
Mount the base. Fasten the base with the supplied screws at your mounting location. If the installation surface is soft or unstable, first drill a hole into the wall with a φ6.0 drill bit, then insert the wall anchor into the hole and fasten the base with screws. (Parts: wall anchor, base, screws, wall.)
Prepare the gimbal. First insert the locking screw cap into the universal joint (gimbal), then screw the round socket nut into the universal joint. (Note the front and back orientation.)
Attach to the solar panel. Screw the universal joint into the back of the solar panel. Tighten it with the included nut.
Fasten the locking screw. Screw the locking screw into the base. Make sure the universal joint is angled upwards.
Adjust left/right. To adjust the solar panel left or right, loosen the locking screw, turn the socket rod, and tighten the locking screw once the panel is in position.
Adjust up/down. The angle of the solar module can be adjusted up to 90° up and down.
Tip: After completing the installation, please check that all locking mechanisms are securely seated.
How to Position Your Solar Panel
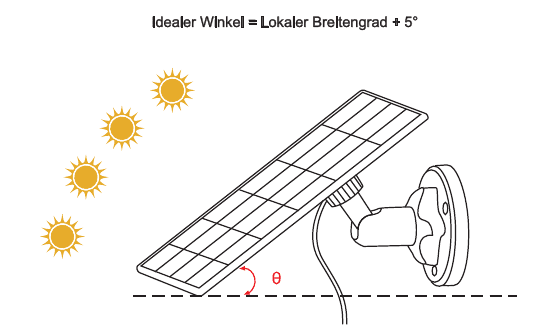
- Find the area that receives the most direct sunlight throughout the day.
- Tilt the solar panel upward by your local latitude + 5 degrees.
- Face it south if you are in the Northern Hemisphere, and north if you are in the Southern Hemisphere.
Ideal angle = Local latitude + 5°
Basic Parameters
| Parameter | Value |
|---|---|
| Cable length | 3 m |
| Operating voltage | 5V DC |
| Operating temperature | -20.5 °C to 48.5 °C (-59 °F to 120 °F) |
Function Overview
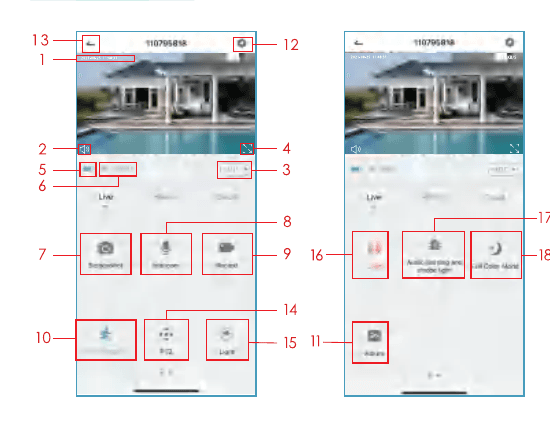
- Timestamp
- Mute button
- Resolution button
- Full screen
- Network speed
- Wi-Fi signal strength
- Take screenshot
- Microphone
- Record video
- ON/OFF motion detection
- Video and screenshot
- Settings button
- Back to home page
- PTZ control
- Light control
- Siren control
- Audio warning and strobe light
- Full color mode setting
Motion Detection Settings
The camera does not support 24/7 recording. As soon as the PIR sensor detects motion, the camera starts recording videos. The video clips are saved on the local Micro SD card or in the cloud.
- Turn motion detection on/off: If you disable motion detection, the camera does not record any videos and you do not receive any motion-based event notifications.
- Motion detection sensitivity: Sensitivity level from 1-10. It is recommended to set a higher level (6-10) to receive more detailed events first. If you feel disturbed by the notifications, you can reduce unnecessary notifications and reduce false alarms.
- Alarm schedule: Set a time period to enable motion detection when you need it.
How to Save Recordings
1. Saved by Hand
Go to the live video, record the video manually by tapping the "Record" button to start or stop. An existing live view automatically stops the recording.
2. Memory Card
The camera supports a Micro SD card (not included), up to 128GB.
3. Cloud Storage
It is not necessary to enter a code to activate the cloud. The cloud is switched on automatically once the payment is completed. If you choose the wrong cloud, please contact us via the app, tap the "Help" button to receive a solution.
Video Playback
1. Video Playback on SD Card
- Go to the main interface, tap the "History-Alert" icon. You will see the motion events detected today. Tap one of these videos to play it.
- Open the "Calendar" to track and play back earlier recorded videos.
2. Video Playback in the Cloud
Go to the main interface, tap the "Cloud-Alert" icon. You will see the motion events detected today. Tap one of these videos to play it.
Camera Sharing
If you want to view the camera with other family members or friends, you can use this function for device sharing. Only the administrator, whose account was bound to the camera first, can share and configure the device. Other members can only watch the live view or playbacks of the device.
Note: Make sure the registered regions of all shared accounts match the administrator's account region.
Open device sharing. Tap "Device share" on the settings page.
Scan QR code. Tap "Scan QR code".
Confirm. Scan the QR code of the shared account and you will receive a confirmation on success. Sharing is complete once you have confirmed. If you select "Enter account", you can search for the account you want to add.
Charging and Battery
1. Charging Method
The app reminds you to charge your camera when the battery is almost empty. Please use the Micro-USB cable to connect it to the 5V/1.5A adapter to charge the camera. During charging, the camera indicator lights up red, and when the camera is fully charged, the indicator lights up solid blue. Full charging takes about 8 hours. You can also use the solar panel to charge the camera.
Note: The exact battery status can be viewed under "Settings - Battery management".
Safety Instructions for Battery Use
The camera is not designed to operate 24/7 at full capacity or to live stream around the clock. It was developed to record motion events and only show them live remotely when you need it.
- The battery is built in; do not remove it from the camera.
- Charge the battery with a standard, high-quality DC-5-V battery charger or solar panel. Do not charge the battery with solar modules of other brands.
- Charge the battery when temperatures are between 0 °C and 45 °C, and always use the battery when temperatures are between -20 °C and 48.5 °C.
- Keep the USB charging port dry, clean and free of dirt, and cover the USB charging port with the rubber plug when the battery is fully charged.
- Do not charge, use or store the battery near sources of ignition such as fire or heaters.
- Do not use the battery if it gives off an odor, generates heat, becomes discolored or deformed, or appears abnormal in any way. If such a battery is in use or being charged, immediately remove the battery from the device or charger and stop using it.
- Always follow the local waste disposal and recycling laws when disposing of the used battery.
2. About the Battery
This camera uses an innovative low-power technology and has different power consumption in different scenarios, which gives it a longer standby capability. If no motion detection is present, the camera switches to standby mode with the lowest power consumption. When motion is detected, the camera is woken up immediately and starts recording video.
Notes:
- If the camera is pointed at a busy street, it is woken up frequently and detects a lot of motion, which quickly drains the battery.
- Battery consumption and standby time are closely related to the number of detected movements per day. The more movements detected, the faster the battery is consumed and the shorter the battery's standby time.
- The typical estimated lifespan of a lithium-ion battery is about two to three years, or 300 to 500 charge cycles, whichever occurs first. One charge cycle is one usage period from fully charged to fully discharged.
- The recommended operating environment for the camera is 4 °F to 140 °F (20 °C to 60 °C). At lower temperatures, this can slow down the battery performance.
FAQ
F1: The camera cannot be turned on. A1: If your camera does not turn on, please try the following solutions:
- Make sure the power switch is turned on.
- Charge the battery with a DC 5V/2A power adapter. The camera is charging when the blue light is on.
F2: The battery is fully charged, but the QR code on the phone cannot be scanned. A2: If you cannot scan the QR code on your phone, please try the following solutions:
- Remove the protective film from the camera lens.
- Wipe the camera lens with dry paper/cloth/tissue.
- Vary the distance between your camera and the phone so the camera can focus better.
- Try to scan the QR code in sufficient lighting. If this does not work, please contact support.
F3: During initial setup, no Wi-Fi connection could be established. A3: If the camera cannot connect to the WLAN, please try the following solutions:
- Make sure you entered the correct Wi-Fi password. Make sure you selected a 2.4GHz Wi-Fi signal.
- Place the camera closer to your router to ensure a strong Wi-Fi signal.
- Change the encryption method of the Wi-Fi network to WPA2-PSK / WPA-PSK (more secure encryption) on your router interface.
- Change your Wi-Fi SSID or password and make sure the SSID is within 31 characters and the password is within 64 characters.
F4: Does the camera show red lights when night vision is enabled? A4: The built-in infrared lamp beads ensure that the camera only shows a slightly faint red glow when night vision is enabled, but the image quality is also clear even with no light.
F5: I have 2.4-GHz Wi-Fi enabled and entered the Wi-Fi password correctly, why does the camera still not connect to Wi-Fi? A5:
- Make sure the network you used in your camera and the phone is the same one.
- Make sure your router opens DHCP so you can log in. Open the DHCP setting in the router settings and check whether it is closed or open. If it is closed, the IP address is not distributed to this IP camera and it fails.
- Make sure the network you use is 2.4 GHz and not 5 GHz. Set the Wi-Fi authentication method to WPA2-PSK or another lower security method. A password is required.
- This camera accepts the special characters &*%##@A (including network name and password).
- If your WLAN has an administrator password and a guest password, please use the admin password to connect the camera.
- Open the camera settings to confirm the Wi-Fi signal. Make sure the Wi-Fi signal is strong.
- If your camera cannot establish a good connection but your network is fine, take out your SD card and try again. The SD card may not be compatible.
- If the number of devices connected to the WLAN is too high, an IP address conflict occurs and a WLAN connection cannot be established.
- Please keep the camera at least 1 meter away from wireless devices, including metal, to avoid wireless interference, including WLAN routers and telephones.
- If you want to change Wi-Fi to connect the camera, please reset the camera by tapping the "Reset" (network configuration) button until you hear a short music tone, the indicator blinks red, and then connect the camera to the app again.
F6: How far should the camera be placed from the router? A6: After testing, the Wi-Fi connection distance can normally reach up to 150 meters outdoors. However, the actual situation depends on the strength of the Wi-Fi and its surroundings (thick walls, electromagnetic devices, large metal objects all cause interference with the Wi-Fi signals). If the camera connection signal is weak or unstable, please place the camera as close as possible to the router.
F7: What is the maximum length of the recording time? A7: You can select the recording time in the app. The camera can record for a fixed time of 10-30s.
F8: Why can't I receive push notifications on my phone? A8: First, make sure that "Receive notifications" is enabled in your app. Second, check your phone settings and allow the app to send push notifications to your phone. Third, please make sure that the app runs in the background to receive notifications (Android system).
F9: Why can't I hear any sound from my camera? A9: The camera automatically takes the sound when you tap the sound symbol. To hear the sound, watch live during viewing. If you want a two-way audio function, please remember to enable two-way communication in the camera settings.
F10: Does my phone have to be connected to the same WLAN as the cameras? Or do I need a WLAN connection to view the camera? A10: No, it doesn't. As long as the camera is connected well to your home WLAN, you can use WLAN or cellular data.
F11: How can I distinguish the 2.4-GHz and the 5-GHz WLAN? A11: You can check the router's user manual or try contacting the operator for help. Or, if you use a dual-band router, you can try to confirm it yourself.
Find the router website. Search for the router website on your computer/laptop. Or, if you connect your WLAN with your phone, tap your WLAN to get the router information.
Rename your WLAN. Log in to your router account. Name your WLAN with 2.4G or 5G to make the distinction easier. (Do not use 5G. 2.4 GHz and 5 GHz mix when you open it, so you do not know whether you connected to 2.4 GHz WLAN or 5 GHz WLAN.)
Select 2.4G WLAN. Select the 2.4G WLAN and then connect it to your phone. Then start connecting your camera.
Legal Statement / Disclaimer
The products described in this manual (including hardware, software, firmware, etc.) should be provided on an "as is" basis. As far as possible by applicable law, no express or implied warranty is given, including but not limited to merchantability or the assurance that the device is suitable for a particular purpose.
When you use this product in connection with internet services, you may be affected by the instability of various connections caused by computer viruses, hacker attacks, system instability and other incompatible factors, which can cause the software to fail to achieve the desired results, and which can lead to incorrect operation or other reasons. For the loss of personal information or data, you should protect your personal information and bear all relevant risks yourself.
When using this product, please be sure to observe the applicable laws. You agree that this product may only be used for civil purposes and not for the violation of the rights of third parties, for use in medical/safety-related devices or other applications that can cause life-threatening situations or injuries, or for weapons of mass destruction, chemical or biological weapons, nuclear explosions, or unsafe nuclear energy use or any dangerous or inhuman use. Any losses or liabilities arising from the use mentioned above shall be borne by yourself.
Should the above content conflict with applicable law, the law takes precedence.
Warranty
Dear customers and friends,
Thank you for your purchase. We will do our best to improve in the future as much as we can. If you have any questions or problems with our product, please do not hesitate to contact us at: [email protected]. We are committed to replying to your e-mails within 24 hours in most cases. We highly value the chance to chat with our customers and hear ideas or suggestions.
Best regards, BondFree
BOIFUN C10 Solar Camera
User manual for the BOIFUN C10 wire-free solar battery camera, covering hardware overview, app setup, charging, installation, PIR motion settings, and FAQs.
K&F CONCEPT DQ201 Solar Camera Quick Start Guide
Setup and usage guide for the K&F CONCEPT DQ201 solar-powered wireless security camera with the CloudEdge app, covering the package contents, product overview, Wi-Fi pairing, wall and solar-panel installation, app functions, and battery FAQs.