 CloudEdge App Docs
BOIFUN Baby Monitor
User manual for the BOIFUN full-featured baby monitor, covering the device layout, camera and monitor pairing, CloudEdge app setup, general settings, smart care, and FAQs.
This guide covers the BOIFUN Baby Monitor, a full-featured baby monitor with a dedicated camera and display that can also be connected to the CloudEdge app.
Need more help? See the Baby Monitor FAQs. For after-sale support, email your order number and the problem to [email protected] and the BOIFUN Service Team aims to reply within 24 hours.
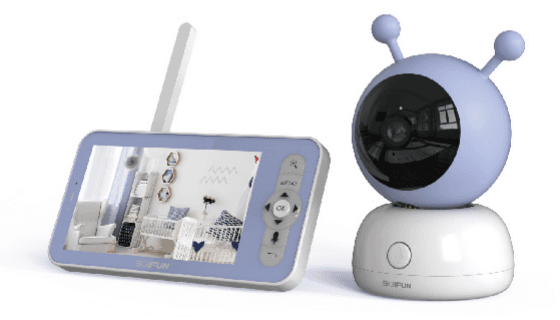
1. What's in the Box
Please consult this checklist for all parts.
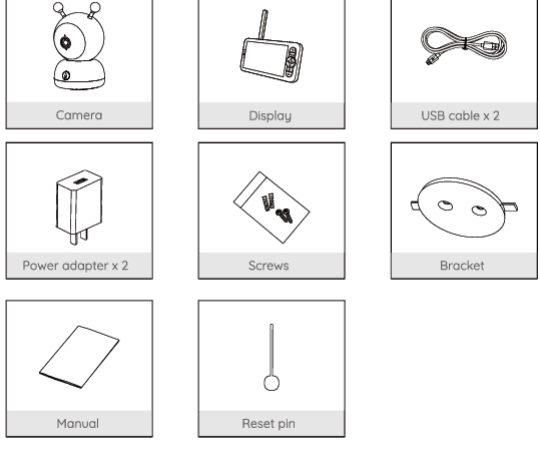
- Camera
- Display
- USB cable x 2
- Power adapter x 2
- Screws
- Bracket
- Manual
- Reset pin
2. Description
Camera
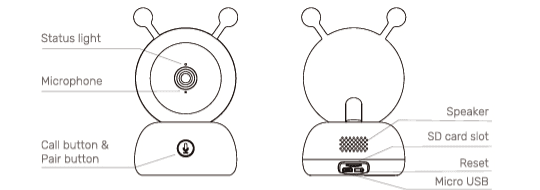
- Status light
- Microphone
- Call button & Pair button
- Speaker
- SD card slot
- Reset
- Micro USB
| Part | Description |
|---|---|
| Micro USB | DC 5V/1A |
| Microphone | Capture sound for your video |
| SD card slot | Support local SD Card storage (Max.128G) |
| Status light | • Solid red light on: network is malfunctional • Blinking red light: wait for network connection (slowly blinking) / connecting the network (fast blinking) • Solid blue light on: camera is working correctly |
| Call/Pairing | Press to make a call to phone; long press for 5 seconds to pair |
| Reset | Press RESET for 5 seconds to reset the camera (if you have modified settings, they will return to factory defaults) |
Display
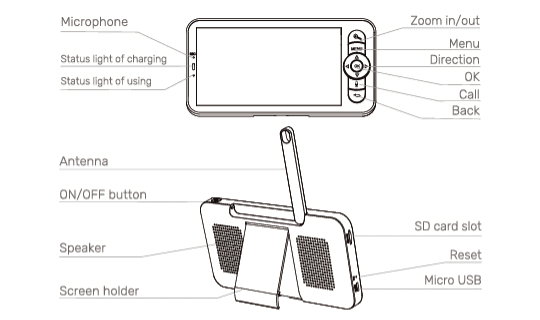
- Microphone
- Status light of charging
- Status light of using
- Zoom in/out
- Menu
- Direction
- OK
- Call
- Back
- Antenna
- ON/OFF button
- Speaker
- Screen holder
- SD card slot
- Reset
- Micro USB
| Part | Description |
|---|---|
| Micro USB | DC 5V/1A |
| Status light of charging | • Orange light: Charging • Green light: Fully charged |
| Status light of using | • Yellow light: The display is on • No light: The display is off |
| Microphone | Capture sound for your video |
| Antenna | Adjust the angle to get better signals |
| ON/OFF button | Long press 5 seconds to turn on and turn off the display |
| Zoom in/out | Zoom the image in 1X, 2X or 4X |
| Menu | • On the homepage, press to enter the menu interface; • On the homepage, long press to enter the setting interface |
| Direction | Control the rotation directions; Select the menu items |
| OK | Confirm |
| Call | Make a call after pressing the button |
| SD card slot | Support local SD Card storage (Max.128G) |
| Reset | Press with a pin to reset the display |
| Back | • Press to back up; • On homepage, long press to stop playing music |
3. Installation
Install the camera on a flat surface.
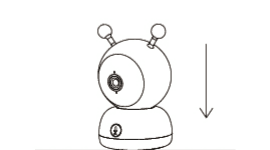
Or use the included mounting bracket to fix the camera to a clean surface.
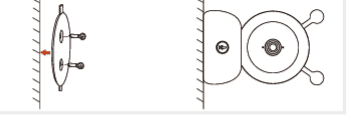
4. Connection
1. Connect the Camera to the Display
Power on the camera and the display and then the camera will connect to the display automatically.
If the connection to each other is not successful the first time, press and hold the reset button on the back of the camera and reconnect the monitor after the second beep of the camera. The connection is distance limited, so make the distance between the camera and the display is no more than 300m.
Disconnect the camera to the display:
Press Menu button on the display screen, and select Settings > Camera Management.
Long press the OK button on the display screen to release the binding.
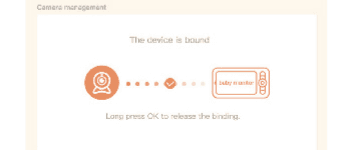
Reconnect the camera to the display:
Press the Menu button on the display screen, and select Settings > Camera Management.
Long press the camera pairing button until you hear the prompt tone.
Press the OK button on the display screen to start pairing.
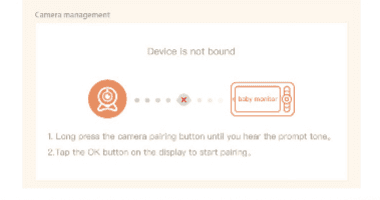
If you have problems with connection, please feel free to contact [email protected] for one-on-one customer service guidance.
2. Connect the Camera to the App
The camera can be connected both to the display and the App. Generally, it is connected to the display by default. Follow the steps below to connect the camera to the App:
Make sure the Wi-Fi network is a 2.4 GHz network, as the camera doesn't support 5 GHz Wi-Fi.
Download the CloudEdge App on your phone. Register a new account to log in or log in directly.
Press the Reset button for five seconds until you hear the "BOOGU" beep, which means the camera has been reset; after 10-20 seconds, you will hear another beep and the red light of the camera blinks slowly.
Follow the step instructions on your smartphone to add the cam, and scan the QR code with your camera.
5. General Setting
- Set up volume:
- Press Menu button on the display screen, and select the volume icon and press OK to enter the interface.
- Press UP and DOWN direction buttons to adjust volume.
- Set up brightness:
- Press the Menu button on the display screen, select the brightness icon and press OK to enter the interface.
- Press UP and DOWN direction buttons to adjust brightness.
- Set up time:
- Press the Menu button on the display screen, and select Settings > Time setting.
- Press direction buttons to change date, time and time displaying mode.
- Set up language:
- Press the Menu button on the display screen, and select Settings > Language.
- Select the language you need.
- Set up sleep mode: You can set up sleep mode to increase standby time.
- Press the Menu button on the display screen, and select Settings > Sleep mode.
- Select sleep mode as 1 minute, 5 minutes, 10 minutes, 30 minutes, 60 minutes or off.
- Setting camera status indicator:
- Press the Menu button on the display screen, select the status indicator icon and press the OK button to enter the interface.
- Press the left and right arrow keys to select on or off.
- SD card:
- Press the Menu button on the display screen, and select Settings > SD card management. Then you can view the total capacity and remaining capacity of your SD card.
- (Optional) You can format the SD card as you needed, but make sure that the important data is backed up.
This product does not support hot-swapping. Please insert the SD card before power on or unplug it after power off. Please format the SD card into FAT32 format before using it.
- Upgrade: Make sure your camera is connected to a 2.4 GHz Wi-Fi. You can upgrade your camera when the upgraded alarm appears. Or Press Menu button on the display screen, and select Settings > Device information to check whether there is an upgrade.
- Low battery alarm: When the camera is low on battery, the low battery alarm will appear on the display screen. Please charge the display as soon as possible.
6. Usage
1. Download
CloudEdge is available for both iOS and Android OS. Search the name "CloudEdge" in App Store or Google Play or scan the QR-Code to download the App.
2. Add Device
Log in the CloudEdge, select "Add Device", then select wifi smart camera and add the smart camera to the App according to the screen tips (Make the smart camera close to the router when configuring).
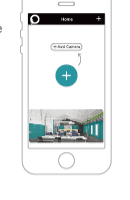
- If you have problems with CloudEdge, please feel free to contact [email protected] for one-on-one customer service guidance.
- If you need to re-select the WiFi network, please press and hold the "RESET" button for 5 seconds, the device will restart, and the indicator will be flashing red.
3. Rotate the Camera
You can adjust the monitoring angle for better vision. The direction buttons on the display screen are available when the camera is powered on. Press direction buttons to rotate the camera horizontally and vertically for a better vision.
4. Photo & Video
- Take a photo: You can take a photo when you want to capture an interesting scene of your baby. Press the Menu button on the display screen, select the photo icon and press OK to take a photo.
- Record a video: You can record a video when you want to capture a meaningful time of your baby. Press the Menu button on the display screen, select the video icon and press OK to record a video.
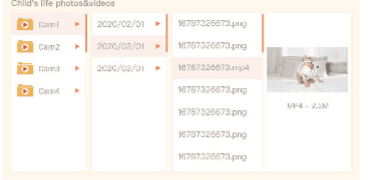
- View the taken photos and recorded videos:
- Press the Menu button on the display screen, select the gallery icon and press OK to enter the interface.
- Select the camera and date, select the photo or video you want to view, and press OK to enter preview mode. For a video, press OK to play or pause in the preview mode. Press the backup button to quit preview or return to main menu.
5. Play Music
You can play music to soothe your baby when the baby is crying or sleeping. A variety of soft music is available.
Press Menu button on the display screen, select the music icon and press OK to enter the music interface. You can select different music, change the music cycle mode, or adjust the music volume.
6. Feeding Reminder
Remind yourself to feed your baby, when you are too busy, or when you want to give your baby a regular diet.
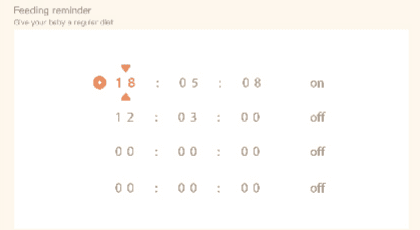
Press the Menu button on the display screen, and select Settings > Feeding reminder.
Press UP and DOWN direction buttons to select between 4 time options and press OK to start time setting.
When start to set up one feeding time, press LEFT and RIGHT direction buttons to change options between hour, minute, second and on/off; and press UP and DOWN direction buttons to change values and select on or off.
Press OK to save settings.
Select on or off to open or close feeding reminders. You can set up to 4 feeding times one day. And when the set time is up, a feeding alarm will appear on the display screen.
7. Humiture Detection
You can real-time monitor the temperature and humidity of your baby room. When the temperature and humidity are out of range, you can get the alarms immediately, and then take measures.
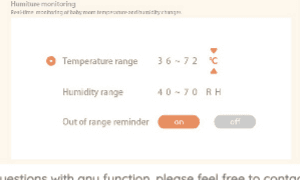
Press the Menu button on the display screen, and select Settings > Humiture detection.
Press UP and DOWN direction buttons to select options between temperature range, humidity range and out of range reminder, and press OK to start setting.
When starting to set up one option, press LEFT and RIGHT direction buttons to change options, and press UP and DOWN direction buttons to change values and units.
Press OK to save settings.
In Out of range reminder option, select to turn on or off the alarm when the temperature and humidity are out of range.
8. Optional Access Channels
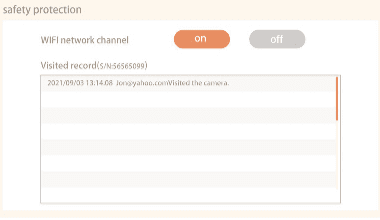
You can turn on or turn off the Wi-Fi network channel so that others cannot live view the videos by App if the function is off. And you can also view the visited records as all visits through the App will be recorded.
9. Smart Care
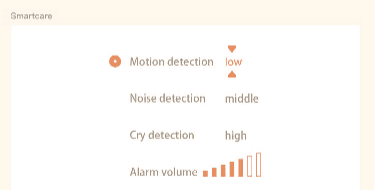
You can turn on functions of motion detection, noise detection and cry detection, so that you can know the baby status immediately, no matter you are sleeping, working, cooking and so on.
Press the Menu button on the display screen and select Settings > Smart care.
Press UP and DOWN direction buttons to select options between motion detection, noise detection, cry detection and alarm volume, and press OK to start setting.
When starting to set up one detection mode, press LEFT and RIGHT direction buttons to change options, and press UP and DOWN direction buttons to adjust the sensitivity. You can select different sensitivity according to needs. Low is low sensitivity, and high is high sensitivity.
When setting up the alarm volume, press LEFT and RIGHT direction buttons to adjust.
Press OK to save settings.
There will be an alarm when the set detection is triggered, press OK to stop alarm.
If you have questions with any function, please feel free to contact [email protected] for one-on-one customer service guidance.
7. Functions
| Function | Description |
|---|---|
| Pan/Tilt | Rotate your camera by sliding on your smartphone, providing you with a good vision. |
| Video flip | Flip your video stream up or down for maximum flexibility. |
| Motion detection | The camera can detect movement, and then the camera will send you push notifications and app alerts. |
| Crying detection | The camera can detect the crying of your baby and the camera will send you push notifications and app alerts. |
| Temperature & humidity detection | The camera can detect the temperature and humidity of the environment, and the camera will send you push notifications and app alerts. |
| Record | Support 24H continuous recording with high capacity SD storage or Cloud storage. |
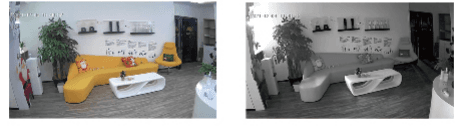
| Day & Night | Never miss a moment, even in complete darkness, with powerful night-vision technology. |
8. FAQ
Q: The display cannot be previewed properly? A: Check whether the display has connected to the camera. If not, pair the camera and the display firstly.
Q: Cannot find the pairing button? A: The pairing button is the call button of the camera. Long press the button for 3 seconds, and follow the step instructions of the display. (To enter the pairing interface of the display, press the Menu button on the display screen, and select Settings > Camera Management.)
Q: What if the display screen is stuck and it doesn't work while pressing any buttons? A: Press the reset button of your display with the pin, and then long press the power button of your display to restart it.
Q: Why the camera or the display cannot identify the SD card? A: Confirm whether the SD card is normally available and the format is FAT32.
Q: Why I can't get the notifications with my cell phone App when I connect the camera to the display? A: Please confirm that the App has been running on the phone, and the relevant reminder function has been opened; Message notification and authority confirmation in the mobile phone system has been opened.
Q: How can I add devices or configure my network? A: The camera can be connected to both the monitor and the application. Generally, it connects to the monitor by default. Please follow the steps below to connect the camera to the application.
Make sure the Wi-Fi network is a 2.4 GHz network, as the camera does not support 5 GHz Wi-Fi.
Download the appropriate application on your phone. Register a new account to log in or log in directly.
Reboot the camera with the pin until the red status light flashes slowly (you must connect the camera to the app within 2 minutes or you must reboot the camera again).
Follow the step-by-step instructions on your smartphone to add the screen and scan the QR code with the camera.
Q: The device prompts offline? A:
- Check whether the equipment is in the power on state, and observe whether the working light of the equipment is on normally.
- Check whether the Wi-Fi network is in good condition and restart the router.
- If the device is located far away from the router, which results in the inability to obtain a good Wi-Fi signal, it is recommended to move the router to a closer place or add a Wi-Fi amplifier to improve the WiFi performance of the home.
- Delete the camera from your CloudEdge account and add it again after resetting the device. Check whether the device firmware and application program are the latest version.
Q: Update router or Wi-Fi password? A: Delete the camera from your CloudEdge account. After resetting the device, use the new Wi-Fi and password to add it again.
Q: Can't play historical video? A:
- Check the status of the SD card in Settings to ensure that the SD card has been successfully recognized.
- Reinsert the SD card.
- In the application, format the SD card.
- Try another new SD card.
Q: The phone cannot receive the alarm push? A:
- Turn on all the push permissions of the 'CloudEdge' application in the system settings of your mobile phone.
- Make sure that the device's motion detection function is successfully turned on.
- Restart the phone, and clear the cache on Android phones.
- Check whether the network is good.
If you encounter any other problems, please send your order and problem to [email protected].
BOIFUN Baby 6T Baby Monitor Quick Start Guide
Setup and usage guide for the BOIFUN Baby 6T baby monitor (camera + display), covering installation, pairing, general settings, photo/video, feeding reminders, humiture and smart-care alerts, app connection, and FAQs.
BOIFUN BABY6T Baby Monitor Quick Start Guide
Quick start guide for the BOIFUN Baby 6T video baby monitor with display and Wi-Fi camera, covering the device layout, app and monitor pairing, general settings, usage, and FAQs.