 CloudEdge App Docs
amstro PTZ Battery-Powered Security Camera User Manual
User manual for the amstro PTZ battery-powered security camera, covering the packing list, product description, app installation and account registration, adding the camera by Bluetooth or QR code, charging the battery, installation, reducing false alarms, and FAQs.
This user manual walks you through setting up the amstro PTZ Battery-Powered Security Camera with the CloudEdge app, from the packing list and product description to charging, installation, and troubleshooting.
Make sure the Wi-Fi the camera connects to is 2.4 GHz (5GHz is not supported) before pairing. For more help, see the Battery Camera FAQs.
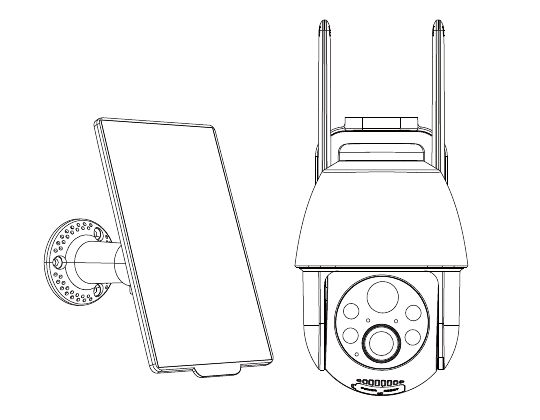
Warning
- Please charge the camera before installation and use!
- Do not use DC power to charge the camera below 0°C/32°F.
- Please leave the camera at room temperature for 8 hours before charging with DC.
- Please use the 5V adapter to charge the camera.
Tips: Solar panel charging is not affected by temperature.
Packing List
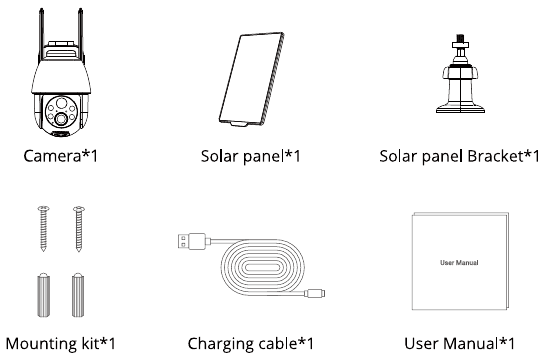
- Camera ×1
- Solar panel ×1
- Solar panel Bracket ×1
- Mounting kit ×1
- Charging cable ×1
- User Manual ×1
Product Description
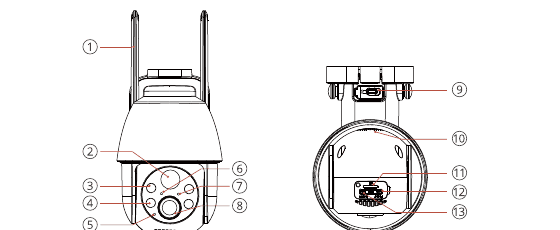
| No. | Part | No. | Part |
|---|---|---|---|
| 1 | Antenna | 8 | Lens |
| 2 | PIR Sensors | 9 | Dedicated Charging Port |
| 3 | Spotlight | 10 | Speaker |
| 4 | IR Light | 11 | SD Card Slot |
| 5 | Microphone | 12 | Power Button |
| 6 | Charging Indicator | 13 | Reset Button |
| 7 | Working Status Light |
| Item | Description |
|---|---|
| Power Button | Press and hold for 5s for power on/off the camera |
| Reset Button | Long press for 5s until hearing the "Boogu" sound to reset the camera |
| Micro-SD Card slot | Support local SD card storage (up to 128G) |
| Charging Indicator | Red means charging; Blue means fully charged. |
| Dedicated Charging port | Use 5V power adapter to charge this camera |
Working Status Light
| Light status | Meaning |
|---|---|
| Solid on red | Network is abnormal |
| Slow flickering red | Enter pairing mode, awaiting Wi-Fi |
| Fast flickering red | Wi-Fi connecting |
| Solid on blue | Wi-Fi connected successfully, the camera running normally |
APP Installation and Account Registration
Download "CloudEdge" APP
- Method 1: Search "CloudEdge" in APP Store (iOS) or Google Play (Android).
- Method 2: Scan the QR Code to directly download the APP.
Please use your phone's camera or Google Chrome to scan the QR code. ATTENTION: Other methods or APP may put your privacy at risk.
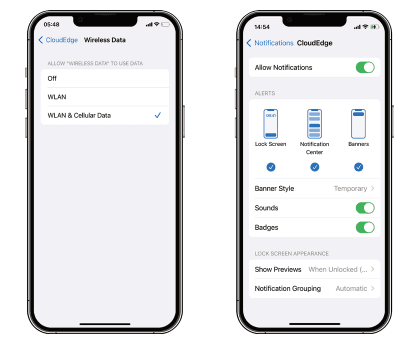
Tips: Please turn on two permissions below when you use this app for the first time.
- Allow "CloudEdge" access to mobile cellular data and wireless LAN, or you will be unable to add the camera.
- Allow "CloudEdge" to receive push messages, or the phone will not receive notifications when motion is detected or the audible alarm is triggered.
Account Registration
Open the APP, click "Sign up now" to register. If you already have an account, click "Log In" to log in.
Choose your current country. (Different registered regions can not share the camera.)
Input a legal email address, then enter the nick name and password.
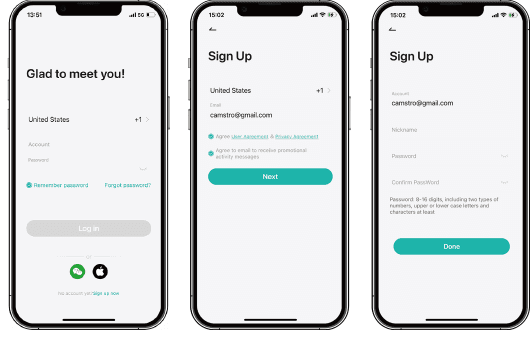
Add the Camera to the APP
Before Using
- Before adding a device, make sure that the device is in the state of slow flashing of red light. If the indicator status is abnormal, please restore the device to factory settings. (long press and hold the device RESET button until you hear the 'boogu' Sound)
- Check if you turn on the Bluetooth of your cellphone and connect the phone to the Wi-Fi to which you want the camera to connect. (After finishing setup, you could turn it off them)
- Put the camera and smart phone 1-1.6ft (30-50cm) away from the router to set Wi-Fi.
- Please make sure the Wi-Fi the camera connected is 2.4 GHz. In our experience, network connection is failed in most cases when users use 5GHz WIFI.
- Make sure the password correction of the Wi-Fi. (Note: the password of the WiFi cannot include single quote, underline, space and splashes (/).)
Method 1: Bluetooth Setup (RECOMMENDED)
Click "Add Device".
Choose the Bluetooth device.
Choose the wanted nearby WiFi and enter the WiFi password.
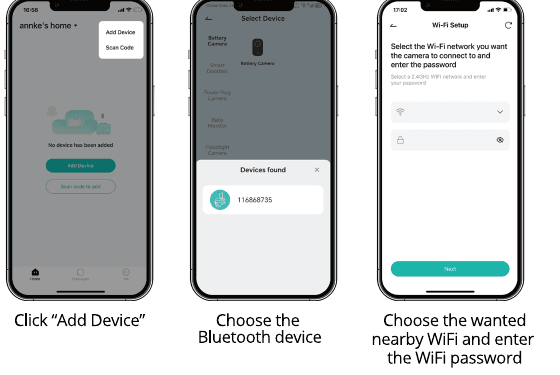
Wait for connection, then the connection is successful and the product adding succeeded.
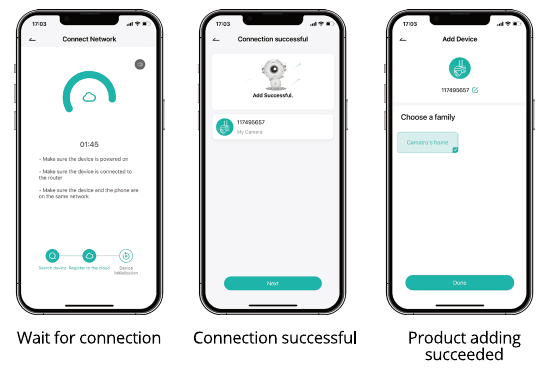
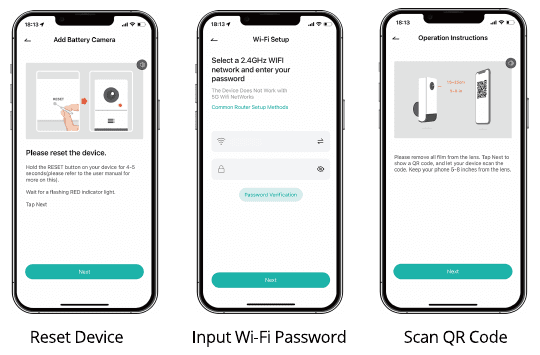
Method 2: Scan Code to Connect
Tap "+" to Add Device.
Select Battery Camera.
Switch on Camera.
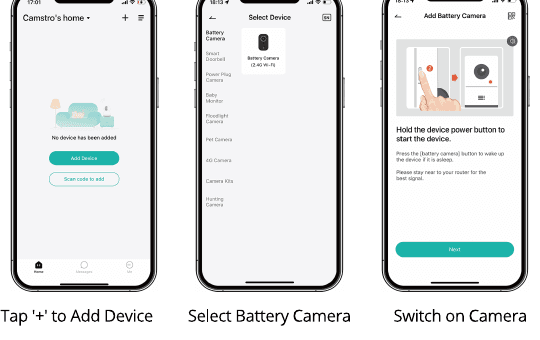
Reset Device, then input the Wi-Fi password and scan the QR code.
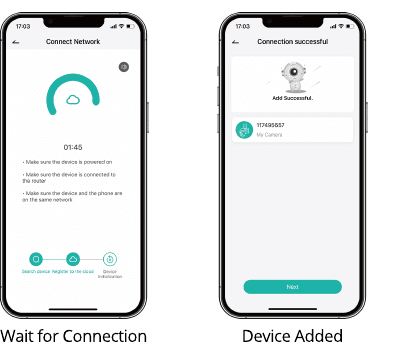
Wait for Connection, then the device is added.
Charge the Battery
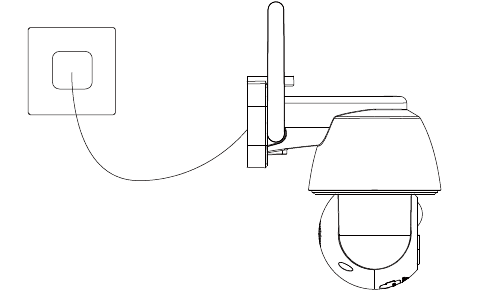
- Charge the battery with a DC5V power adapter. The battery is a built-in battery and cannot be removed.
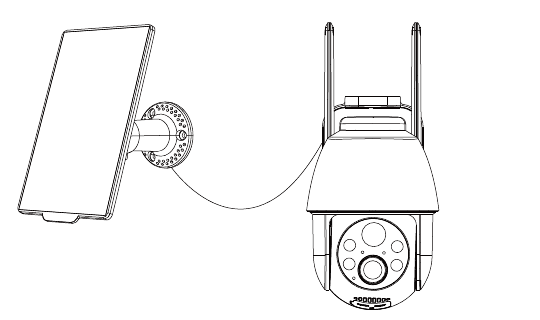
- Charge the battery with the Solar Panel.
- For the weatherproof performance, always cover the dedicated charging port with the rubber plug after finishing charging the battery.
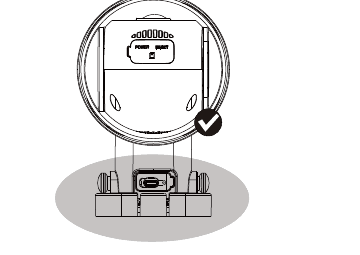
Charging indicator:
- Red LED: Charging
- Blue LED: Fully Charged
Installation Guides
Please fix the bracket, then install the camera.
Mark the perforated position on the wall.
If it is a wooden wall, you can use the nails provided with the product to fix the bracket to the wall.
If it is cement wall or ceramic tile wall, please use an electric drill to drill a hole in the wall and then install the bracket with the expansion screw provided with the product.
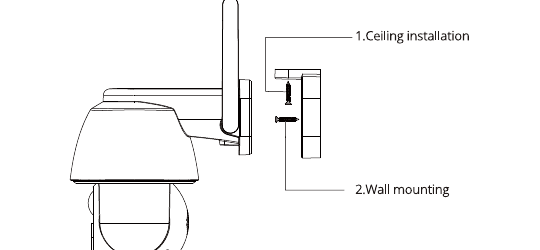
Other Mounting Methode
- Install the camera 2-3 meters (7-10ft) above ground. The detection range of the motion sensor would be maximized at such a height.
- For effective motion detection, please install the camera angularly.
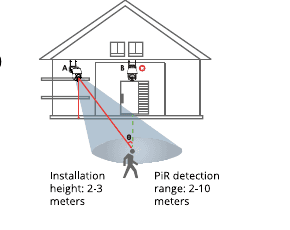
Tips: If a moving object approaches the PIR sensor vertically, the camera may fail to detect motion.
Important Notes on Reducing False Alarms
- Do not face the camera towards any objects with bright lights, including sunshine, bright lamp lights, etc.
- Do not place the camera near any outlets, including the air conditioner vents, humidifier outlets, the heat transfer vents of projectors, etc.
- Do not install the camera at places with strong wind.
- Do not face the camera towards a mirror.
- Keep the camera at least 1 meter away from any wireless devices, including Wi-Fi routers and phones in order to avoid wireless interference.
- Set the camera to detect humans only. Tap camera setting > Alarm Management > Humanoid Detection.
FAQs
Q: Fast power consumption?
A:
- Poor wifi coverage (for example, a signal is below 75%) will increase power consumption.
- The PIR trigger frequency is high, and the power consumption will increase when the infrared light / white light is on at night.
- The mobile phone often accesses the camera remotely, which will increase the power consumption.
- For the first use, it is recommended to use the power to 10%, and then charge it to 100%, which is helpful for the health of the lithium battery.
Q: Update router or Wi-Fi password?
A: Delete the camera from your CloudEdge account. After resetting the device, use the new Wi-Fi and password to add it again.
Q: The device prompts offline?
A:
- Check whether the equipment is in the power-on state, and observe whether the working light of the equipment is on normally.
- Confirm that the current location has good wifi coverage and the network is stable, make sure that the wifi signal is above 75%. You can try to use the third-party wifi analysis tool "wifi analyzer" to analyze the current wifi signal coverage and interference status. If the coverage is poor and the interference is large, it is recommended to replace the camera installation position or adjust the router position or use a second-stage router.
- If the device is located far away from the router, which results in the inability to obtain a good Wi-Fi signal, it is recommended to move the router to a closer place or ensure the Wi-Fi signal strength is to be over than 85% to improve the Wi-Fi performance of the home.
- Delete the camera from your CloudEdge account and add it again after resetting the device. Check whether the device firmware and application program are the latest version.
- Avoid using wifi extenders.
Q: Alarm push frequently?
A:
- In the app, lower the sensitivity of the motion detection alarm.
- Check whether there are objects that interfere with and trigger the PIR sensor in the field of view of the device, such as the outdoor unit of the air conditioner, driving cars, passing pedestrians, etc. The angle of the device can be adjusted appropriately to avoid these easily disturbing objects.
- Turn on "human motion detection" and use humanoid algorithm to filter useless alarms.
Q: How far should the camera be placed from the router?
A: After testing, the Wi-Fi connection distance can reach up to 492ft in the open area normally. However, the actual situation depends on the strength of Wi-Fi and its surrounding environment (thick walls, electromagnetic devices, large metal objects will all cause interference to the Wi-Fi signals). If the camera connection signal is weak or unstable, please place the camera as close to the router as possible.
Q: Device doesn't detect motion events?
A:
- In the case of unstable network, the message may not be pushed in time after the PIR is triggered. In this case, you can first confirm the network status and remove the camera to verify and confirm in an environment with good network coverage.
- Inappropriate installation position will result in PIR not triggering and not detecting. If the position is too high, the object is too far away, or the object is too small, the camera will not trigger, try to adjust the installation position according to the trigger requirements.
Q: Why can't I receive push notifications to my phone?
A: Firstly, please make sure that "Receive Alert Notifications" turned on in your APP. Secondly, check your phone settings, and allow the APP to push notifications to your phone. Thirdly, please make sure the APP is running the background to receive notifications (Android system).
Q: SD card not recognized?
A:
- Support capacity is 16 ~ 128GB TF card.
- Before use, make sure to format the TF card as FAT32 or exFAT file system on the computer, then insert it into the camera, and finally perform the format memory card operation on the camera again.
- If the TF card is not recognized during use, it is generally a quality problem of the TF card, and it is necessary to replace the memory card with more stable reading and writing capacity.
For more detailed FAQs, please log in to the APP, search in "Me" - "Help" - "Battery Camera".
Safety Instruction
These instructions are intended to ensure that user can use the product correctly to avoid danger or property loss.
- Warnings: Serious injury or death may occur if any of the warnings are neglected.
- Cautions: Injury or equipment damage may occur if any of the cautions are neglected.
Warnings
- Proper configuration of all passwords and other security settings is the responsibility of the installer and/or end-user.
- In the use of the product, you must be in strict compliance with the electrical safety regulations of the nation and region.
- Input voltage should meet both the SELV (Safety Extra Low Voltage) and the Limited Power Source with 100~240 VAC or 12 VDC according to the IEC60950-1 standard.
- Do not connect several devices to one power adapter as adapter overload may cause over-heating or a fire hazard.
- Please make sure that the plug is firmly connected to the power socket.
- If smoke, odor or noise rise from the device, turn off the power at once and unplug the power cable, and then please contact the service center.
Preventive and Cautionary Tips
- Please install the camera away from the elderly and children, so as not to cause electrical injury. Ensure the electric safety to avoid fire caused by current overload.
- Do not drop the camera or subject it to physical shock.
- Do not touch the camera lens with fingers. If cleaning is necessary, use a clean cloth with a bit of ethanol and wipe it gently.
- Do not aim the camera to the sun or extra bright positions. Blooming or smearing may occur otherwise (which is not a malfunction), and affect the lifespan of the sensor at the same time.
- The camera sensor may be burned by a laser beam, so when any laser equipment is in use nearby, make sure that the camera lens will not be exposed to the laser beam.
- Do not place the camera in extremely hot, cold or dusty environments, and do not expose it to high electromagnetic radiation.
- To avoid heat accumulation, good ventilation is required for the operating environment.
- This camera supports dustproof and waterproof and is ideal for outdoor use. Please make sure to fix it firmly. Avoid injury from falling.
Allesin PTZ Surveillance Camera (Outdoor/Indoor)
Quick start guide for the Allesin PTZ surveillance camera, covering the package contents, product layout, app download and permissions, account registration, adding the device, recording and cloud storage, playback, sharing, alarm management, installation and troubleshooting in the CloudEdge app.
ANRAN P3Max PTZ Camera Quick Start Guide
Setup guide for the ANRAN P3Max HD WiFi PTZ security camera, covering what's included, product overview, mounting, account registration, WiFi pairing with the CloudEdge app, FAQ, and safety statements.