LogoCloudEdge App Docs
Website Homepage

Getting Started

Documentation

Help Center

FAQs

User Manual

User Manual

Products

Allesin PTZ Surveillance Camera (Outdoor/Indoor)amstro PTZ Battery-Powered Security Camera User ManualANRAN P3Max PTZ Camera Quick Start GuideANRAN PTZ Camera Quick Start GuideBG ANGEL DX2 PTZ CameraBOIFUN DQ201 PTZ CameraBOIFUN PTZ CameraBOIFUN PTZ Battery-powered Security Camera User ManualBOIFUN Outdoor PTZ Security Camera User ManualDEKCO DC5E PTZ Camera Quick Start GuideFUNOVATION DomeCam Smart WiFi HD Camera Quick Start GuideieGeek 19G0K PTZ Outdoor Security Camera User ManualieGeek DQ201 PTZ Battery Security CameraieGeek PTZ Battery Security Camera User ManualieGeek ZS-GX1S PTZ Battery Security CameraieGeek ZY-C2 PTZ Battery Security CameraJennov PTZ Camera Quick Start GuidePTZ Security Camera Quick Start GuidePTZ Security Camera Quick Installation Guideulofy Smart WiFi HD Camera (PTcam) Quick Start Guide
User ManualPTZ Camera

ieGeek ZS-GX1S PTZ Battery Security Camera

User manual for the ieGeek ZS-GX1S PTZ battery security camera, covering the camera layout, app pairing, charging, installation, PIR motion sensor settings and FAQs in the CloudEdge app.

This is the user manual for the ieGeek ZS-GX1S PTZ Battery Security Camera, which works with the CloudEdge app.

Need more help? See the Battery Camera FAQs. If you need help, please contact ieGeek before returning your product. Most questions can be answered through our online support center at http://www.iegeek.com or our after-sale mailbox at [email protected].

Please read this manual thoroughly before using this wireless security camera. Before connecting this camera to the Wi-Fi, please ensure the Wi-Fi signal strength is over 85% to keep a good Wi-Fi signal. This wireless camera supports event recording when Wi-Fi is disconnected.

1. Camera Introduction
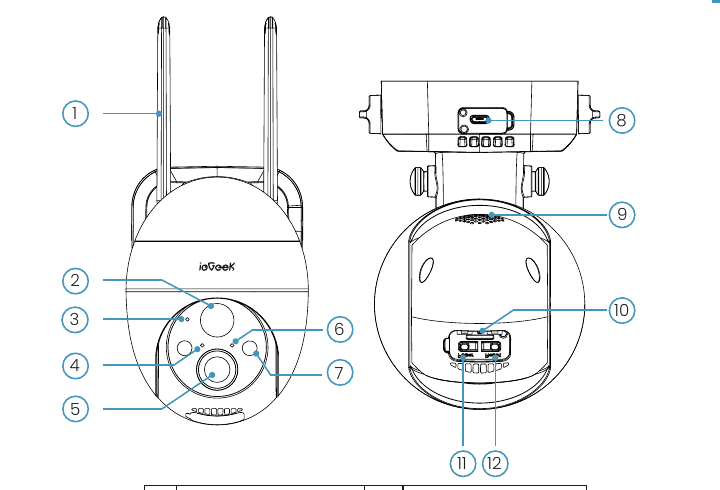
ieGeek ZS-GX1S front view and rear/base view with numbered parts
No.PartNo.Part
1Antenna7Spotlight & IR Light
2PIR8USB Charge Port
3Microphone9Speaker
4Charging Indicator10SD Card Slot
5Lens11Power Button
6Working Status Light12Reset Button
PartDescription
Power ButtonPress and hold for 5s to power the camera on/off
Reset ButtonPress and hold for 5s until hearing "Boogu" to reset or restore to factory setting
SD Card SlotSupports local SD card storage (up to 128G)
Charging IndicatorRed means charging, blue means fully charged
USB Charge PortUse a 5V 2A power adapter to charge this camera

Working Status Light

StatusMeaning
Solid on redNetwork is abnormal
Slow flickering redAwaiting Wi-Fi connection and start adding devices
Fast flickering redWi-Fi connecting
Solid on blueWi-Fi connected successfully, the camera running normally

2. APP Installation and Account Registration

Download the "CloudEdge" App

  • Method 1: Download the "CloudEdge" or "ieGeek Cam" app from the App Store (iOS) or Google Play (Android).
  • Method 2: Scan the "CloudEdge" app QR code to download it.

Tips: Please turn on the 2 permissions below when using this app for the first time.

  1. Allow the "CloudEdge" app to access mobile cellular data and the wireless LAN, or it will fail to add the IP camera.
  2. Allow the "CloudEdge" app to receive pushed messages, or the phone will not receive an alarm push when motion detection or an audible alarm is triggered.
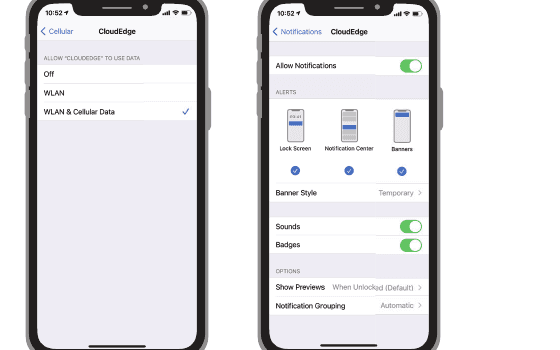
iOS cellular data and notification permission screens for the CloudEdge app

Register an Account

New users need to register by email. The concrete steps are as follows:

Click "Register".
Follow the steps to complete the registration of the account.
Log in.

Note:

  • When registering a new account, please choose the region which you are actually in and the correct country code. (Different registered regions can't share the camera.)
  • Please choose to register by e-mail.

3. How to Add a Camera for APP

Before Using:

Please insert the Micro SD card before power on, otherwise the SD card can not be detected.
Put the camera and smart phone 1-3 ft (30-100 cm) away from the router to set Wi-Fi.
Make sure that the camera is using 2.4GHz Wi-Fi.

Wi-Fi Connection Steps

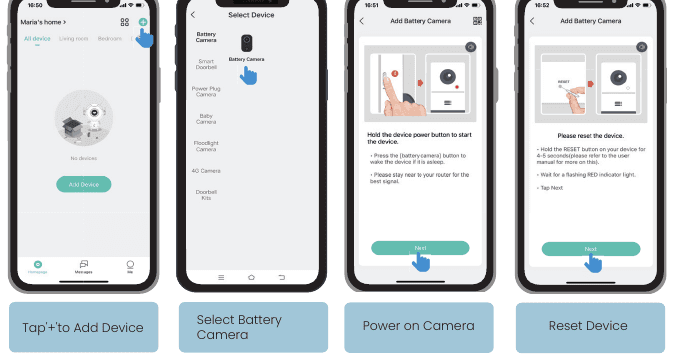
App screens: tap plus to add a device, select Battery Camera, power on the camera, reset the device
Tap "+" to add device.
Select "Battery Camera".

Power on the camera. Hold the device power button to start the device. Press the (battery camera) button to wake the device if it is asleep. Please stay near to your router for the best signal.

Reset the device. Hold the RESET button on your device for 4-5 seconds (please refer to the user manual for more on this). Wait for a flashing RED indicator light, then tap "Next".

Input Wi-Fi password. Select a 2.4GHz Wi-Fi network and enter your password. Reconfirm whether your Wi-Fi account and password are correct, then tap "OK".

Scan QR code. Remove all film from the lens. Tap "Next" to show a QR code, and let your device scan the code. Keep your phone 5-8 inches from the lens.
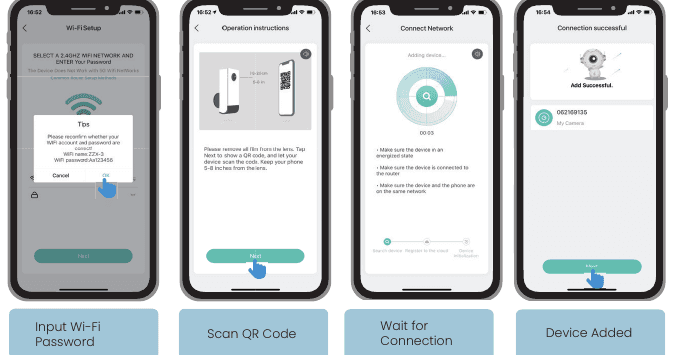
Wait for connection. Make sure the device is in an energized state, the device is connected to the router, and the device and the phone are on the same network.
Device added. When "Connection successful" appears, tap "Next".
App screens: input Wi-Fi password, scan QR code, wait for connection, device added successfully

Note: If it can't be powered on, please plug in a DC 5V 2A power adapter to charge the camera for 15 min first.

My camera fails to connect Wi-Fi?

Before adding a device, make sure that the device is in the state of slow flashing red light. If the indicator status is abnormal, please restore the device to factory settings (long press and hold the device RESET button until you hear the "boogu" sound).
Please make sure the Wi-Fi the camera connected is 2.4GHz. In our experience, network connection is failed in most cases, which is caused by that users used 5GHz Wi-Fi.
Make sure the password correction of the Wi-Fi. (Note: the password of the Wi-Fi cannot include single quote, underline, space and virgule (/).)
Check the number of the devices your router connected. In general, the router has a connection limits. Once the devices that your router connected exceed the its max limit numbers, other devices will cannot connect the router.
Make sure the QR code on the phone screen is normal and the distance between the phone and the camera lens is 10-15cm (3.9-5.9inch) during the scanning process.
Check the current location has good Wi-Fi coverage and a stable network (Wi-Fi signal is greater than 80%).
Avoid using Wi-Fi extenders.
After checking the above information, if the camera cannot connect the Wi-Fi, please try to re-download the APP, reset the camera and restart the router, and then add the camera again.
If you tried all steps, but still no luck, please message your order and problem to [email protected].

4. Charge the Battery

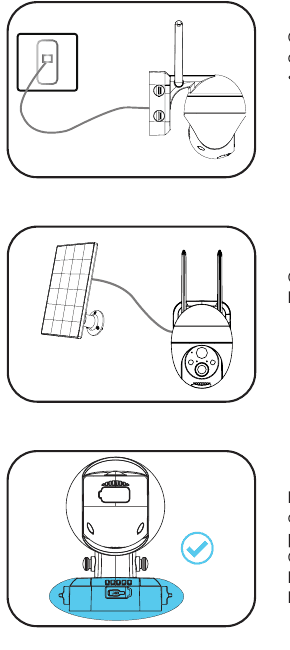
Charging the camera with a power adapter, with the ieGeek solar panel, and covering the USB port with the rubber plug

Charge the battery with a 5V 2A power adapter.

  • The battery is a built-in battery and cannot be removed.

Charge the battery with the ieGeek Solar Panel.

For the weatherproof performance, always cover the USB charging port with the rubber plug after finishing charging the battery.

Charging Indicator:

  • Red LED — Charging
  • Blue LED — Fully Charged

5. Installation Guides

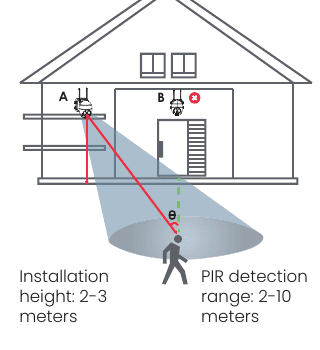
House diagram showing camera installation height and PIR detection range
  • Install the camera 2-3 meters (7-10 ft) above ground. The detection range of the motion sensor would be maximized at such a height.
  • For effective motion detection, please install the camera angularly.

Diagram labels:

  • Installation height — 2-3 meters
  • PIR detection range — 2-10 meters

NOTE: If a moving object approaches the PIR sensor vertically, the camera may fail to detect motion.

6. Notes on PIR Motion Sensor

PIR Sensor Detection Range

The PIR detection range can be customized to meet your specific needs. You may refer to the following table to set it up in Device Settings via the CloudEdge App.

SensitivityDetection Distance (for moving and living objects)
Level 1-3 (Low)Up to 2-5 meters
Level 4-7 (Med)Up to 5-8 meters
Level 8-10 (High)Up to 8-10 meters

7. Important Notes on Reducing False Alarms

  • Do not face the camera towards any objects with bright lights, including sunshine, bright lamp lights, etc.
  • Do not place the camera near any outlets, including the air conditioner vents, humidifier outlets, the heat transfer vents of projectors, etc.
  • Do not install the camera at places with strong wind.
  • Do not face the camera towards a mirror.
  • Keep the camera at least 1 meter away from any wireless devices, including Wi-Fi routers and phones in order to avoid wireless interference.

8. FAQs

For more detailed FAQs, please log in to the APP, search in "Me" → "FAQ" → "Help Document" → "Battery Camera".

The device prompts offline?

Check whether the equipment is in the power-on state, and observe whether the working light of the equipment is on normally.
Confirm that the current location has good Wi-Fi coverage and the network is stable, make sure that the Wi-Fi signal is above 75%. You can try to use the third-party Wi-Fi analysis tool "Wi-Fi analyzer" to analyze the current Wi-Fi signal coverage and interference status. If the coverage is poor and the interference is large, it is recommended to replace the camera installation position or adjust the router position or use a second-stage router.
If the device is located far away from the router, which results in the inability to obtain a good Wi-Fi signal, it is recommended to move the router to a closer place or ensure the Wi-Fi signal strength is over than 85% to improve the Wi-Fi performance of the home.
Delete the camera from your CloudEdge account and add it again after resetting the device. Check whether the device firmware and application program are the latest version.
Avoid using Wi-Fi extenders.

Update router or Wi-Fi password?

Delete the camera from your CloudEdge account. After resetting the device, use the new Wi-Fi and password to add it again.

Alarm push frequently?

In the app, lower the sensitivity of the motion detection alarm.
Check whether there are objects that interfere with and trigger the PIR sensor in the field of view of the device, such as the outdoor unit of the air conditioner, driving cars, passing pedestrians, etc. The angle of the device can be adjusted appropriately to avoid these easily disturbing objects.
Turn on "human motion detection" and use the humanoid algorithm to filter useless alarms.

Device doesn't detect motion events

In the case of unstable network, the message may not be pushed in time after the PIR is triggered. In this case, you can first confirm the network status and remove the camera to verify and confirm in an environment with good network coverage.
Inappropriate installation position will result in PIR not triggering and not detecting. If the position is too high, the object is too far away, or the object is too small, the camera will not trigger; try to adjust the installation position according to the trigger requirements for many times.

SD card not recognized

Support capacity is 16~128GB TF card.
Before use, make sure to format the TF card as FAT32 or exFAT file system on the computer, then insert it into the camera, and finally perform the format memory card operation on the camera again.
If the TF card is not recognized during use, it is generally a quality problem of the TF card, and it is necessary to replace the memory card with more stable reading and writing.

Fast power consumption

In the case of poor Wi-Fi coverage (such as signal is below 75%), which will increase power consumption.
The PIR trigger frequency is high, and the power consumption will increase when the infrared light/white light is on at night.
The mobile phone often accesses the camera remotely, which will increase the power consumption.
For the first use, it is recommended to use the power to 10%, and then charge it to 100%, which is helpful for the health of the lithium battery.

ieGeek PTZ Battery Security Camera User Manual

User manual for the ieGeek PTZ battery security camera, covering the product overview, status light and charging, app pairing, Wi-Fi connection and troubleshooting, wall mounting, PIR motion-sensor tuning, and false-alarm reduction with the CloudEdge app.

ieGeek ZY-C2 PTZ Battery Security Camera

User manual for the ieGeek ZY-C2 PTZ battery security camera, covering product layout, app pairing, charging, installation, PIR motion detection and FAQs in the CloudEdge app.

Table of Contents

1. Camera Introduction
Working Status Light
2. APP Installation and Account Registration
Download the "CloudEdge" App
Register an Account
3. How to Add a Camera for APP
Wi-Fi Connection Steps
My camera fails to connect Wi-Fi?
4. Charge the Battery
5. Installation Guides
6. Notes on PIR Motion Sensor
PIR Sensor Detection Range
7. Important Notes on Reducing False Alarms
8. FAQs
The device prompts offline?
Update router or Wi-Fi password?
Alarm push frequently?
Device doesn't detect motion events
SD card not recognized
Fast power consumption