 CloudEdge App Docs
PTZ Security Camera Quick Start Guide
Set up the PTZ Security Camera with the CloudEdge app, covering the product diagram, indicator lights, app download, account registration, and Bluetooth or QR code pairing.
This guide walks you through setting up your PTZ Security Camera with the CloudEdge app, from understanding the hardware to connecting the camera to your Wi-Fi network.
Need more help? See the Camera FAQs for troubleshooting tips.
1. Product Diagram
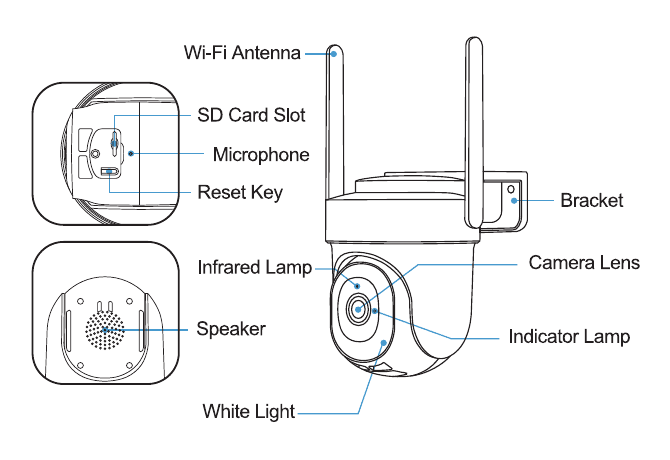
- Wi-Fi Antenna
- SD Card Slot
- Microphone
- Reset Key
- Bracket
- Infrared Lamp
- Camera Lens
- Indicator Lamp
- Speaker
- White Light
Indicator Status
| Status | Meaning |
|---|---|
| Reset Button | Keep pressing for 5 seconds to reset |
| Blink Slowly in Red | Awaiting Wi-Fi connection, ready add devices |
| Blink Fast in Red | Wi-Fi connecting |
| Solid in Red | Network problem |
| Solid in Blue | Wi-Fi connected, camera running normally |
| Blink Slowly in Blue | Firmware update |
2. Download and Install App
Download CloudEdge App from Google Play™ or App Store™. Or scan the QR codes as below, with your smart phone.
Google Play™ is a trademark of Google Inc. App Store™ is a service mark of Apple Inc.
Please turn on both of the following permissions:
- Allow CloudEdge App to access mobile cellular data and wireless LAN, otherwise it will fail to connect the camera.
- Allow CloudEdge App to receive pushed messages, otherwise the phone will not receive alarms when motion is detected.
3. Account Registration
New user needs to sign up CloudEdge App with email address. Click 'Sign up' to create a New Account and follow the steps to complete registration.
4. Add Camera to App
Preparations for connection
- Insert a Micro SD Card into the camera to save video clips or you can start the 7-day free cloud service. Without Micro SD Card or cloud service, no video will be saved.
- Please select 2.4G/5GWiFi to ensure good signal.
- When connecting to the network, please take the camera close to the router (Recommended within 10-15ft).
Method 1: Bluetooth Setup (Recommended)
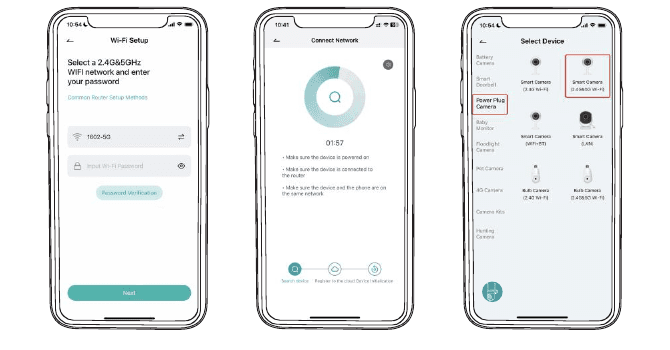
On the Homepage, tap "Add" or "+" in the upper right corner, tap "Add Device".
If the Bluetooth of cellphone doesn't turn on, the app will show a pop-up, please allow it to turn on Bluetooth.
After Bluetooth turns on, the app will automatically search for devices that are on and not bound. Select the device you want to connect in the search list.
To connect the camera, select either the 2.4GHz or 5GHz Wi-Fi and enter the password. The app will automatically display the Wi-Fi you may be using when Bluetooth is turned on. Usually, the name and password for both Wi-Fi networks are the same or similar. If you cannot find the Wi-Fi network, please contact your router provider to check your router's Wi-Fi settings.
The app will automatically go to the page where the wifi connection is in progress. A sound will be heard. Wait for connection successful and camera indicator light changes to steady blue. Click "Next" to edit the camera name and choose a family. Click "Done" to finish the setup.
If failed to connect, check the reason and resolution shown on the app. Long press the reset button until hear a "cuckoo" sound to reset the camera and start again, or try the other methods below.
Method 2: QR Code Setup
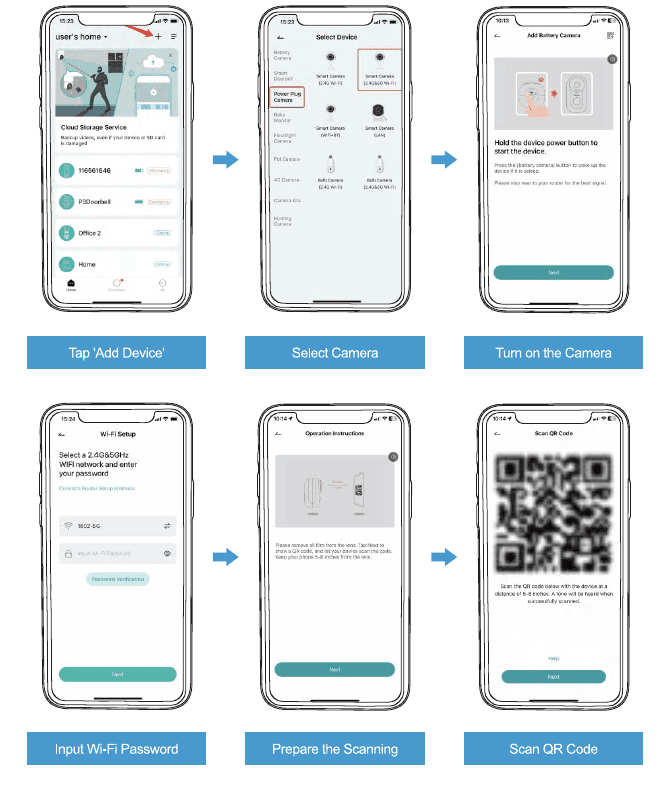
Tap 'Add Device' — On the homepage, tap the "+" in the upper right corner and select Add Device.
Select Camera — Choose the matching camera type from the device list.
Turn on the Camera — Hold the device power button to start the device. Press the (battery camera) button to wake up the device if it is asleep. Please stay near to your router for the best signal.
Input Wi-Fi Password — Select a 2.4G & 5GHz Wi-Fi network and enter your password.
Prepare the Scanning — Please remove all film from the lens. Tap Next to show a QR code, and let your device scan the code. Keep your phone 5-8 inches from the lens.
Scan QR Code — Scan the QR code below with the device at a distance of 5-8 inches. A tone will be heard when successfully scanned.
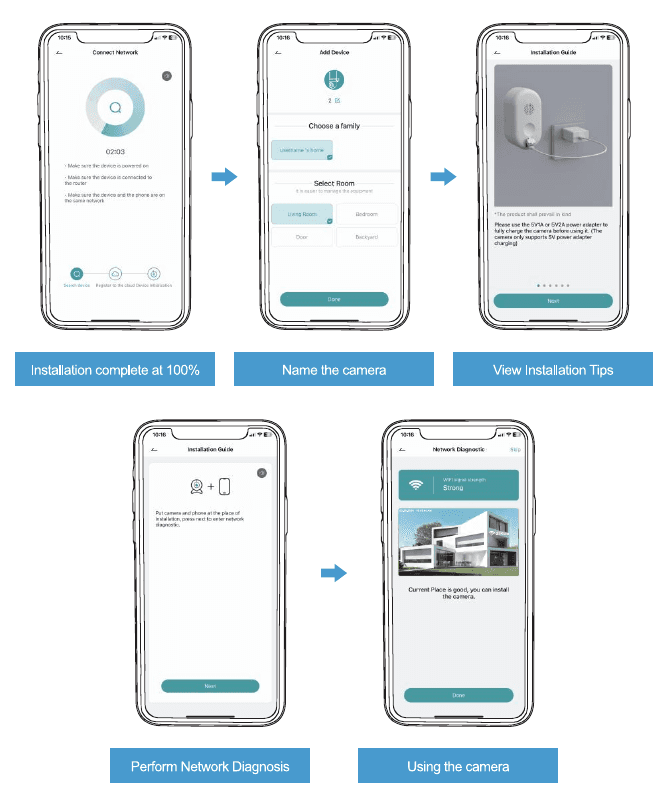
Installation complete at 100% — Wait for the network connection progress to reach completion.
Name the camera — Choose a family and select a room, then tap Done.
View Installation Tips — Use the 5V/2A power adapter to fully charge the camera before using it. (The camera only supports 5V power adapter charging.)
Perform Network Diagnosis — Put camera and phone at the place of installation, press next to enter network diagnostic.
Using the camera — When signal strength is Strong, the current place is good and you can install the camera. Tap Done.
Jennov PTZ Camera Quick Start Guide
Setup and operation guide for the Jennov HD WiFi PTZ Security Camera, covering installation, WiFi pairing in the CloudEdge app, recording, motion alarms, night vision and device sharing.
PTZ Security Camera Quick Installation Guide
Quick installation guide for the indoor/outdoor PTZ Wi-Fi security camera, covering the packing list, appearance, CloudEdge app setup, mounting and troubleshooting.