 CloudEdge App Docs
ieGeek PTZ Battery Security Camera User Manual
User manual for the ieGeek PTZ battery security camera, covering the product overview, status light and charging, app pairing, Wi-Fi connection and troubleshooting, wall mounting, PIR motion-sensor tuning, and false-alarm reduction with the CloudEdge app.
This manual walks you through setting up and using the ieGeek PTZ battery security camera with the CloudEdge app, from the product overview and charging to Wi-Fi pairing, wall mounting, and PIR motion settings.
This wireless security camera connects only to a 2.4 GHz Wi-Fi signal — it does not support 5 GHz Wi-Fi. For more help, see the battery camera FAQs.
Warning tips:
- Before connecting this camera to Wi-Fi, make sure the Wi-Fi signal strength is over 85% to keep a good Wi-Fi signal.
- This wireless camera supports event recording when Wi-Fi is disconnected.
1. Product Description
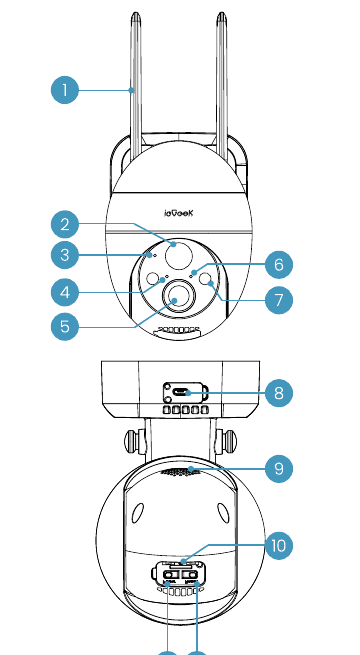
- Wi-Fi antenna
- PIR
- Microphone
- Charging indicator
- Lens
- Working status light
- Spotlight and IR light
- Dedicated charging port
- Speaker
- SD card slot
- Reset button
- Power button
| Component | Description |
|---|---|
| Power button | Press and hold the power button for 5 seconds to turn the camera on/off. |
| Reset button | Press and hold for 5 seconds until you hear "boogu" to reset or restore factory settings. |
| SD card slot | Supports local SD card storage (up to 128 GB). |
| Power indicator | Red means it is charging; blue means charging is complete. |
| Dedicated charging port | Use 5V / 2A to charge the camera. |
Working Status Light
| Indicator | Status |
|---|---|
| Solid red | The camera network is abnormal. |
| Slowly flashing red | Waiting for Wi-Fi connection. |
| Quickly flashing red | Connecting to Wi-Fi. |
| Solid blue | The camera is working normally. |
2. Adding the Camera to the App
2.1 Download the "ieGeek Cam" App
Method 1: Download the "ieGeek Cam" and "CloudEdge" app from the App Store (iOS) or Google Play (Android).
Method 2: Scan the QR code of the "ieGeek Cam" app to download it.
Note: When you use the app for the first time, enable the 2 permissions below.
- Allow "ieGeek Cam" to access mobile data and the wireless LAN, otherwise you will not be able to add the device.
- Allow "ieGeek Cam" to receive push messages, or the phone will not receive push notifications when motion detection or audio alarms are triggered.
2.2 Register an Account
New users must register via email. The specific steps are as follows:
Tap "Registration".
Follow the steps to complete the account registration.
Log in.
Tips:
- Please use the correct email address.
- Select the correct international prefix.
- When you register a new account, choose your current region. (Cameras cannot be shared across different registered regions.)
3. How to Add a Camera to the App
Before you use it:
Insert the Micro SD card before powering on, otherwise the SD card cannot be detected.
Place the camera and the smartphone 1–3 feet (30–100 cm) from the router to set up the Wi-Fi.
Make sure the camera uses 2.4 GHz Wi-Fi.
Steps for the Wi-Fi Connection
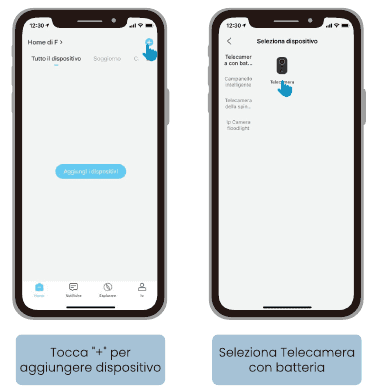
Tap "+" to add a device.
Select "Battery Camera".
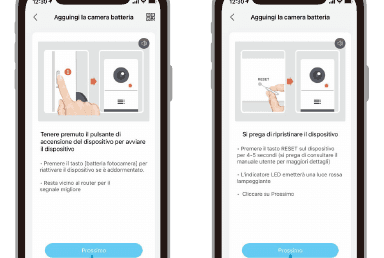
Power on the camera. Press and hold the device's power button to start the device. Press the [battery camera] button to restore the device or turn it off. Stay close to the router for the best signal.
Reset the device. Press the RESET button on the device for 4–5 seconds (see the user manual for more details). The LED indicator will emit a slow flashing red light. Tap "Next".
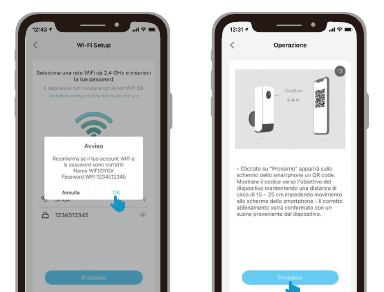
Enter the Wi-Fi password. Select a 2.4 GHz Wi-Fi network and enter its password, then confirm that the Wi-Fi name and password are correct and tap "OK".
Scan the QR code. Tap "Next"; a QR code will appear on the phone screen. Point it at the camera lens, keeping a distance of about 15–25 cm so the camera can scan it. When the alignment is correct, it will be confirmed with a prompt sound from the device, then tap "Next".
Wait for the connection. Make sure the device is powered, connected to the router, and that the device and the phone are on the same network.
The device is added. The camera is added successfully.
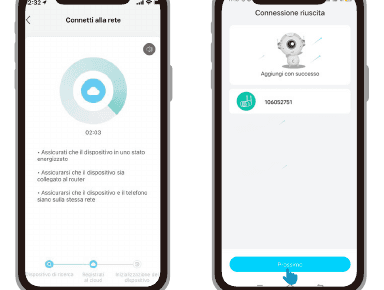
Note: If it cannot be powered on, first connect the DC 5V 2A power adapter to charge the camera for 15 minutes.
My Camera Cannot Connect to Wi-Fi
Make sure the Wi-Fi the camera connects to is 2.4 GHz. In our experience, the network connection often fails because users used 5 GHz Wi-Fi.
Make sure the Wi-Fi password is correct. (Note: the Wi-Fi password cannot include quotation marks, underscores, spaces, or commas ( / ).)
Check the number of devices connected to the router. In general, the router has a connection limit. Once the devices connected to the router exceed the maximum allowed, other devices will not be able to connect to the router.
Make sure the QR code on the phone screen is normal and that the distance between the phone and the camera lens is 10–15 cm (3.9–5.9 inches) during the scanning process.
After verifying the information above, if the camera still cannot connect to Wi-Fi, try downloading the app again, reset the camera and restart the router, then add the camera again.
The current location must have good Wi-Fi coverage and a stable network (signal over 80%).
Avoid using Wi-Fi extenders.
If you have tried all the steps but still have no luck, send a message with your order and problem to [email protected].
4. Charging the Battery
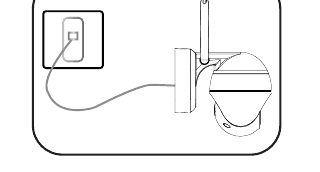
Charge the battery with a 5V 2A power adapter.
The battery is built in and cannot be removed.
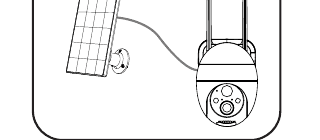
Charge the battery with the ieGeek solar panel.
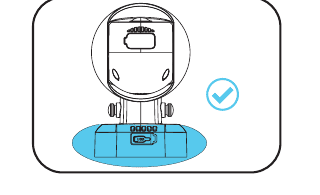
To make the camera better resist the weather, cover the dedicated charging port with the rubber cap every time after charging the battery.
Charging indicator:
- Red LED — charging
- Blue LED — fully charged
5. Camera Installation Tips
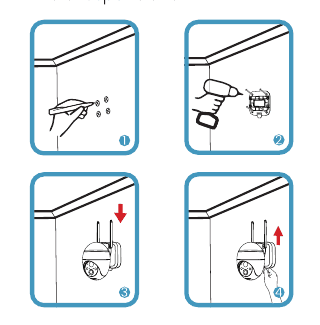
Installation steps:
Mark the punch position on the wall.
Fix the bracket to the wall with screws and expansion screws.
Grasp the base of the camera to fit it onto the bracket buckle, lower it, and listen for the "click" sound when it locks.
Note: The bracket buckle and the camera base must overlap.
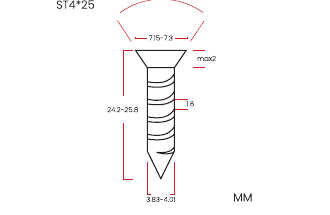
Screws: 1/4 in screw ×4, expansion screw ×4.
Corresponding screw image (ST4×25, dimensions in mm):
Steps to dismount:
Press the "Push" part of the bracket and push the camera upward to remove it.
NOTE: Be careful not to cut your hand when you press.
- Use the protective cover to make the camera better resist the weather when installing it outdoors.
- Install the camera 2–3 meters (7–10 ft) above the ground. This height maximizes the motion sensor's field of view.
- For efficient motion detection, install the camera at an angle.
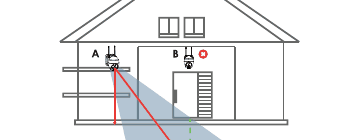
- Mounting height — 2–3 meters
- PIR detection range — 2–10 meters
Note: If a moving object approaches the PIR sensor vertically, the camera may not detect it.
6. PIR Motion Sensor Tips
PIR sensor detection distance: The PIR sensor's detection range can be customized to meet your needs. Refer to the table below to configure it in the device settings via the CloudEdge app.
| Sensitivity | Detection distance (for moving objects and living beings) |
|---|---|
| Level 1–3 (Low) | Up to 2–5 meters |
| Level 4–7 (Medium) | Up to 5–8 meters |
| Level 8–10 (High) | Up to 8–10 meters |
7. Important Notes on Reducing False Alarms
- Do not point the camera at any object with intense light, including sunlight, intense lamp light, etc.
- Do not place the camera near any vent, including air-conditioner vents, humidifier vents, projector heat-transfer vents, etc.
- Do not install the camera in places with strong wind.
- Do not point the camera at a mirror.
- Keep the camera at least 1 meter away from any wireless device, including Wi-Fi routers and phones, to avoid wireless interference.
8. FAQs
For more detailed frequently asked questions, open the app and search under "Me" – "Help and questions" – "Battery Camera".
Why is the device offline?
Check whether the device is powered on and whether the working status light is on normally.
You can try using a third-party Wi-Fi analysis tool ("Wi-Fi analyzer") to check the current signal coverage and interference status. If the coverage is poor and the interference is large, it is recommended to change the camera's installation position, adjust the router position, or use a secondary router.
If the device is far from the router and cannot get a good Wi-Fi signal, it is recommended to move the router somewhere closer, or make sure the Wi-Fi signal strength is over 85% to improve the device's Wi-Fi performance.
Delete the camera from your CloudEdge account and add it again after resetting the device.
Check whether the device firmware and the app are the latest version.
Avoid using Wi-Fi extenders.
How to update the router or Wi-Fi password?
Delete the camera from your CloudEdge account. After resetting the device, use the new Wi-Fi or the new password to add it again.
The alarm is triggered too frequently?
Reduce the motion-detection alarm sensitivity in the app.
Check whether there are objects that interfere with and trigger the PIR sensor in the device's field of view, such as an air-conditioner outdoor unit, passing vehicles, pedestrians, etc. The device angle can be adjusted appropriately to avoid these objects easily disturbing it.
Enable "Alarm only when people appear" and use the humanoid algorithm to filter out unnecessary alarms.
The camera does not detect
If the network is unstable, the message may not be sent in time after the PIR is triggered. In this case, first confirm the network status and move the camera to verify and confirm in an environment with good coverage.
An inappropriate installation position will cause missed triggering and missed PIR detection. If the position is too high, the object is too far, or the object is too small, the camera will not be triggered. Try adjusting the installation position several times according to the triggering requirements.
Fast power consumption
In case of poor Wi-Fi coverage (when the signal is below 75%), this will increase power consumption.
A high PIR trigger frequency increases power consumption when the infrared/white light is on at night.
The phone frequently accesses the camera remotely, which increases power consumption.
For the first use, it is recommended to use power down to 10% and then charge it to 100%, which is good for the health of the lithium battery.
SD card not recognized
The supported capacity is a 16–128 GB TF card.
Before use, make sure to format the TF card as FAT32 or exFAT on the computer, then insert it into the camera and finally run the memory card formatting operation on the camera.
If the TF card is not recognized during use, it is generally a quality problem with the TF card, and you need to replace the memory card with one that reads and writes more stably.
ieGeek DQ201 PTZ Battery Security Camera
User manual for the ieGeek DQ201 PTZ battery security camera, covering camera layout, app pairing, charging, installation, PIR motion detection and FAQs in the CloudEdge app.
ieGeek ZS-GX1S PTZ Battery Security Camera
User manual for the ieGeek ZS-GX1S PTZ battery security camera, covering the camera layout, app pairing, charging, installation, PIR motion sensor settings and FAQs in the CloudEdge app.