 CloudEdge App Docs
ANRAN HD WiFi Battery Camera Quick Start Guide (Micro-USB, with Strobe & Device Share)
Setup guide for the ANRAN HD WiFi battery security camera, covering what's included, product overview, mounting, account registration, WiFi pairing, humanoid detection, device sharing and FAQs.
This guide explains how to set up and use the ANRAN HD WiFi battery security camera with the CloudEdge app.
Need more help? See the Battery Camera FAQs.
1. What's Included
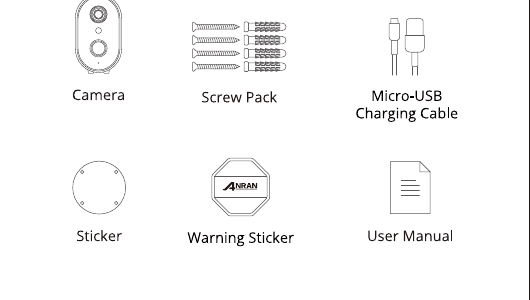
- Camera
- Screw Pack
- Micro-USB Charging Cable
- Sticker
- Warning Sticker
- User Manual
2. Product Overview
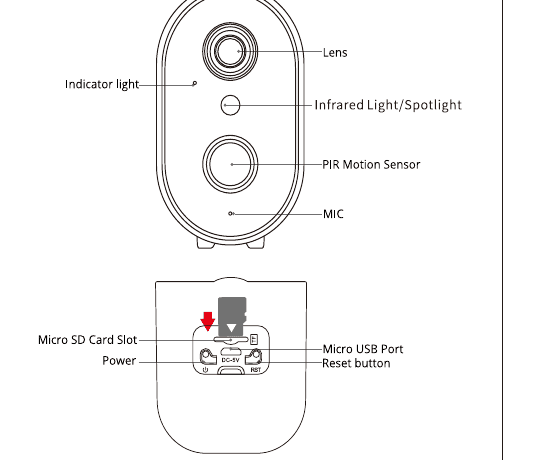
Front:
- Lens
- Indicator light
- Infrared Light / Spotlight
- PIR Motion Sensor
- MIC
Back:
- Micro SD Card Slot
- Power
- Micro USB Port
- Reset button
Please insert the Micro SD Card according to the direction shown in the diagram. The Micro SD Card might JAM if inserted incorrectly and the device could be damaged.
- SD Card Port: Supports a micro SD card for local storage (Max 128GB).
- Reset button: Used to restore the camera to factory settings (press and hold for 5-8s).
- Card capacity requirements: 8-128GB.
- Read and write speed requirements: class10 level.
- File format: FAT32.
3. App Installation and Setup
Search "ANRAN" on the Apple Store or Google Play to download the app.
- from Google Play
- from Apple Store
- or scan the QR code printed in the manual
4. Mounting the Camera
Select Height and Location
Hang anranCam 7-10 ft (2-3 m) above the ground. This height maximizes the detection range of the motion detection of anranCam. Avoid placing anranCam under direct sunlight.
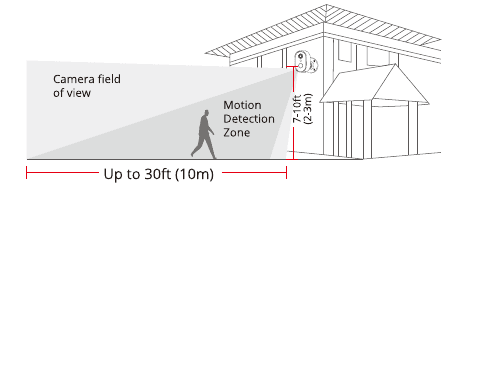
- Camera field of view
- Motion Detection Zone
- Mounting height — 7-10 ft (2-3 m)
- Detection distance — Up to 30 ft (10 m)
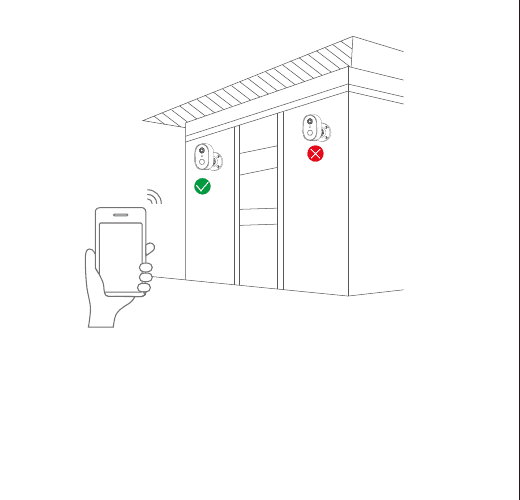
Test the WiFi Signal at the Installation Position
Use a cell phone to test the WiFi signal quality at the installation position before installing the camera. Make sure the WiFi router can provide a good WiFi signal.
5. Register an Account
Open the APP to sign up for an account. Go to the login interface, and click "Sign Up".
Sign up with your email address, and click "Next".
Set up a "Nickname" and "Password" for your APP, then click "Done" to complete.
6. Set Up WiFi for the Camera
The WiFi camera can only connect to a 2.4 GHz WiFi signal. It does not support 5 GHz WiFi. Therefore, it only needs to connect to the WiFi signal of the family in the 2.4 GHz frequency band for normal use.
Put both your mobile phone and the camera near the router, and the distance should be within 5 meters.
Log in to "ANRAN", then tap the "+" icon in the center. Tap "Battery Camera" to add the device.
Reset the device and wait for a flashing RED indicator light, then tap "Next".
Select the Wi-Fi the device needs to connect with (your home Wi-Fi), input the password and click "Next".
Using the device, scan the QR code on the mobile phone according to the operation the figure shows, then proceed to the next step after hearing the prompt tone.
After the network configuration is successful, set the name and password for the device to add it successfully; then you can view the camera screen in real time.
7. Humanoid Detection
Turn on humanoid detection and the alert will be triggered only when human motion is detected.
Click the Settings button and select "Alarm Management", then enable "Motion Detection" and click "Alarm Working Mode", select "Custom Mode" and click the Settings button to set the humanoid alarm.
- Recording Time: The duration of each alarm video.
- Alarm Interval: Interval of each alarm push.
If you want to detect other moving objects such as vehicles, please turn off the humanoid detection switch. Don't turn on "Day Detection" and "Night Detection".
8. Audio Warning and Strobe Light
Audio warning and strobe light is only valid at night.
Three alarm methods are available:
- Audio warning: When motion or human form is detected, the camera will give an audible alarm.
- White Light warning: When motion or human form is detected, the camera will emit a light alarm.
- Audio warning and strobe light: When motion or human form is detected, the camera will sound and light alarm.
9. Device Share
The camera can only be added by one APP account. If other family members want to view the camera, you can share the camera with your family through the sharing function of the APP.
Click the Settings button and select "Device Share" → "Add" → "Enter account" and input the other party's APP account, then your family will receive a shared message on the APP. Click Agree to view the camera you shared.
10. FAQ
Q: The device prompts offline?
A:
- Check whether the equipment is in the power-on state.
- Check whether the Wi-Fi network is in good condition and restart the router.
- If the device is located far away from the router, which results in the inability to obtain a good Wi-Fi signal, it is recommended to move the router to a closer place or add a Wi-Fi amplifier to improve the Wi-Fi performance of the home.
- Delete the camera from your CloudEdge account and add it again after resetting the device.
- Check whether the device firmware and application program are the latest version.
Q: Why is it still in the list of devices after resetting?
A: The reset device only resets the network configuration of the camera, but cannot change the configuration on the App. Remove the camera, and it must be deleted by the App.
Q: How to cut the camera network to another router?
A: First remove and reset the device on the App and then configure the device again by the App.
Q: Why doesn't the device identify the SD card?
A: It is recommended to plug in the SD card after a power cut. Confirm whether the SD card is normally available and the format is FAT32. Also, the TF card can't be identified when the internet environment is not good.
Q: Why can't I get the notifications with my cell phone App?
A: Please confirm that the App has been running on the phone, and the relevant reminder function has been opened; message notification and authority confirmation in the mobile phone system have been opened.
Safety Statement
FCC Statement
This device complies with Part 15 of the FCC Rules. Operation is subject to the following two conditions: (1) this device may not cause harmful interference, and (2) this device must accept any interference received, including interference that may cause undesired operation.
Warning: Changes or modifications not expressly approved by the party responsible for compliance could void the user's authority to operate the equipment.
Note: This equipment has been tested and found to comply with the limits for a Class B digital device, pursuant to Part 15 of the FCC Rules. These limits are designed to provide reasonable protection against harmful interference in a residential installation. This equipment generates, uses and can radiate radio frequency energy and, if not installed and used in accordance with the instructions, may cause harmful interference to radio communications. However, there is no guarantee that interference will not occur in a particular installation. If this equipment does cause harmful interference to radio or television reception, which can be determined by turning the equipment off and on, the user is encouraged to try to correct the interference by one or more of the following measures: (1) Reorient or relocate the receiving antenna. (2) Increase the separation between the equipment and receiver. (3) Connect the equipment into an outlet on a circuit different from that to which the receiver is connected. (4) Consult the dealer or an experienced radio/TV technician for help.
FCC Radio Frequency Exposure Statement
The device has been evaluated to meet general RF exposure requirements. The device can be used in fixed/mobile exposure conditions. The min separation distance is 20cm.
Notice: Shielded cables — All connections to other computing devices must be made using shielded cables to maintain compliance with FCC regulations.
Warranty Tips
Please fill in the following information or scan the QR code to activate the free 12-month warranty from the order date on.
After finishing filling or scanning, please take a picture and send it to the email ([email protected]). Then your free warranty will take effect!
During the warranty period, if any parts of the product are damaged, please contact us immediately and we will provide a satisfactory resolution.
- Order Date
- Order Number/ID
- Buyer E-mail
- Buyer Tel
Zulino Video Doorbell Quick Start Guide
Quick start guide for the Zulino wireless video doorbell camera with chime, covering the box contents, product overview, CloudEdge app setup, chime pairing, installation, charging, and troubleshooting.
ANRAN HD WiFi Battery Camera Quick Start Guide (Micro-USB, 5V 2A)
Quick start guide for the ANRAN HD WiFi battery security camera, covering the product layout, app installation and account registration, powering on, Wi-Fi pairing, PIR motion detection settings, specifications and FAQs.