LogoCloudEdge App Docs
Website Homepage

Getting Started

Documentation

Help Center

FAQs

User Manual

User Manual

Products

ANRAN HD WiFi Battery Camera Quick Start Guide (Micro-USB, with Strobe & Device Share)ANRAN HD WiFi Battery Camera Quick Start Guide (Micro-USB, 5V 2A)ANRAN HD WiFi Battery Camera Quick Start Guide (Type-C, 5V 1A)WiFi Security Camera (Battery) Quick Installation GuideBOIFUN DD201 Battery Camera User ManualBOIFUN DD202 Battery Camera User ManualCOOAU ZS-GQ1 Battery Security CameraCOOAU ZS-GX2S Battery Camera User ManualDEATTI Smart Battery CameraDEATTI GX5S Battery Camera User ManualDIHOOM Battery CameraG-Homa Battery Camera User ManualieGeek Battery Camera User Manual (10400mAh, 4–6 Month Battery Life)ieGeek Wire-free Battery Camera User Manual (Spotlight, Magnetic Mount)ieGeek Wire-free Battery Camera User Manual (Built-in Solar Panel)ieGeek Battery Camera User Manual (PIR Level 1–10 Sensitivity, 90–120 Day Battery)ieGeek Wire-free Battery Camera User Manual (Folding Stand, Combo Spotlight)ieGeek Battery Camera User Manual (Solar Panel Compatible)ieGeek Battery CameraieGeek ZS-GQ1 Battery CameraieGeek ZS-GX3S Battery CameraJennov Battery Camera Quick Start GuideJouSecu ZS-GX5 Battery CameraMECO ELEVERDE Smart WiFi Security Outdoor CameraTopcony ZS-GX1S Battery CameraXTU R1 Battery Powered CameraYESKAMO Smart Battery Powered IP Camera User ManualZOSI Smart WiFi Battery Security Camera Quick Start GuideZUMIMALL GX1S Battery Powered Camera
User ManualBattery Camera

YESKAMO Smart Battery Powered IP Camera User Manual

Setup and usage guide for the YESKAMO smart battery powered IP camera, covering product structure, button and LED indicators, specifications, CloudEdge app pairing, sharing with family, motion detection, storage, charging, installation and troubleshooting.

This guide explains how to set up and use the YESKAMO Smart Battery Powered IP Camera with the CloudEdge app.

Need more help? See the Battery Camera FAQs.

I. Statement

  1. Though we apply all efforts to make the manual complete and accurate, there could still be some discrepancies due to products' timely update.
  2. The products and manual are subject to change without previous notification.
  3. The content in this manual is only for reference. We don't promise the accessories or App are exactly the same with you received. Detailed information is in accordance with the final products.
  4. Should you meet any challenges or issues in operating the camera, please do not hesitate reaching out us for assistance. We always responsive to any questions.

Contact us — WWW.YESKAMO.COM

  • Email (United States): [email protected]
  • Email (United Kingdom): [email protected]
  • Phone: +1 830 745 5888 (US) / +44 20 3807 4763 (UK)

II. Safety Caution

  1. Please read the manual carefully and operation in accordance with the instructions.
  2. Please do not transform or modify the product, do not open the case or disassemble the product.
  3. Please use the product under its standard working temperature and humidity, extra-high temperature and humidity will reduce battery performance and lead to camera drop line.
  4. If doesn't use the camera for a long time (a week or more), take off the camera and stored it in room. If the moisture inside does not evaporation due to the temperature and humidity of environment, it will affect the periphery of the main board and cause rust.
  5. Avoid mud, sand, water, drops, bumps, etc., Also avoid setting up device on that environment and condition as it can lead to failures or damage.
  6. Conditions of Fire, earthquake, lightning, wind and flood damage, other disasters or external factors (such as pollution or voltage disturbances) that could cause malfunction or damage, do not use this product.
  7. Malfunctions or damages due to bracket failures (storage in hot and humid places, battery leakage, etc.) or improper protection, we assume no responsibility.
  8. The camera is IP65 weatherproof, it's better to install the battery camera in a shaded area (such as under eaves) to prevent any possibility of accelerated wear and tear the element. Please noticed IP65 rate won't allow soak into water or stay under heavily rain for long time.
  9. Please turn off the device before insert micro SD card. Please setup camera and test camera well before installation.

III. Product Details

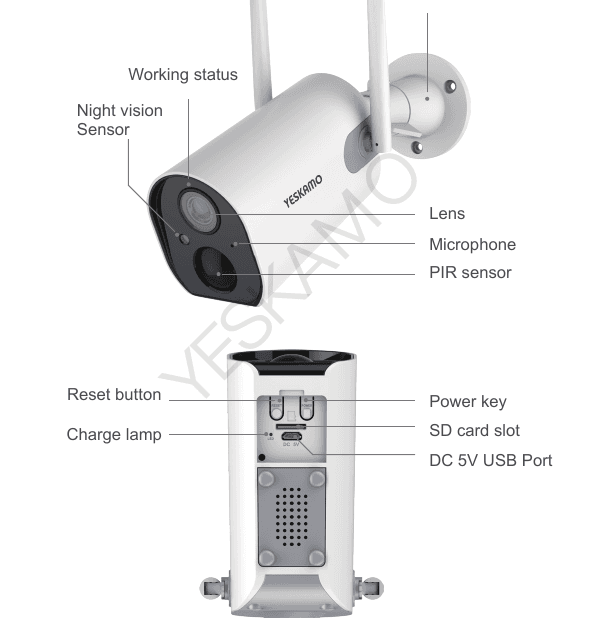
1. Camera structure

Front and back views of the YESKAMO battery camera with labeled parts

Front:

  • Working status — front indicator light
  • Night vision Sensor
  • Lens
  • Microphone
  • PIR sensor
  • Bracket

Back:

  • Reset button
  • Charge lamp
  • Power key
  • SD card slot
  • DC 5V USB Port

2. Camera button and indicator

NoCamera ButtonOperation
1Power-ButtonPress and hold the button for 5 seconds to turn on/off the device.
2Reset-ButtonPress and hold the button for 5 seconds to reset and restart the device.
NoFront IndicatorCamera Status
1Flashes red slowlyWaiting for Wi-Fi connection, and start Add devices.
2Flashes red fastWiFi connecting
3Constant redNetwork is abnormal
4Constant blueWiFi connected, camera is running normally.

3. Specification

Camera
Image sensor1080P Color Sensor 1/3CMOS
Audio Input/outputBuilt-in microphone and speaker
Lens3.6mm
Angle of view100 degree
Day & nightElectronic (IR-CUT filter with auto switch)
Compression Standard
Video compressionH.264
Bit rate16Kbps~2Mbps
Dual streamYes
Image
Image resolution1080P (19201080), VGA (640480)
Frame rate25fps
Network
Alarm triggerPIR Intelligent motion detection
Wireless SecurityWEP, WPA, WPA2
Remote wakeupSupport
Wireless2.4G WIFI (IEEE802.11b/g/n)
SecurityUser authentication, software encryption
Battery
Battery10400mA, rechargeable
Standby consumption500μA
Work consumption220mA
Standby time10 months
Working time4 months (assumed 15 times wake up per day)
General
Operating temperature-20 °C to 50 °C
Power supplyOptional DC 5V 1A/2A
IR distanceNight visibility up to 20 meters

IV. Configuration on Phone App

1. Download CloudEdge App on phone

1.1 Searching the "Cloudedge" App from phone App store or Google play and install it. (App may be updated, the QR code in the manual is for reference only.)

1.2 Please approve the following two authorities when you run this App for the first time.

Enable 4G or wireless LAN on phone.

Enable Cloudedge's "Notification" on phone's "Settings". Enter phone "Settings" >> Notification >> Cloudedge, and enable "Allow notification" on the Notification management interface of Cloudedge.

2. Create Account and Login

2.1 Selecting Your country, Example as: United States.

2.2 Tap "Sign Up" on the interface.

Sign up App account:

Sign up your email address OR phone number, enable the "Registration means agreement with user agreement and privacy policy" and click next.

A verification code will sent via text, input the verified code, set username and password, tap "done". If you sign up with your email address and without receiving any code, you may check your email spam.

Login App with the created account.

3. Add device to phone app

3.1 Power and reset the camera

Power the camera: uncover the rubber seal cover on camera bottom, press and hold the camera power button for 5 seconds to turn it on, make sure the front indicator light red, it blinks red when ready for configuring network. If it doesn't turn on, please charging it with DC5V 1A/2A power adapter for 15 minutes to wake it up.

DC5V 1A/2A power adapter is not included in package.

Power key on the camera bottom and the front power indicator turning red

Take the camera and smartphone close to the router (30 to 100 cm) and connect phone to the router's Wi-Fi, support 2.4GHz WiFi only.

Camera and smartphone placed 30-100 cm from the router

Reset camera: press and hold the camera reset button for about 5 seconds to reset it, release after hear the prompt "bugu" sound.

3.2 Wi-Fi wireless connection

Add device on app: Run Cloudedge app on phone, tap "+" on screen and choose "Battery Camera".

We powered and reset the camera on previous steps already, here we just click "next" on below screens.

WiFi Setup: It auto identify your 2.4GHz wireless network name (if no, please tap "change WiFi" to select). Input your WiFi password, make sure it's correct, then touch "Next".

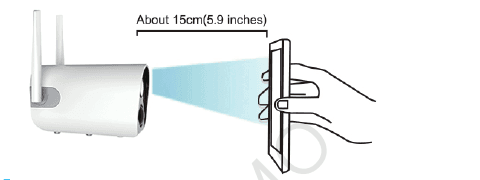
At the "Scan QR Code" interface, Put the QR code in front of the Camera lens about 15 cm (5.9 inches). After the camera recognizes the QR code, it makes "bugu" sound. Then we tap "next" on phone.

Holding the phone QR code about 15 cm in front of the camera lens

Camera is connecting to network, waiting the bar update to 100% to finish connection. Please make sure the ID on the "Device Found" is the same series number print on camera. Touch "Done" to complete the initial setting, camera front indicator blinks blue.

Camera send notifications when motion detected, but save recording only when equipped with storage capacity. Please insert MicroSD card or purchase cloud service on App to save the video.

  1. Configuration is finished, the camera in standby status when not watching video or no motion detected and the indicator off.
  2. If need switch WiFi network, require to reset the camera and re-setup. If you reset the camera after setup, the camera will disconnect with network.
  3. The camera support setup on one phone only, need reset to setup to another phone. It allows share the device on the default mobile phone to others. Refer to "V. Share the Camera with Family" for detail instructions.

V. Share the Camera with Family

1. Sign up new account

Download Cloudedge App on family's phone, sign up and login with new account. (Follow the instruction of previous "IV. Configuration on Phone App > 2. Create account and login".)

2. Add as friends

2.1 On default phone APP "Friends" interface, enter App account e-mail or mobile number of the family's phone, tap "Add".

2.2 Approve request: The family's phone will receive your friends' request, touch the request notification lead to "message" > "system message" interface of App. Touch the request and "Tips" box pop up, touch "Agree" to approve friends request.

3. Share camera

3.1 On family's phone App "Devices" interface, slide screen to update data and the camera ID appears.

3.2 From the default phone "Friends" interface to choose specific friend, sharing the device or cancel sharing by touching the frame.

4. Sharing permissions

4.1 You can adjust camera setting on the default phone only. The friends' phones have only viewing privileges.

4.2 Once the added account on the "Friends" interface is deleted, sharing will be failed.

4.3 If the camera ID is deleted on the default phone, the camera ID on friends' phones deleted automatically.

VI. Cloudedge APP Menu

CloudEdge Devices home screen with numbered controls
  1. Add camera
  2. Recording time
  3. Playback
  4. Camera icon
  5. Camera ID
  6. Alarm information icon: A red dot on the icon indicates that alarm triggered. Tap the icon to display the recorded screenshot or video.
  7. Cloud storage service
  8. Device
  9. Message
  10. Friends
  11. Me (Personal Center)
CloudEdge live view screen with numbered controls
  1. Camera Settings: Alarm, SD card, etc.
  2. Battery level
  3. Microphone: on / off
  4. SD/HD switch
  5. Full screen display
  6. Bit rate
  7. Network signal strength
  8. Preview
  9. Replay
  10. Cloud storage service
  11. Screenshot
  12. Intercom option: long press it to talk
  13. Recording: manually recording
  14. Body detection: Default at "ON" and appears green, recording once movements detected.
CloudEdge History playback screen with numbered controls
  1. Green playback time zone: Motion detection video other than alarm time
  2. Red playback time zone: video of the alarm time
  3. Calendar: Click to select a date
  4. Screenshot
  5. Recording: Recording manually
  6. Alarm: alarm notifications

VII. More Features About Battery Camera

1. Motion Detection Alarm

The battery camera with PIR sensor is not designed for 7x24 hours recording, it realize security purpose by pushing alarm notifications to phone and record video when motion events detected, you can replay recordings anytime via CloudEdge APP.

1.1 The PIR sensor detecting sensitivity is adjustable with Low and High options. Default at High.

1.2 Receive Notifications — Enable the "Receive Notifications" to get notification alarm when motion triggered. It default enabled. Tap video frame on "Message" screen to see all alarm notifications history. (Required storage capacity to replay.)

On the alarm message list:

  • Alarm Record
  • Alarm snapshot
  • Tap it to play alarm video & clip
  • Tap to preview alarm snapshot, there are 2 frames as per second

2. Video Storage and Replay

2.1 Video recording save to the Micro SD card or Alicloud service (Need subscription fee). Micro SD card default not included in the package.

2.2 Micro SD card support up to 128 GB. To ensure the recognition rate and SD card quality, we recommend Class 10 Speed Micro SD Card.

2.3 Please format Micro SD card before insert it into the camera, support FAT2 or EXFAT32 format only.

2.4 Please insert SD card when power off camera. It shows storage capacity on CloudEdge app when SD card recognized.

3. Battery Management and Recharge

3.1 Battery management

The camera built-in 10400mAh 18650 lithium battery, theoretical battery life 60-90 Days is assumed camera wakes up 15 times per day and watching 5 Minutes of playback. If your battery capacity drain too fast, may because the camera wakes up very frequent. It is recommended to lower the Sensitivity of "Body Detection" or occasionally turn it off.

3.2 Power adapter recharge

You can charge the camera with the DC 5V / 1A or 2A Adapter, the power adapter isn't included in package. Charge lamp light red while charging and turns blue when 100% full charged.

3.3 Solar panel recharge

The battery IP camera support charging with Yeskamo solar panel. Please do not use others solar panel to charge it. Solar panel charging isn't efficient as electricity, but still can meet most of the security needs. Please make sure the solar panel well connected and get direct strong sunlight.

4. Two-way Talk and Volume Control

4.1 Two-way Talk

Tap live stream frame the voice button show up, tap it to Mute/On sound.

Press and hold the Intercom button to talk to camera scene, with sound on you can hear back.

4.2 Volume Control

Adjust Volume from Settings >> Basic Function >> Speaker Volume, default volume at 70.

VIII. Installation

1. Camera Surveillance Area

When installing the camera, the PIR sensor should not be vertically aligned with the moving objects, as it may not sensitive to movement. It is recommended that the camera be tilted more than 10 degrees to capture motions.

Recommended camera tilt angle so the PIR sensor crosses the path of moving objects

2. Camera Installation

Full charge camera before installation. It takes 4 Hours to get full charged with 5V 2A Charger (Not included).

Use the electric drill to drill holes in the wall, fix the bracket base with screws.

Then rotate the bracket wing clockwise to install the camera. And rotate the bracket wing counterclockwise to remove the camera when necessary.

Camera attaching to the wall-mounted bracket base with 360-degree adjustment

3. Tips to Reduce False Alarms

  • Do not install the camera in a place directly facing bright objects or light source, including sunshine, bright lamp lights, etc.
  • Please do not install the camera in the place where the vehicles and personnel frequently go in and out.
  • A large number of data results show that the camera can detect people and vehicles within a distance of 15 meters (55 feet).
  • Keep the camera away from outlets such as air conditioning vents, humidifier, heat transfer openings of projectors etc.
  • Do not leave the camera facing the mirror.
  • Keep the camera at least 1 meter away from wireless devices to avoid wireless interference.
  • Please make sure there are no obstacles within 3 meters in front of the lens.

IX. Troubleshooting

No.IssuesSolution and operation
1Connection can not be established1) Check your Wi-Fi name and password. 2) Make sure your WiFi is 2.4G, it does not support 5G. 3) Make sure your camera and mobile phone are near the router. 4) Email contact customer service staff to solve your problem within 24 hours.
2Reset to default1) Press and hold the reset button for 5 seconds. 2) Hear a "bu gu" sound. 3) The red light starts to flash slowly.
3How to connect the camera to new WIFI network1) Press the reset button to the factory setting. 2) Remove the camera in the CloudEdge APP. 3) Re-connection.
4Alarm picture without persons1) The camera needs time to wake up and people are moving too fast. 2) Some objects with dissipative heat may be detected by PIR, and it is recommended to lower the sensitivity of the PIR alarm.
5Frequent alarm1. Because the environment or the number of vehicles where you install the camera trigger the cameras frequently. It is recommended to change the installation angle. 2. Adjust the camera alarm sensitivity to "low".
6Why is someone crossing without alarm?The PIR inspection area has a range limitation. It may be that the person passing the position is too far or too close, or the person passes quickly from a corner of the camera and is not successfully detected by the PIR.
7No alarm pushEnable notification of the CloudEdge app in the mobile settings.
8No alarm video recordingPlease insert the TF card. or turn on cloud storage.
9Device offlineCheck if the network works well, It is possible that the location where the camera is installed is too far from the router, causing the wifi to not cover the camera.
10Video delayCheck the WIFI network, the distance between the camera and the router should not be too long.
11Short battery lifeThe camera was awakened too often and should not be placed on the roadside or in the sun.
12Cannot start camera after replacing battery1) Check if the positive and negative poles of the battery are correct. 2) Check if the battery is the recommended type.
13Unable to charge1. Please use the 5V 1A/2A power adapter to charge the camera correctly. 2. When the charging is normal, the charging indicator will light red. If the charging indicator does not light, the charging is not successful. Please check if the power adapter and charging cable are normal.
14CloudEdge APP Flashback1. It may be that your phone system version is too low or too high, resulting in poor compatibility. It is recommended that you uninstall the app and re-download it. 2. Contact customer service staff to provide information such as the model number and system version number of your mobile phone.
15Unable to register account1. When registering an account, please select the correct country. 2. When you register your account, you do not need to enter a verification code. Please follow the process to register your account.
16Unable to add friendYour account and friend account must choose the same country, or the same area. For example, accounts in Europe and America cannot add friends.

XTU R1 Battery Powered Camera

Quick start guide for the XTU R1 Battery Powered Camera, covering the product layout, app pairing, live video, video playback, settings, battery care and mounting in the CloudEdge app.

ZOSI Smart WiFi Battery Security Camera Quick Start Guide

Quick start guide for the ZOSI Smart WiFi battery security camera, covering the package contents, component layout, CloudEdge app setup, Wi-Fi pairing, app interface, PIR motion detection, push notifications, mounting and an LED status / troubleshooting reference.

Table of Contents

I. Statement
II. Safety Caution
III. Product Details
1. Camera structure
2. Camera button and indicator
3. Specification
IV. Configuration on Phone App
1. Download CloudEdge App on phone
2. Create Account and Login
3. Add device to phone app
3.1 Power and reset the camera
3.2 Wi-Fi wireless connection
V. Share the Camera with Family
1. Sign up new account
2. Add as friends
3. Share camera
4. Sharing permissions
VI. Cloudedge APP Menu
VII. More Features About Battery Camera
1. Motion Detection Alarm
2. Video Storage and Replay
3. Battery Management and Recharge
3.1 Battery management
3.2 Power adapter recharge
3.3 Solar panel recharge
4. Two-way Talk and Volume Control
4.1 Two-way Talk
4.2 Volume Control
VIII. Installation
1. Camera Surveillance Area
2. Camera Installation
3. Tips to Reduce False Alarms
IX. Troubleshooting