 CloudEdge App Docs
DIHOOM Battery Camera
User manual for the DIHOOM smart battery-powered IP camera, covering the camera layout, LED indicators, specifications, CloudEdge app setup, SD-card recording, device sharing, installation, and troubleshooting.
The DIHOOM Smart Battery Powered IP Camera is a wire-free, PIR motion-activated security camera managed through the CloudEdge app.
Need help? Many problems are solved by changing a single setting. If the camera does not work as expected, check the Troubleshooting & FAQ section below, or browse the Battery Camera FAQs.
Statement
- Though we apply all efforts to make the manual complete and accurate, there could still be some discrepancies due to products and app timely update.
- The products and manual are subject to change without previous notification.
- The content in this manual is only for users' reference. We don't promise it's exactly the same with the products you purchase. Detailed information is in accordance with the final products.
Safety Caution
- Please read the manual carefully and operate in accordance with the instructions.
- Please do not transform or modify the product, do not open the case or disassemble the product.
- Please use the product under its standard working temperature and humidity.
- Avoid mud, sand, water, drops, bumps, etc. Also avoid setting up the device in an environment and condition that can lead to failures or damage.
- Conditions of fire, earthquake, lightning, wind and flood damage, other disasters or external factors (such as pollution or voltage disturbances) could cause malfunction or damage — do not use this product under them.
- If you don't use the camera for a long time (a week or more), take off the camera and store it in a room. If the moisture inside does not evaporate due to the temperature and humidity of the environment, it will affect the periphery of the main board and cause rust.
- Malfunctions or damages due to bracket failures (storage in hot and humid places, battery leakage, etc.) or improper protection — we assume no responsibility.
- Please open the package and test the camera function well to make sure it is working before installation.
- Although the camera is waterproof, it is suggested to install the battery camera in a shaded area (such as eaves) to prevent any possibility of accelerated wear and tear of the element.
1. Product Description
Camera structure
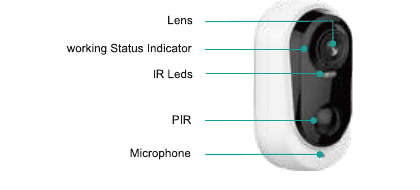
- Lens
- Working Status Indicator
- IR LEDs
- PIR
- Microphone
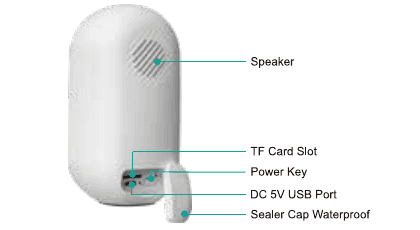
- Speaker
- TF Card Slot
- Power Key
- DC 5V USB Port
- Sealer Cap Waterproof
Camera button and indicator
| No. | Camera button | Operation |
|---|---|---|
| 1 | Power | Press and hold the button for 5 seconds to turn on/off the device. |
| 2 | Reset | Hold the RESET button on your device for 4–5 seconds, until a flashing red indicator light. |
| No. | Indicator | Status |
|---|---|---|
| 1 | Red light flashes slowly (about once per second) | Awaiting for Wi-Fi connection, and start Add devices. |
| 2 | Red light flashes fast (multiple times per second) | Wi-Fi connecting |
| 3 | Red light solid on | Network is abnormal |
| 4 | Blue light solid on | Wi-Fi connected, camera is running normally |
| 5 | Blue light flashes slowly (once every two seconds) | Watching Live view |
| 6 | Blue light flashes fast (multiple times a second) | Camera upgrading |
| 7 | No light | Sleep/Shutdown |
Specification
| Item | Specification |
|---|---|
| Image sensor | 1/2.9" CMOS Color Sensor |
| Lens | 3.2 mm |
| Angle of view | 140° |
| Infrared range | Up to 10 meters (32 ft) |
| Bit rate | 32 Kbps ~ 2 Mbps |
| Video compression | H.264 |
| Audio input/output | Built-in microphone and speaker |
| Audio features | Support two-way voice function, support audio and video synchronization |
| PIR distance | Up to 10 meters (32 ft) |
| PIR gear | Support 10 gears adjustable |
| Battery | 5200 mAh |
| Standby consumption | 250 uA |
| Standby time | 10 months |
| Working time | 5 months |
| Alarm trigger | PIR intelligent motion detection |
| Wireless security | WEP, WPA, WPA2 |
| Wireless | 2.4G Wi-Fi (IEEE 802.11b/g/n) |
| Security | User authentication, software encryption |
| Operating temperature | -10 °C to 45 °C |
| Power input | DC 5V +-5% / 1.5A |
| Reset key | Support one key reset |
| Business function | Support remote monitoring and playback |
2. Configuration on Phone App
Download the CloudEdge app
Search "CloudEdge" in the App Store or Google Play and install it. (The app may be updated; QR codes in the box are for reference only.)
When you run the app for the first time, please approve the following two permissions:
- Step 1. Enable 4G or wireless LAN on phone.
- Step 2. Enable CloudEdge "Notification" in phone Settings: go to Settings >> Notification >> CloudEdge, and enable "Allow notification" on the notification management interface of CloudEdge.
Create account and login
Select your country (example: United States).
Tap "Sign up now" on the lower right corner of the screen.
Input an email address, create a nickname and password, then hit "Done".
The account signs up successfully and auto logs in.
Configuration on phone app
Power the camera
Uncover the rubber seal cover on the camera bottom, press and hold the camera power button for 5 seconds to turn it on. Make sure the front indicator is red — it blinks red when ready for configuring the network.
If it doesn't turn on, please charge it with a DC 5V / 2A power adapter for 15 minutes to wake it up.
NOTE: A DC 5V / 2A power adapter is not included in the package — please use your phone charger.
Wi-Fi configuration
Add device on app. Run the CloudEdge app on your phone, tap "Add device" on screen and choose "Battery Camera".
Make sure you follow the correct procedure to power on the camera, and the indicator turns red and blinks slowly.
Take the camera and smartphone close to the router (30 to 100 cm) and connect the phone to the router's Wi-Fi. 2.4 GHz Wi-Fi only is supported. Reset the camera by quickly pressing the power button twice; after you hear the prompt "bugu" sound the camera is reset.
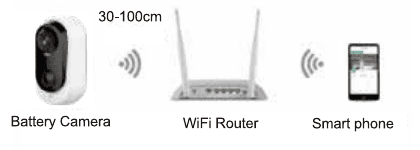
Select the 2.4 GHz Wi-Fi SSID and enter the password, then click "Next". The device does not work with 5G Wi-Fi networks.
Follow the "Operation instruction" on the app, remove the camera lens film and hit "Next" to get a QR code. Scan the QR code with the camera lens at a distance of 10–15 cm (3.9–5.9 inch) until the QR code is recognized. After you hear the sound "Bugu", the scan succeeded.
Click "Next", and the camera will start connecting to Wi-Fi. Once the connection is complete, a "connection successfully" notification page will pop up. Then click "Next" to switch to the "Devices" screen, and Wi-Fi connection is done. Now you can watch live video.
SD card recording
This product does not include an SD card. If you need an SD card to store your files, please purchase it by yourself.
SD card requirements:
- Recommend the use of brand-name cards such as SanDisk, Samsung, etc.
- Support 2–128 GB capacity.
- Recommend the use of standard Class 10 SD cards.
- Only FAT32 format is supported.
Insert the memory card into the SD card slot of the device and the device will automatically start saving the video.
How to watch videos on SD card:
- Click the "History" or "Alert" button on the alarm information icon in the app to enter the video playback interface. Drag the timeline or select the alarm point to find the corresponding time period you want to play back.
- Insert the SD card into your computer. The video file is in MP4 format. You can play the video directly using a video player.
More statement about camera
The wireless battery smart camera is not designed for 24-hour surveillance — it sends alert notifications and saves recordings only when motion is detected.
After Wi-Fi configuration is finished, the camera will be in standby status when not watching video or no motion is detected, and the front indicator is off.
The camera supports setup on one phone only; you need to reset to set up on a new phone. It allows sharing the device on the default mobile phone with others. Refer to Share device with family for detailed instructions.
3. Share Device with Family
Sign up a new account
Download the CloudEdge app on another phone, sign up and login with this new account. (Follow the previous Create account and login instructions to create a new account.)
Device share
This function can be achieved through "Shared".
Invite your friends to download and install the CloudEdge app and login.
Click the "Shared" icon → "shared family" and tap the home you want to share on the listing → "+Add member".
There are two methods to establish sharing:
- A. QR code sharing — Tap "Scan QR Code" on the default phone app and scan the family's phone app QR code (1. Me → Tap the QR code on the right top, or 2. Me >> My Information >> My QR Code).
- B. Sharing through account — Choose "enter account" and input the family account ID.
Shared device
Click the "Shared device" to watch the operation video, and then follow the steps to complete device sharing.
Tip: When sharing, please make sure the app account is registered in the same region. Otherwise, you will not be able to share successfully.
4. CloudEdge App Menu
Main page
- Simultaneous 4-split-screen playback
- Add devices
- Camera display mode and device management
- Recording date & time
- Hide current view
- Go to the video view page
- Playback motion recordings
- Camera ID or name
- Main functions
Main functions
| Function | Description |
|---|---|
| Notification | Turn on/off device's notification |
| Device Share | Share device with others |
| Alarm Message | Check alarm message |
| Setting | Adjust device setting |
| Help & Feedback | Send feedback to our techs |
Preview page
- Parameter settings (alarm settings, video, lighting, device information, firmware upgrade, etc.)
- Turn the microphone on/off
- Video definition settings (SD, HD options)
- Full screen display
- SD card video playback
- Cloud storage video playback
- Manual screen-shot
- Voice intercom (long press to talk)
- Manually capture video clips
- Turn on/off motion detection
- Turn on/off floodlight
- Turn on/off siren
- Audio warning and strobe light
- Full color mode
- Store screen-shots and manual video files
Tip: To zoom in or out of the image, please pinch or stretch two fingers on your phone screen.
Video replay page
- Video timeline with drag-and-drop time selection
- Timeline zoom button
- Select video playback date
- Select alarm video clips
- Video screen-shot
- Record video — first click to start recording, click again to end recording
- Save video screen-shots and recorded videos
Setup page
- Get device information (modify device name, network information, MAC address, time zone)
- Enable to receive alert notifications
- Installation guide, network diagnostics
- Enable 12-hour clock
- Turn off the light, night vision settings, screen flip
- Adjust speaker volume
- Adjust the detection sensitivity, set alert plan, the length of recording, alarm interval, motion detection settings, optimize the battery life
- Check the battery level
- View SD card capacity, format
- Cloud storage service
- Version upgrade
- Restart the device to reboot it
- Delete the device and operate it before rewiring
5. Installation
Camera surveillance area
When installing the camera, the PIR sensor should not be vertically aligned with the moving objects — it may cause the camera not to be that sensitive as it should be. It is recommended that the camera be tilted more than 10 degrees to capture motions.
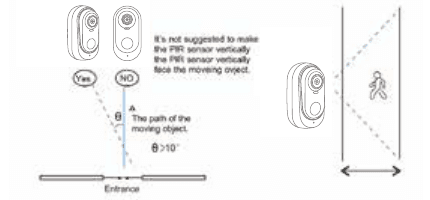
Camera installation
Use the electric drill to drill holes in the wall, fix the bracket base with screws.
Then rotate the bracket wing clockwise to install the camera. And rotate the bracket wing counterclockwise to remove the camera when necessary.
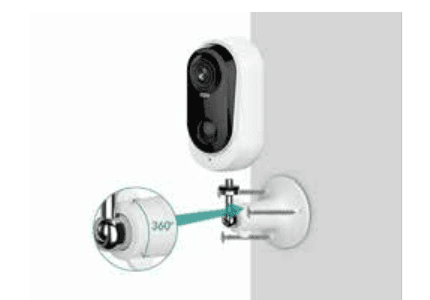
Some tips on installation:
- From "Setting", there is battery management — you can view current battery and the schematic of charging.
- From "Setting", there is an installation guide. Tap "Next" and it will help you test the Wi-Fi strength of the position; please install it where the Wi-Fi signal strength shows great.
Tips to reduce false alarms
- Do not install the camera in a place directly facing bright objects or light sources, including sunshine, bright lamp lights, etc.
- Please do not install the camera in the place where vehicles and personnel frequently go in and out, such as a street.
- Keep the camera away from outlets such as air-conditioning vents, humidifier, heat-transfer openings of projectors, etc.
- Do not leave the camera facing the mirror or glass.
- Keep the camera at least 1 meter away from wireless devices to avoid wireless interference.
- Please make sure there are no obstacles within 3 meters in front of the lens.
6. Troubleshooting & FAQ
Trouble shooting sheet
| No. | Description | Solution and operation |
|---|---|---|
| 1 | Unable to connect | 1) Check your Wi-Fi name and password. 2) Ensure your Wi-Fi is 2.4G Hz, not 5G Hz Wi-Fi. 3) Ensure your camera and phone close to router. |
| 2 | Reset | 1) Press power button twice, hear one tone. 2) Red light turns to flash slowly. |
| 3 | Change to a new network | 1) If camera is online, you can select one new Wi-Fi on camera settings, input password to change. 2) If camera is not online, reset the camera and connect it to new Wi-Fi. |
| 4 | Failed to add device | Please enable CloudEdge app cellular data on in mobile settings. |
| 5 | No alarm push | Please enable CloudEdge app notification in mobile settings. |
| 6 | No alarm video record | 1) Please insert SD card. 2) Please format the SD card before use. |
FAQ
- Battery Camera doesn't support 7/24 constantly recording — only supports motion events recording when motion detected.
- Battery camera doesn't support any PC software or browser.
- Battery Camera doesn't support 5G Wi-Fi.
- Battery Camera charging supports DC 5V 1A/2A charger; you can use your phone charger. It takes 5–6 hours to get fully charged.
- IP battery camera supports offline recording with SD card. The IP battery camera cannot work without Wi-Fi — it supports events recording when Wi-Fi disconnected, but firstly the camera should be configured with a 2.4G Wi-Fi network.
- It is unlimited to add IP camera to app, and also unlimited to share video to other persons. But the system only allows 2 devices online simultaneously.
- Regarding with SD card:
- 7.1 Please kindly ensure SD card is a good brand such as Kingston, SanDisk, Class 10 level, up to 128 GB.
- 7.2 Please first format the SD card on PC, or plug it in again when CloudEdge cannot read the SD card.
- 7.3 If no SD card in camera, there is no alarm recording — the system will snap photos and save them in the "Events" list. If an SD card is inserted, there will be no snapshot photos.
Still need help? Visit the Battery Camera FAQs or contact DIHOOM customer support at [email protected].
DEATTI GX5S Battery Camera User Manual
User manual for the DEATTI GX5S wire-free battery camera, covering the product layout, status LED, CloudEdge app setup, Wi-Fi pairing, installation, the live-view interface, motion detection, camera sharing and troubleshooting.
G-Homa Battery Camera User Manual
User manual for the G-Homa wireless security battery camera, covering the camera layout, LED status, app installation, account registration, Wi-Fi pairing, charging, installation and PIR motion-sensor setup with the CloudEdge app.