 Dokumentacja CloudEdge App
Instrukcja obsługi bezprzewodowej kamery bateryjnej ieGeek (składany stojak, reflektor combo)
Instrukcja obsługi bezprzewodowej kamery bateryjnej ieGeek – opis kamery, wskaźniki LED, pobieranie aplikacji, parowanie przez Bluetooth i Wi-Fi, ładowanie, montaż, uwagi dotyczące czujnika ruchu PIR oraz najczęstsze pytania.
Niniejsza instrukcja opisuje sposób konfiguracji i użytkowania bezprzewodowej kamery bateryjnej ieGeek wraz z aplikacją ieGeek Cam / CloudEdge.
Potrzebujesz więcej pomocy? Zapoznaj się z Najczęstszymi pytaniami dotyczącymi kamery bateryjnej lub w aplikacji przejdź do „Ja" – „FAQ" – „Dokumenty pomocy" – „Kamera bateryjna".
1. Opis kamery
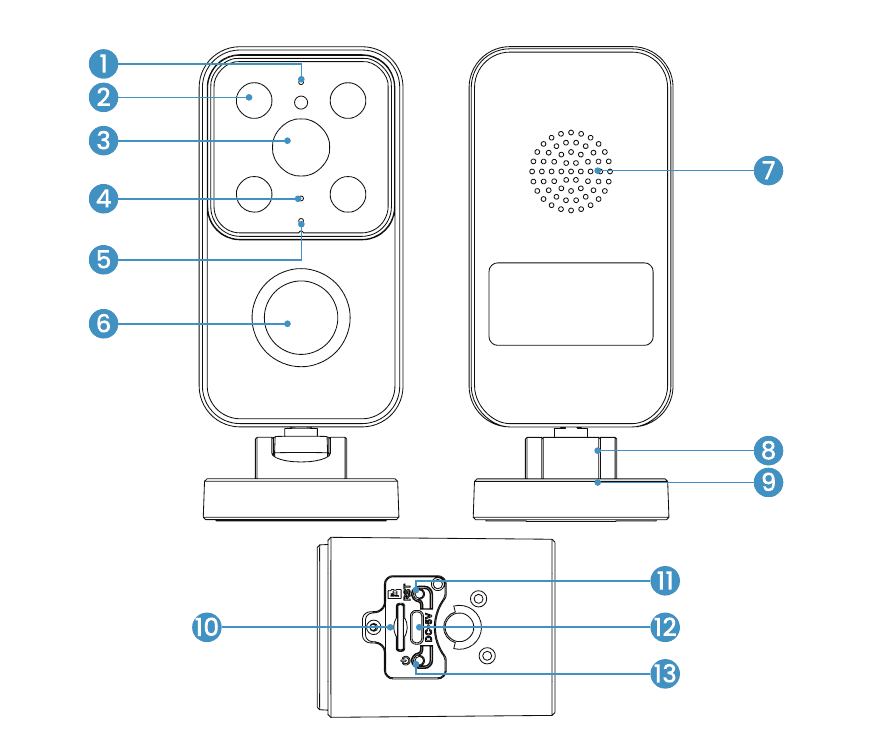
- Wskaźnik stanu pracy
- Reflektor + kombinowane światło podczerwone
- Obiektyw
- Mikrofon
- Wskaźnik ładowania
- PIR
- Głośnik
- Składany stojak
- Port mocowania uchwytu
- Gniazdo karty SD
- Przycisk Reset
- Port ładowania
- Przycisk zasilania
Szczegóły przycisków i wskaźników
| Element | Opis |
|---|---|
| Przycisk zasilania | Naciśnij i przytrzymaj przez 5 s, aby włączyć/wyłączyć kamerę |
| Reset | Naciśnij i przytrzymaj przez 5 s do usłyszenia dźwięku „Boogu", aby zresetować lub przywrócić ustawienia fabryczne |
| Gniazdo karty SD | Obsługuje lokalne przechowywanie danych na karcie SD (do 128 G) |
| Wskaźnik ładowania | Czerwony = ładowanie, niebieski = w pełni naładowany |
Wskaźnik stanu pracy
| Wskaźnik | Znaczenie |
|---|---|
| Świeci ciągłym czerwonym | Sieć jest niedostępna |
| Wolno miga na czerwono | Oczekiwanie na połączenie Wi-Fi; trwa dodawanie urządzenia |
| Szybko miga na czerwono | Trwa łączenie z Wi-Fi |
| Świeci ciągłym niebieskim | Wi-Fi połączone pomyślnie; kamera działa normalnie |
2. Pobieranie aplikacji i rejestracja konta
Pobierz aplikację „ieGeek Cam"
- Metoda 1: Pobierz aplikację „ieGeek Cam" lub „CloudEdge" z App Store (iOS i Android).
- Metoda 2: Zeskanuj kod QR aplikacji „ieGeek Cam" zamieszczony w instrukcji.
Wskazówka: Przy pierwszym uruchomieniu aplikacji włącz poniższe 2 uprawnienia:
- Zezwól aplikacji „ieGeek Cam" na dostęp do mobilnej transmisji danych i sieci WLAN – bez tego nie będzie można dodać kamery IP.
- Zezwól aplikacji „ieGeek Cam" na odbieranie powiadomień push – bez tego telefon nie będzie otrzymywał alertów po wykryciu ruchu ani po włączeniu alarmu dźwiękowego.
Rejestracja konta
Nowi użytkownicy muszą zarejestrować się za pomocą adresu e-mail. Kroki są następujące:
Kliknij „Zarejestruj się".
Postępuj zgodnie z instrukcjami, aby ukończyć rejestrację konta.
Zaloguj się.
- Podczas rejestracji wybierz region, w którym faktycznie się znajdujesz, oraz właściwy kod kraju. (Kamera nie może być współdzielona między różnymi regionami rejestracji.)
- Zarejestruj się za pomocą adresu e-mail.
3. Jak dodać kamerę do aplikacji
Przed użyciem:
- Włóż kartę Micro SD przed włączeniem kamery – w przeciwnym razie karta nie zostanie wykryta.
- Podczas konfigurowania Wi-Fi umieść kamerę i smartfon w odległości 30–100 cm (1–3 stopy) od routera.
- Upewnij się, że kamera korzysta z sieci Wi-Fi 2,4 GHz.
Metoda 1: Konfiguracja przez Bluetooth (zalecana)
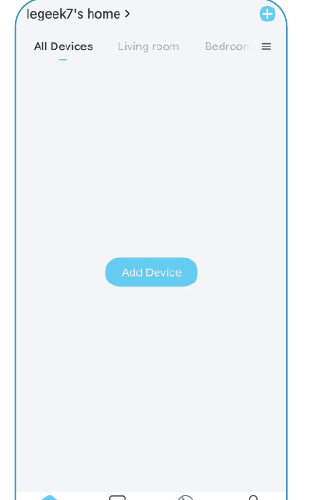
Na ekranie głównym kliknij „Dodaj" lub „+" w prawym górnym rogu, a następnie kliknij „Dodaj urządzenie".
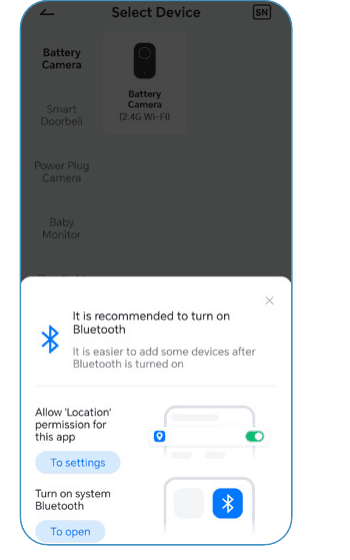
Jeśli Bluetooth lub Wi-Fi telefonu nie jest włączone, aplikacja wyświetli okno podręczne – zezwól na włączenie Bluetooth.
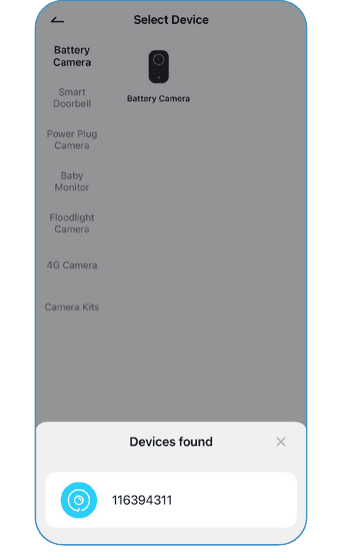
Po włączeniu Bluetooth i Wi-Fi aplikacja automatycznie wyszuka włączone i nieskojarzone urządzenia. Wybierz urządzenie z listy, wskaż swoją sieć Wi-Fi 2,4 GHz i wprowadź hasło.


Metoda 2: Połączenie przez Wi-Fi
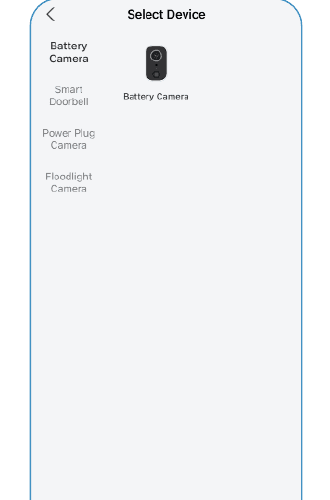
Kliknij „+", aby dodać urządzenie.
Wybierz Kamera bateryjna.
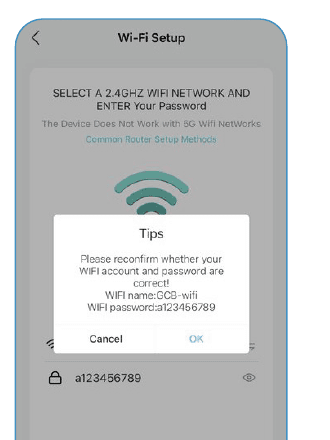
Wprowadź hasło Wi-Fi. Sprawdź ponownie, czy nazwa sieci i hasło są poprawne.
Zeskanuj kod QR. Usuń wszelkie folie ochronne z obiektywu. Kliknij Dalej, aby wyświetlić kod QR, i przybliż go do kamery. Trzymaj telefon w odległości 15–25 cm (5–8 cali) od obiektywu.

Włącz kamerę. Naciśnij i przytrzymaj przycisk zasilania, aby uruchomić urządzenie. Jeśli urządzenie jest uśpione, naciśnij przycisk [kamera bateryjna], aby je wybudzić. Pozostań w pobliżu routera, aby uzyskać najlepszy sygnał.

Zresetuj urządzenie. Naciśnij i przytrzymaj przycisk RESET na urządzeniu przez 4–5 sekund (szczegóły znajdziesz w instrukcji obsługi). Poczekaj na migające CZERWONE światło wskaźnika, a następnie kliknij Dalej.

Poczekaj na połączenie. Upewnij się, że urządzenie jest włączone, podłączone do routera oraz że urządzenie i telefon są w tej samej sieci.
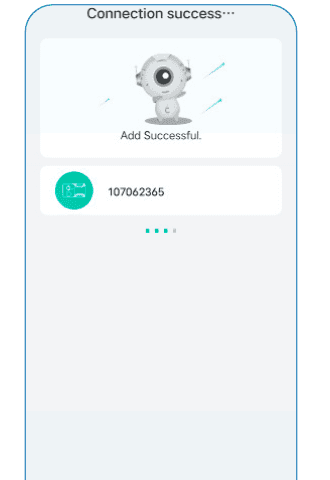
Urządzenie dodane. Po wyświetleniu komunikatu „Dodano pomyślnie" kamera jest podłączona.
Uwaga: Jeśli kamera nie chce się włączyć, najpierw podłącz ją do zasilacza DC 5 V 2 A i ładuj przez co najmniej 15 minut.
Kamera nie łączy się z Wi-Fi?
- Upewnij się, że sieć Wi-Fi, z którą łączy się kamera, działa w paśmie 2,4 GHz.
- Sprawdź, czy hasło Wi-Fi jest prawidłowe. (Uwaga: hasło Wi-Fi nie może zawierać apostrofów, podkreślników, spacji ani ukośników (/).)
- Jeśli router osiągnął maksymalną liczbę podłączonych urządzeń, inne urządzenia nie będą mogły się połączyć.
- Upewnij się, że kod QR na ekranie telefonu jest wyraźny, a odległość między telefonem a obiektywem kamery wynosi 10–15 cm (3,9–5,9 cala) podczas skanowania.
- Jeśli kamera nadal nie łączy się z Wi-Fi, spróbuj ponownie zainstalować aplikację, zresetować kamerę, ponownie uruchomić router, a następnie dodać kamerę jeszcze raz.
- Jeśli wypróbowałeś wszystkie kroki, ale problem nadal występuje, napisz do nas na adres [email protected], podając numer zamówienia i opis problemu.
4. Ładowanie baterii
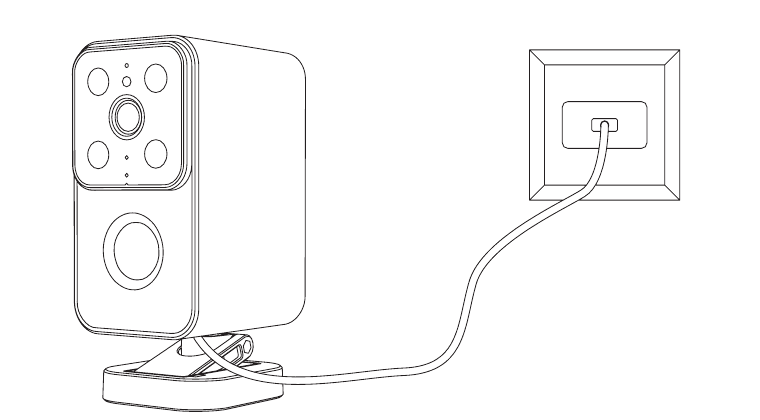
Ładuj baterię za pomocą zasilacza 5 V 2 A.
- Bateria jest wbudowana i nie można jej wyjąć.
Przed pierwszym użyciem naładuj kamerę do pełna. Aby zachować odporność na warunki atmosferyczne, po zakończeniu ładowania zawsze zakrywaj port ładowania gumową zatyczką.
Wskaźnik ładowania:
- Czerwona LED — Ładowanie
- Niebieska LED — W pełni naładowany
5. Instrukcja montażu
Uchwyt na spodzie kamery ma 4 otwory montażowe. Możesz użyć tylko lewego i prawego otworu albo tylko górnego i dolnego otworu. Pozwala to stabilizować kamerę zarówno poziomo, jak i pionowo.

Przed montażem upewnij się, że wybrane miejsce instalacji jest wystarczająco mocne, a następnie sprawdź obraz kamery.
Metoda 1: Montaż zdejmowany (zalecany – łatwe zdjęcie do ładowania)
Odchyl podstawę w dół. Kamera/podstawa może się obracać.
Wybierz miejsce montażu kamery (zaznacz pozycje śrub ołówkiem).
Wywierć w ścianie 2 otwory (lewy i prawy).
Wsuń 2 kołki rozporowe do otworów (lewy i prawy otwór).
Wkręć 2 śruby w otwory. (Nie wkręcaj śrub do końca – powinny nieco wystawać.)
Rozłóż składany uchwyt, aby ustawić kąt kamery.
Wyrównaj otwór w podstawie uchwytu kamery ze śrubami i zawieś kamerę.
Metoda 2: Montaż stały
Rozłóż składany uchwyt, aby ustawić kąt kamery. Kamera/podstawa może się obracać. Ustaw podstawę pod kątem pokazanym na rysunku.
Wybierz miejsce montażu kamery (zaznacz pozycje śrub ołówkiem).
Wywierć w ścianie 2 otwory (górny i dolny).
Wsuń 2 kołki rozporowe do otworów (górny i dolny otwór).
Przyłóż kamerę do otworów i wkręć 2 śruby.
Sprawdź obraz kamery i dostosuj jej kąt.
- Przy montażu na zewnątrz użyj wodoszczelnej zatyczki kamery, aby zapewnić lepszą odporność na warunki atmosferyczne.
- Zamontuj kamerę na wysokości 2–3 metrów (7–10 stóp) nad ziemią. Na tej wysokości zasięg czujnika ruchu jest maksymalny.
- Aby zapewnić skuteczne wykrywanie ruchu, montuj kamerę pod kątem. Jeśli poruszający się obiekt zbliża się do czujnika PIR prostopadle, kamera może nie wykryć ruchu.

- Wysokość montażu — 2–3 metry
- Zasięg wykrywania PIR — 2–10 metrów
6. Uwagi dotyczące czujnika ruchu PIR
Zasięg wykrywania czujnika PIR
Zasięg wykrywania PIR można dostosować do własnych potrzeb. Skonfiguruj go w Ustawieniach urządzenia w aplikacji ieGeek Cam zgodnie z poniższą tabelą.
| Czułość | Odległość wykrywania (poruszające się i żywe obiekty) |
|---|---|
| Poziom 1–3 (Niska) | Do 2–5 metrów |
| Poziom 4–7 (Średnia) | Do 5–8 metrów |
| Poziom 8–10 (Wysoka) | Do 8–10 metrów |
Ważne wskazówki dotyczące ograniczenia fałszywych alarmów
- Nie kieruj kamery w stronę obiektów emitujących jasne światło, w tym bezpośredniego słońca, jaskrawych lamp itp.
- Nie umieszczaj kamery w pobliżu wylotów powietrza, takich jak kratki klimatyzatora, nawilżaczy czy otworów wentylacyjnych projektorów.
- Nie instaluj kamery w miejscach narażonych na silny wiatr.
- Nie kieruj kamery bezpośrednio na lustro.
- Trzymaj kamerę co najmniej 1 metr od urządzeń bezprzewodowych, w tym routerów Wi-Fi i telefonów, aby uniknąć zakłóceń.
7. Najczęstsze pytania
Bardziej szczegółowe odpowiedzi znajdziesz w aplikacji: „Ja" – „FAQ" – „Dokumenty pomocy" – „Kamera bateryjna".
Urządzenie sygnalizuje tryb offline?
- Sprawdź, czy urządzenie jest włączone, i upewnij się, że kontrolka pracy świeci normalnie.
- Upewnij się, że w bieżącej lokalizacji jest dobre pokrycie Wi-Fi i stabilna sieć – sygnał Wi-Fi powinien przekraczać 75%.
- Możesz użyć aplikacji analizatora Wi-Fi innej firmy, np. „WiFi Analyzer", aby przeanalizować aktualne pokrycie sygnałem i poziom zakłóceń. Jeśli pokrycie jest słabe lub zakłócenia duże, zalecamy przeniesienie kamery, zmianę pozycji routera lub zastosowanie routera pomocniczego.
- Unikaj używania wzmacniaczy Wi-Fi.
Jak zmienić router lub hasło Wi-Fi?
Usuń kamerę z konta CloudEdge. Po zresetowaniu urządzenia dodaj je ponownie, używając nowej sieci Wi-Fi i nowego hasła.
Kamera nie łączy się z Wi-Fi?
- Upewnij się, że sieć Wi-Fi podłączona do telefonu działa w paśmie 2,4 GHz, a w bieżącej lokalizacji jest dobre pokrycie i stabilna sieć (sygnał Wi-Fi > 75%).
- Unikaj używania wzmacniaczy Wi-Fi.
- Sprawdź, czy hasło Wi-Fi zostało wprowadzone poprawnie.
W rzadkich przypadkach może wystąpić niezgodność sieci, przez którą aplikacja i kamera nie mogą się poprawnie połączyć. W takim przypadku nasza kamera nie jest kompatybilna z tą siecią – prosimy o kontakt z działem obsługi posprzedażnej ([email protected]).
Szybkie zużycie baterii?
- Przy słabym sygnale Wi-Fi (poniżej 75%) zużycie energii wzrasta.
- Wysoka częstotliwość wyzwalania PIR oraz używanie podczerwieni lub białego światła w nocy zwiększają zużycie energii.
- Częste zdalne uzyskiwanie dostępu do kamery z telefonu również zwiększa zużycie energii.
- Przy pierwszym użyciu zaleca się rozładowanie baterii do 10%, a następnie naładowanie do 100% – pomaga to utrzymać kondycję baterii litowej.
Kamera nie wykrywa ruchu?
- Przy niestabilnej sieci wiadomości mogą nie być wysyłane na czas po wyzwoleniu czujnika PIR. Sprawdź najpierw stan sieci i przetestuj kamerę w miejscu z dobrym pokryciem.
- Nieodpowiednia pozycja montażu może uniemożliwić wyzwolenie czujnika PIR. Jeśli kamera jest zamontowana zbyt wysoko, obiekt jest zbyt daleko lub zbyt mały, kamera może nie wykryć ruchu. Wielokrotnie dostosowuj pozycję montażu zgodnie z wymaganiami dotyczącymi wyzwalania.
Karta SD nie jest rozpoznawana?
- Obsługiwana pojemność to 16–128 GB (karta Micro SD).
- Przed użyciem sformatuj kartę Micro SD na komputerze w systemie plików FAT32 lub exFAT, następnie włóż ją do kamery i ponownie sformatuj kartę pamięci bezpośrednio w kamerze.
- Jeśli karta Micro SD przestaje być rozpoznawana podczas użytkowania, jest to zwykle problem z jakością karty – wymień ją na kartę o bardziej stabilnych parametrach odczytu i zapisu.
Instrukcja obsługi ieGeek Battery Camera (czułość PIR poziom 1–10, bateria 90–120 dni)
Konfiguracja, parowanie Wi-Fi, funkcje aplikacji, alarmy ruchu, ładowanie, montaż i rozwiązywanie problemów bezprzewodowej kamery akumulatorowej ieGeek z aplikacją CloudEdge.
Instrukcja obsługi ieGeek Battery Camera (kompatybilna z panelem słonecznym)
Przewodnik po konfiguracji, ładowaniu, montażu i rozwiązywaniu problemów bezprzewodowej kamery akumulatorowej ieGeek, sparowanej z aplikacją CloudEdge.