 CloudEdge App Docs
MECO ELEVERDE Smart WiFi Security Outdoor Camera
Quick start guide for the MECO ELEVERDE 100% wire-free battery outdoor camera, covering product overview, app download, account registration, camera pairing, live view, history playback, cloud, settings, sharing, PIR detection, installation and night-vision tips.
This guide explains how to set up and use the MECO ELEVERDE Smart WiFi Security Outdoor Camera, a 100% wire-free outdoor camera with rechargeable battery, with the CloudEdge app.
Need more help? See the Battery Camera FAQs.
1. Product Overview

Front:
- Working Status Indicator
- Lens
- PIR
- Microphone
- Screw interface
- Iron Ball Wall Mount
Back:
- Speaker
- TF Card Slot
- Reset Key
- Power Key
- DC5V USB Port
- LED Light
- Power Key: Press and hold for 5 seconds to power on/off. Quick press 1 second to wake up.
- Reset Key: Press and hold for 5 seconds, it will reset and restart.
LED Status:
| LED Status | Meaning |
|---|---|
| Solid on Blue | Wi-Fi connected, normal work |
| Slow blinking Red | Awaiting Wi-Fi connection |
| Fast blinking Red | Device is abnormal and needs to be reset |
2. Download the App
Download the CloudEdge app from the App Store or Google Play (scan the QR codes printed in the manual).
Please ALLOW the below 2 permissions when first running the App:
- Allow CloudEdge to use mobile cellular data and wireless LAN (if not allowed, it will fail to add the IP camera).
- Allow CloudEdge to get system push message permissions (when the camera triggers motion detection or audible alarm, the phone can receive alarm push).
Register Account
New users need to register by e-mail. Click "Sign Up", enter your email address and set your Nickname and Password to complete registration.

Add Camera
After logging in, click on "+" and "Battery Camera".
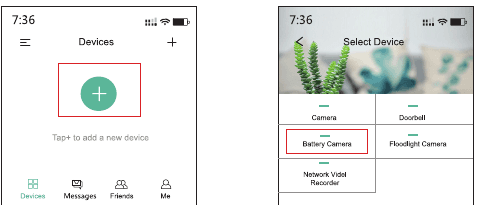
Press and hold for 5 seconds to power on; make sure the LED indicator flashes RED slowly.

Select the router Wi-Fi and enter the correct password. (Note: Wi-Fi only supports 2.4G, does not support 5G.) Put the QR code in front of the camera lens 4-6 inch, then tap Next after hearing the "Bugu".

After scanning the code, wait for Device Found, you can edit the camera name here, then click "Done".

3. Function Overview
Devices

- Hide or show the preview camera image(s).
- Access to the videos recorded.
- Enter the interface of Cloud directly.
- Add the new camera.
Messages
- Device Share — Show friends list, show the camera you shared.
- Alarm Message — Will show all the videos recorded after tapping on the preview camera image you'd like to check, then tap > on the left to watch the videos recorded.
- System Messages — Show friends add notifications, as well as other system information.
Live

- A. Setting
- B. Battery capacity
- C. SD / HD quality switching
- D. Full Screen
- E. Signal strength
Live view controls:
- Video quality — SD is 720P to ensure the smoothness of the video. HD for 1080P can provide better clarity, but requires signal strength over 90% and network stability.
- Screenshot — Click to capture real-time photos saved to your phone.
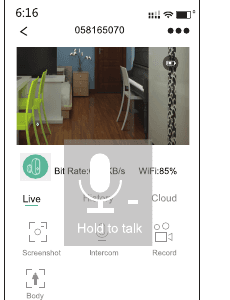
- Intercom — Press and hold the voice button to talk to other people through the camera.
- Body Detection — The option is ON by default. The camera will send an alarm message to your mobile phone after triggering motion detection. If you switch it off, you can only watch the live video.
- Battery capacity — If the battery capacity is less than two, please charge as soon as possible. (The camera battery below 20% will also remind you to charge as soon as possible.)
- Wi-Fi signal — Please ensure that the signal strength is higher than 80%, otherwise it will easily cause poor connect. Please get the camera closer to the router for better signal.
- Record — Click to start recording live video, click again to end, and the video will be automatically saved to your phone.
History
If you need to watch the playback recording, you need to insert a CLASS 10 memory card into the camera.

Timeline: You can zoom in or out on the playback alarm video, the blue area represents the recording duration, the red line represents the alarm point, and the blank position indicates no alarm recording.

- Calendar — When the time on the calendar is blue, it means that there is an alarm video on the day, you can click to select play.
- Screenshot — There are photos in the playback video that need to be saved. You can click Pause and then click Save to Phone.
- Record — There is a video to be saved in the playback video. Click Start, click again to end, and the video will be saved to the phone.
- Alarm — Contains all alarm time points, click to watch the alarm video.
Cloud
- The first purchase has a 7-day free cloud service that can be experienced and can be used directly.
- If you insert a memory card and open a cloud service, the video will be recorded on both the memory card and the cloud service.
Setting
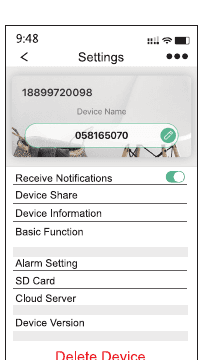
- Device name — Click to change your camera name.
- Receive notifications — The camera does not push an alert message to the phone when it is turned off.
- Device share — Click Share to send this device to your family.
- Device info — View signal strength, SN code, and IP address.
Basic Function:
- Rotate View — When you flip it on the ceiling, click ON to rotate the screen 180°.
- Night Vision — Turn off or turn on night vision, or set it Automatic to change.
- Speaker Volume — Adjust the volume of the camera speaker.
- Power management — Remaining battery of the camera.
Other settings:
- Alarm Setting — Adjust sensitivity high and low. Alarm only when people appear.
- SD Card — Check the memory card capacity and format the memory card.
- Cloud Server — Tap it to subscribe the cloud plan.
- Device version — View the firmware version.
4. Other Functions
How to Share the Camera
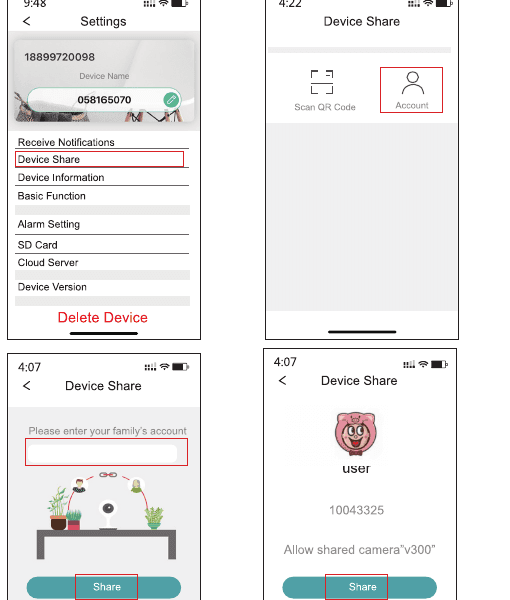
Your family's mobile phone also needs to download the "CloudEdge" app, and use his email to create a new account.
After successful registration, go to the camera - click on Settings "...".
Click Device Share - Add - Account, enter your family's email account.
Click on Share after searching, then your family can use it.
PIR Function
Please don't touch or press it.
The farthest detection distance of the PIR is 10 meters. You can also adjust the sensitivity to High or Low in the settings.
Principle: When the detected object temperature is higher than 20°, it will wake up the camera. If it is detected that the object is a human, it will push the alarm message to the mobile phone and record the detection video on the memory card.

| Sensitivity | Detecting Distance (for moving and living things) |
|---|---|
| High | Up to 5 meters (16ft) |
| Low | Up to 10 meters (33ft) |
How to Install the Camera
Reduce false alarms or alarm delays. The camera installation needs to have a tilt angle, which can effectively improve the monitoring range, and reduce the moving object too fast so that it is not recorded.
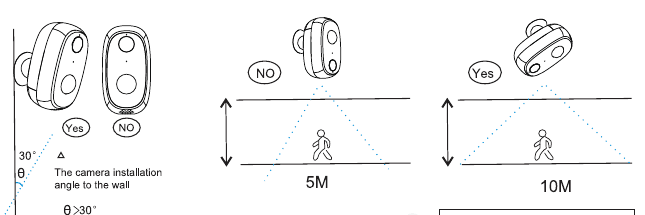
- The camera installation angle to the wall: θ > 30°.
Talk to camera and hear from the camera?
Press and hold the intercom button to speak, and the person in front of the camera can hear the sound from the camera.
How to Get Better Night Vision
Do not have direct illumination of the lens, do not cover it or place it in front of the glass, and do not have obstacles within 1 meter of the lens.
The best place for night vision:

5. Tips
Please install the microSD Card (not included) before powering on the camera. This camera supports microSD Card with capacity up to 128G. If a microSD Card is needed, please contact us at [email protected] to get a Free 32G microSD Card.
Press and hold the Power Button for 5s to turn on/off the camera. If it does not power on, please use a USB adapter (not included) with standard 5V 1A/2A output to charge, then try again.
Press the Power Button once to wake up the camera from sleep mode.
The camera is not designed for 7/24 all day recording, it only starts to record videos when the PIR sensor detects the movements of human body.
JouSecu ZS-GX5 Battery Camera
User guide for the JouSecu ZS-GX5 wire-free rechargeable battery security camera, covering setup in the CloudEdge app, PIR detection, night vision, battery management and troubleshooting.
Topcony ZS-GX1S Battery Camera
User manual for the Topcony ZS-GX1S wireless battery camera, covering hardware layout, app setup, adding the camera to Wi-Fi, installation and FAQs.