 CloudEdge App Docs
ieGeek Battery Camera
User manual for the ieGeek wireless battery security camera, covering product overview, adding the camera to the app, Wi-Fi setup, charging, installation, PIR motion detection, and troubleshooting.
The ieGeek Battery Camera is a wireless rechargeable security camera managed through the CloudEdge app.
Need help? Please contact ieGeek before returning your product. Most questions can be answered through the online support center at www.iegeek.com or the after-sale mailbox at [email protected]. You can also browse the Battery Camera FAQs.
Warming tips
- Before connecting this camera to Wi-Fi, please ensure the Wi-Fi signal strength is over 85% to keep a good Wi-Fi signal.
- This wireless camera supports event recording when Wi-Fi is disconnected.
1. Product overview
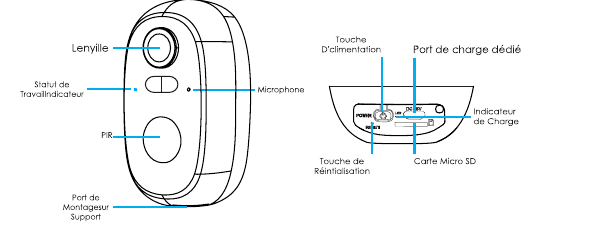
- Lens
- Working Status Indicator
- Microphone
- PIR (motion sensor)
- Mounting Port (on bracket)
- Power Button
- Dedicated Charging Port
- Charging Indicator
- Reset Button
- Micro-SD Card
| Item | Description |
|---|---|
| Power button | Press and hold the power button for 5 seconds to turn the camera on/off. |
| Reset button | Press and hold for 5 seconds until you hear "boogu" to reset or restore factory settings. |
| SD card slot | Supports local storage on an SD card (up to 128 GB). |
| Charging indicator | Red means charging is in progress; blue means charging is complete. |
Working status indicator
| LED status | Indication |
|---|---|
| Solid red | Camera network abnormal |
| Slow flashing red | Waiting for a Wi-Fi connection |
| Fast flashing red | Wi-Fi connection in progress |
| Solid blue | Camera working normally |
2. Add the camera to the app
Download the "CloudEdge" app
- Method 1: Download the "CloudEdge" and "ieGeek Cam" app from the App Store (iOS) or Google Play (Android).
- Method 2: Scan the QR code of the "CloudEdge" app to download it.
Please enable the two permissions below when you use this app for the first time.
- Allow the "CloudEdge" app to access cellular mobile data and the local wireless network, otherwise it will not be able to add the IP camera.
- Allow the "CloudEdge" app to receive a push message, or the phone will not receive an alarm when motion detection or the sound alarm is triggered.
Open an account
New users need to register by email:
Tips
- Please use the correct email address.
- Please select the correct country code.
- When registering a new account, please select the region where you are actually located. (Different registration regions cannot share the camera.)
3. How to add a camera to the app
Before you start:
Wi-Fi connection steps

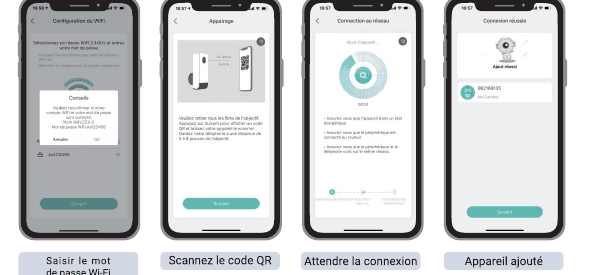
If the camera cannot be turned on, please first plug in the DC 5V 2A power adapter to charge the camera for 15 minutes.
When connecting to Wi-Fi for the first time, please make sure that:
- The Wi-Fi currently connected to the mobile phone is a 2.4 GHz network.
- The current location has good Wi-Fi coverage and a stable network (Wi-Fi signal above 75%).
- Avoid using Wi-Fi extenders.
- Check whether the Wi-Fi password is entered correctly.
If the connection fails, it is necessary to clearly verify whether the Wi-Fi password is entered correctly. In rare cases of special network incompatibility, the app and camera may not connect correctly. In that case the camera is not compatible — please contact after-sale service ([email protected]).
4. Charge the battery

- Charge the battery with a 5V 2A power adapter.
- The battery is a built-in battery and cannot be removed.
- Charge the battery with the ieGeek solar panel.
To better protect the camera from water, cover the dedicated charging port after charging — always with the rubber plug.
| Charging indicator | Indication |
|---|---|
| Red LED | Charging |
| Blue LED | Fully charged |
5. Installation guides
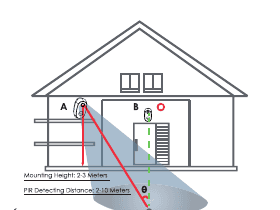
- Use the camera housing for better weather resistance when installing the camera outdoors.
- Install the camera 2–3 meters (7–10 feet) above the ground. This height maximizes the range of the motion detector.
- For effective motion detection, install the camera at an angle.
If a moving object approaches the PIR sensor vertically, the camera may not detect the movement.
Important notes on installation and charging
6. PIR motion sensor notes
PIR sensor detection distance
The PIR detection settings can be customized according to your specific needs. You can refer to the following table to configure them in Device Settings in the CloudEdge app.
| Sensitivity | Detection distance (for moving and living things) |
|---|---|
| Level 1–3 (Low) | Up to 2–5 meters |
| Level 4–7 (Medium) | Up to 5–8 meters |
| Level 8–10 (High) | Up to 8–10 meters |
Important notes to reduce false alarms
- Do not install the camera facing objects with bright lights, including the sun, bright lamps, etc.
- Do not place the camera too close to a high-traffic area. In our many tests, the recommended distance between the camera and the vehicle is 16 meters (52 feet).
- Do not place the camera near a power outlet, including air-conditioning vents, humidifier vents, or projector heat-transfer vents, etc.
- Do not install the camera where there is strong wind.
- Do not install the camera facing a mirror.
- Keep the camera at least 1 meter away from any wireless device, including Wi-Fi routers and phones, to avoid wireless interference.
7. FAQs
For more detailed FAQs, please connect to the app: "My Account" → "FAQ" → "Battery Camera".
Fast power consumption?
- In case of poor Wi-Fi coverage (for example, if the signal is below 75%), power consumption will increase.
- The PIR trigger frequency is high, and power consumption will increase when the infrared light / white light is on at night.
- The mobile phone often accesses the camera remotely, which increases power consumption.
- For the first use, it is recommended to use the power down to 10%, then charge it to 100%, which is good for the health of the lithium battery.
Camera offline?
- Confirm that the current location has good Wi-Fi coverage and that the network is stable; make sure the Wi-Fi signal is above 75%.
- You can try using a third-party Wi-Fi analysis tool ("analyzer") to analyze the current coverage of the Wi-Fi signal and the state of interference. If the coverage is poor and interference is significant, it is recommended to change the camera's installation position, adjust the router position, or use a second-floor router.
- Avoid using Wi-Fi extenders.
Update the password of your router or your Wi-Fi?
Remove the camera from your CloudEdge account, reset the device, then add it again using the new Wi-Fi or password.
The alarm is often triggered?
- In the app, lower the sensitivity of the motion detection alarm.
- Check whether there are objects in the camera's field of view that interfere with the PIR sensor and trigger it, such as outdoor air-conditioning units, moving cars, or passing pedestrians. You can adjust the angle of the camera to avoid these objects interfering easily.
- Enable the "alarm only when people are present" option and use the humanoid algorithm to filter out unnecessary alarms.
The camera does not detect?
- In case of an unstable network, the message may not be pushed in time after the PIR is triggered. In that case, first confirm the network status and remove the camera to verify it in an environment with good network coverage.
- An inappropriate installation position will lead to the PIR not triggering and not detecting. If the position is too high, the object is too far, or the object is too small, the camera will not trigger; try to adjust the installation position according to the trigger requirements several times.
Micro-SD card not recognized?
- The supported capacity is a 16–128 GB Micro-SD card.
- Before use, make sure to format the Micro-SD card as FAT32 or exFAT on the computer, then insert it into the camera and finally perform the formatting operation of the memory card on the camera again.
- If the Micro-SD card is not recognized during use, it is generally a Micro-SD card quality problem, and it is necessary to replace the memory card with one that reads and writes more stably.
8. FCC statement
This equipment has been tested and found to comply with the limits for a Class B digital device, pursuant to part 15 of the FCC rules. These limits are designed to provide reasonable protection against harmful interference in a residential installation. This equipment generates, uses and can radiate radio frequency energy and, if not installed and used in accordance with the instructions, may cause harmful interference to radio communications. However, there is no guarantee that interference will not occur in a particular installation. If this equipment does cause harmful interference to radio or television reception, which can be determined by turning the equipment off and on, the user is encouraged to try to correct the interference by one or more of the following measures:
- Reorient or relocate the receiving antenna.
- Increase the separation between the equipment and receiver.
- Connect the equipment into an outlet on a circuit different from that to which the receiver is connected.
- Consult the dealer or an experienced radio/TV technician for help.
Any changes or modifications not expressly approved by the party responsible for compliance could void the user's authority to operate the equipment.
This equipment complies with Part 15 of the FCC Rules. Operation is subject to the following two conditions:
- This device may not cause harmful interference, and
- This device must accept any interference received, including interference that may cause undesired operation.
FCC Radiation Exposure Statement: The equipment complies with FCC Radiation exposure limits set forth for an uncontrolled environment. This equipment should be installed and operated with a minimum distance of 20 cm between the radiator and your body.
FCC ID: 2AZL7-ZS-GX1S
Manufacturer: Shenzhen CTV Int Cloud Technology Co., Ltd. 601, B Building, No.10, East District, Shangxue Industrial City, Xinxue Community, Bantian Street, Longgang District, Shenzhen, Guangdong Province, China — www.iegeek.com — [email protected]
ieGeek Battery Camera User Manual (Solar Panel Compatible)
Setup, charging, installation and troubleshooting guide for the ieGeek wireless battery camera, paired with the CloudEdge app.
ieGeek ZS-GQ1 Battery Camera
User manual for the ieGeek ZS-GQ1 wireless battery-powered security camera, covering product details, app setup, installation, PIR alarm settings, and troubleshooting.