 CloudEdge App Docs
ieGeek Wire-free Battery Camera User Manual (Built-in Solar Panel)
Product layout, app download and account registration, Wi-Fi pairing, battery charging, installation, PIR motion settings and FAQs for the ieGeek wire-free battery camera with the CloudEdge app.
This guide covers the ieGeek Wire-free Battery Camera and how to set it up with the CloudEdge app, including the product layout, app download and account registration, Wi-Fi pairing, charging, installation, PIR motion sensor tips and FAQs.
For more help, see the Battery Camera FAQs. You can also reach ieGeek through the after-sale mailbox at [email protected] — most questions can be answered through the online support center at www.iegeek.com.
Warning Tip:
- Before connecting this camera to the Wi-Fi, please ensure the Wi-Fi signal strength is over 75% to keep a good Wi-Fi signal.
- This wireless camera supports events recording when Wi-Fi is disconnected.
1. Product Introduction

| # | Part | # | Part |
|---|---|---|---|
| 1 | Solar panel | 2 | Lens |
| 3 | Infrared light | 4 | Charging indicator |
| 5 | Reflector | 6 | Microphone |
| 7 | Working status indicator | 8 | PIR sensor |
| 9 | Reset button | 10 | Dedicated charging port |
| 11 | Power button | 12 | Speaker |
| 13 | Bracket mount port | 14 | SD card slot |
Buttons and Indicators
| Item | Description |
|---|---|
| Power button | Press and hold the power button for 5 seconds to power the camera on / off |
| Reset button | Press and hold for 5 seconds until you hear "boogu" to reset or restore to factory settings |
| SD card slot | Supports local SD card storage (maximum 128 GB) |
| Power indicator | Orange indicates charging, green indicates fully charged |
| Working Status Indicator | Meaning |
|---|---|
| Solid red | The camera network is abnormal |
| Red flashing slowly | Awaiting Wi-Fi connection |
| Red flashing quickly | Wi-Fi connection in progress |
| Solid blue | The camera is working normally |
2. Download the App and Register the Account
Download the "ieGeek Cam" App
- Method 1: Download the "ieGeek Cam" and "CloudEdge" apps from the App Store (iOS) or Google Play (Android).
- Method 2: Scan the "ieGeek Cam" app QR code to download it.
Note: When using the app for the first time, allow the following 2 authorizations.
- Allow "ieGeek Cam" to access mobile data and WLAN, otherwise you will not be able to add devices.
- Allow "ieGeek Cam" to receive push messages, otherwise the phone will not receive push notifications when motion detection or sound alarms are triggered.
Register the Account
New users need to register by e-mail. The specific steps are as follows:
Tips:
- Please use the correct e-mail address.
- Select the correct international prefix.
- When registering a new account, select your current region. (Cameras cannot be shared across different registered regions.)
3. How to Add the Camera to the App
Before you start:
- Insert the Micro SD card before power on, otherwise the SD card cannot be detected.
- Place the camera and smartphone 1-3 feet (30-100 cm) away from the router to set up Wi-Fi.
- Make sure the camera uses 2.4 GHz Wi-Fi.
Method 2: Scan the Code to Connect
On the home page, tap "Add" or "+" in the top-right corner, then tap "Add device".
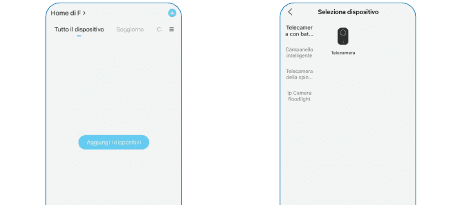
If your phone's Bluetooth is not on, the app will show a pop-up; allow Bluetooth to be turned on.
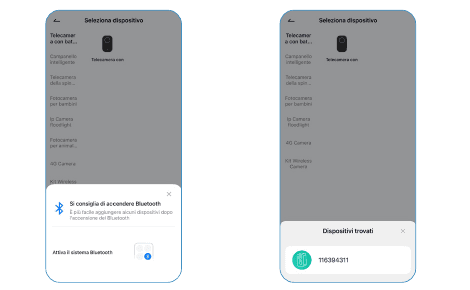
Power on the camera. Press and hold the power (camera battery) button to start the device. Place it near the router for a better signal.

Enter the Wi-Fi password. Select a 2.4 GHz Wi-Fi network and enter the password, then confirm.

Wait for the connection. The app shows the connection progress. Make sure the device is powered on, the device is connected to the router, and the device and phone are on the same network.
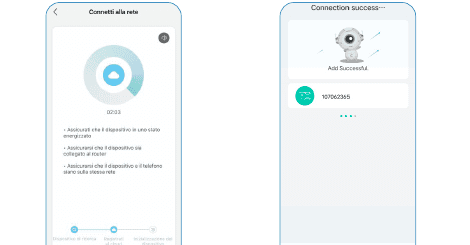
Note: If the camera can't be powered on, first connect a DC 5V 2A power adapter to charge the camera for 15 minutes.
My Camera Cannot Connect to the Wi-Fi?
4. Charge the Battery

- Charge the battery with a 5V 2A power adapter. The battery is built-in and cannot be removed.
- Charge the battery with the ieGeek solar panel.
- To help the camera better resist the weather, cover the dedicated charging port with the rubber plug every time after charging the battery.
| Charging Indicator | Meaning |
|---|---|
| Orange LED | Charging |
| Green LED | Charge complete |
5. Camera Installation Tips
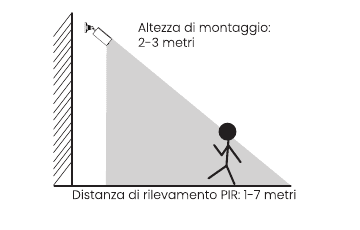
- Mounting height: 2-3 meters.
- PIR detection distance: 1-7 meters.
Tips:
- Use the protective cover to help the camera better resist the weather when installing it outdoors.
- Please install the camera at a height of 2-3 meters (7-10 ft) from the ground. This height maximizes the motion sensor's detection field.
- For efficient motion detection, install the camera at an angle.
Warning: If a moving object approaches the PIR sensor vertically, the camera may not be able to detect it.
6. PIR Motion Sensor Tips
PIR Sensor Detection Distance
The PIR sensor detection range can be customized to suit your needs. You can refer to the following table to configure it in the device settings via the ieGeek Cam app.
| Sensitivity | Detection Distance (for moving and living objects) |
|---|---|
| Level 1-3 (Low) | Up to 2-5 meters |
| Level 4-7 (Medium) | Up to 5-8 meters |
| Level 8-10 (High) | Up to 8-10 meters |
Important Notes on Reducing False Alarms
- Do not point the camera at any object with intense lights, including sunlight and intense lamp lights, etc.
- Do not place the camera near any vent, including air conditioner vents, dehumidifier vents, projector heat transfer vents, etc.
- Do not install the camera in windy places.
- Do not point the camera at a mirror.
- Keep the camera at least 1 meter away from any wireless device, including Wi-Fi routers and phones, to avoid wireless interference.
7. FAQs
For more detailed frequently asked questions, open the app and look in "Me" - "Help and Questions" - "Battery Camera".
Why is the device offline?
Updating the router password or Wi-Fi?
Delete the camera from your ieGeek Cam account. After resetting the device, use the new Wi-Fi or the new password to add it again.
Can't connect to the Wi-Fi?
Rapid power consumption
The camera does not detect?
SD card not recognized?
ieGeek Wire-free Battery Camera User Manual (Spotlight, Magnetic Mount)
Setup and usage guide for the ieGeek wire-free battery camera covering camera layout, app pairing, battery charging, installation, the PIR motion sensor, and FAQs with the CloudEdge app.
ieGeek Battery Camera User Manual (PIR Level 1–10 Sensitivity, 90–120 Day Battery)
Setup, Wi-Fi pairing, app functions, motion alerts, charging, installation and troubleshooting for the ieGeek wireless battery security camera with the CloudEdge app.