 CloudEdge App Docs
ieGeek Battery Camera User Manual (PIR Level 1–10 Sensitivity, 90–120 Day Battery)
Setup, Wi-Fi pairing, app functions, motion alerts, charging, installation and troubleshooting for the ieGeek wireless battery security camera with the CloudEdge app.
This guide covers the ieGeek wireless battery security camera and how to set it up with the CloudEdge app, including the camera layout, Wi-Fi pairing, app functions, motion alerts, battery management, installation and FAQs.
For more help, see the Battery Camera FAQs. You can also reach ieGeek after-sales support by Amazon message or email [email protected] — the best service will be offered to you.
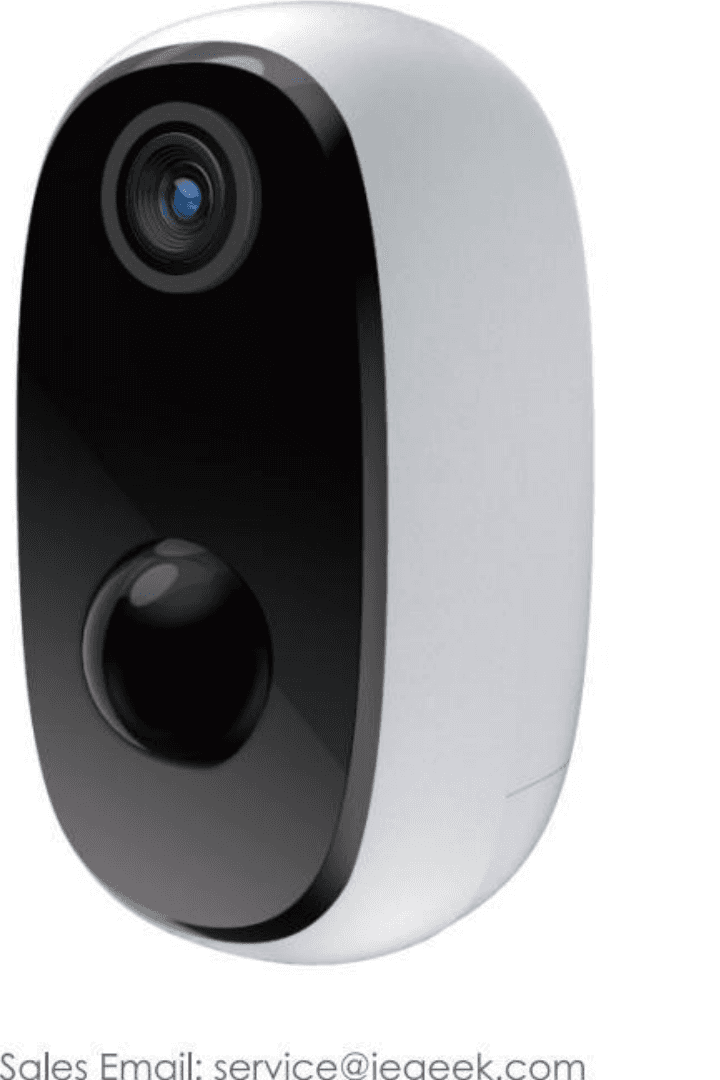
Warming Tip: When the camera is in an abnormal state, please long press the power button for about 15-20s to try to restart the camera.
1. After-Sale Support
Thanks for purchasing our ieGeek battery Wi-Fi security camera. If you have any problems or suggestions, please feel free to contact us by Amazon message or send e-mails to our official mailbox ([email protected]).
Note:
- The camera only supports 2.4GHz Wi-Fi; it doesn't support 5GHz Wi-Fi.
- Please ensure that the Wi-Fi signal strength is over 85%. If the camera is far away from the signal source, it won't be connected successfully for the first time.
- If your router is connected with too many devices, the camera will fail to connect Wi-Fi because of the IP address conflict.
- This wireless camera does not support PC Browser and Software.
- This wireless camera supports events recording when Wi-Fi disconnected.
- Video playback works in the CloudEdge app only. It does not support the 3rd party player.
- Manually snapshot and recording files are saved in mobile. Events snapshot files are saved in Cloud. Events recording files are saved in Micro SD card.
- It will consume the batteries' power if you watch live footage or the recorded videos from the SD card.
2. Packing List
- 1 × Battery Camera
- 1 × Screws Sets
- 1 × Metal Mount
- 1 × USB cable
- 1 × Quick User Guide
3. Product Introduction

- Working Status Indicator — LED that shows the camera's working state
- Lens — main camera lens (front)
- Microphone — built-in microphone
- PIR — passive infrared motion sensor
- Microphone / Bracket Mount Port — bottom microphone and mounting point for the bracket
- Power Key — power button (bottom)
- DC 5V USB Charging Port — charging port
- Charging Indicator — charging status LED
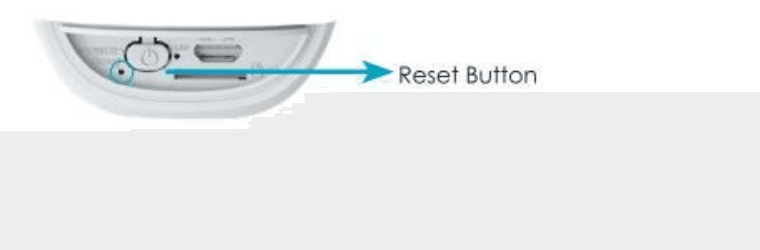
- Reset Key — reset button
- Micro SD Card Slot — Micro SD card slot
| Camera Keys | Operations |
|---|---|
| Power key | Press and hold for 5s for power on / power off the camera |
| Power key | Quick press 1s to wake up the camera from standby mode |
| Reset key | Press and hold for 5s to reset or restore to factory settings |
| Reset key | Quick press 1 second to enter AP distribution network mode |
| LED Condition | Meaning |
|---|---|
| Slow flickering Red | Awaiting Wi-Fi connection and start adding devices |
| Fast flickering Red | Wi-Fi connecting |
| Solid on Red | Network is abnormal |
| Solid on Blue | Wi-Fi connected successfully, the camera running normally |
| Slow flickering Blue | AP mode |
4. APP Installation and Account Registration
4.1 Download the CloudEdge App
- Method 1: Download "CloudEdge" from the App Store (iOS) or Google Play (Android).
- Method 2: Scan the "CloudEdge" app QR code to download it.
Tips: Please turn on the 2 below permissions while using this app for the first time.
- Allow the CloudEdge app to access mobile cellular data and wireless LAN, or it will fail to add the IP camera.
- Allow the CloudEdge app to receive pushed messages, or the phone will not receive alarm push when motion detection or audible alarm is triggered.
4.2 Register Account
New users need to register by email. The concrete steps are as following:
- When registering a new account, please choose the region which you are actually in. (Different registered regions can't share the camera.)
- Please choose to register by e-mail.
5. How to Add Camera to App
5.1 Install Micro SD card
Please insert a Micro SD card to record videos when motion is detected and for playback. (Micro SD card is not included; the camera supports up to 128GB Micro SD card.)

Note: Please insert the Micro SD card before power on, otherwise the SD card can not be detected.
5.2 Power on camera
Press and hold on the power button for 5s to turn on the camera. (If it can't be powered on, please plug in a DC 5V 2A power adapter to charge the camera for 15min first.) The indicator with red light blinking slowly means the camera is started successfully.

Note: A DC 5V 2A power adapter is not included in the packing list.
5.3 Connect the camera

- Note: Put the camera and smart phone 1 to 3 feet (30 to 100 cm) away from the router to set Wi-Fi.
- Note: The camera only supports 2.4GHz Wi-Fi; it doesn't support 5GHz Wi-Fi.
Wi-Fi Connection Steps
Before connecting the camera, please press and hold the reset button for 5 seconds to reset or restore factory. When you hear the sound of "Boogu", that means resetting successfully.
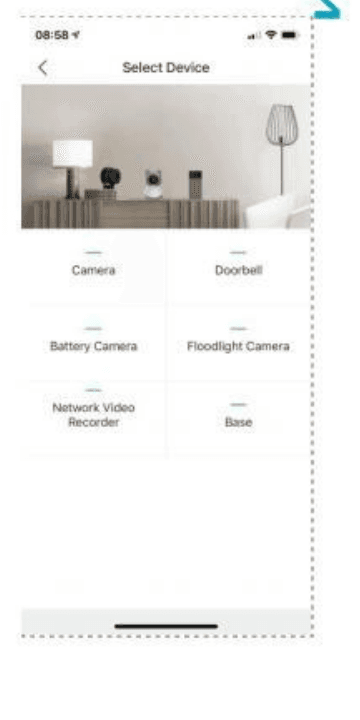
Run the CloudEdge app, click "+" and select "Battery Camera". According to the guide on the app, please ensure the camera was activated. (The LED indicator light is turning red and flickering slowly.)
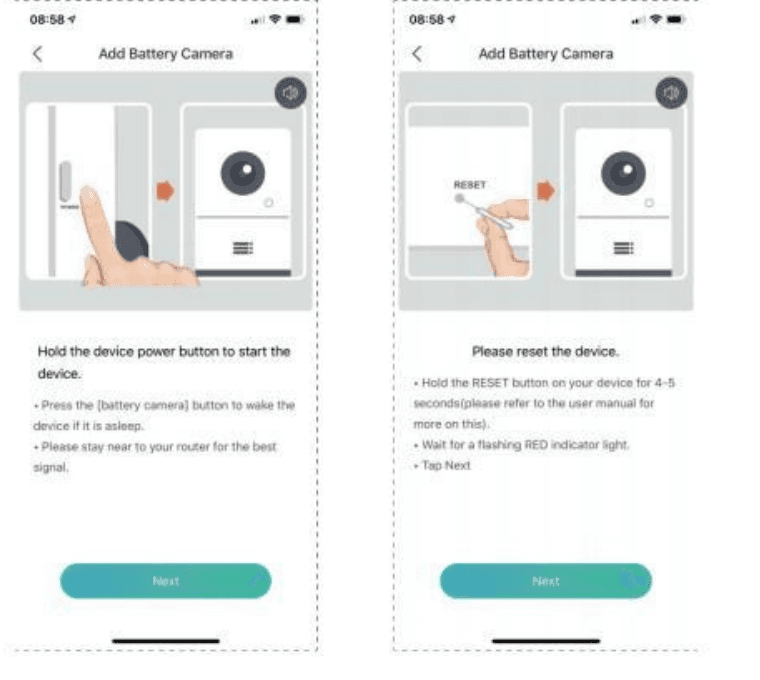
After entering the "Add Battery Camera" interface, click "Next"; when entering the next interface, click "Next" again.
Select the 2.4GHz Wi-Fi SSID and input the Wi-Fi password, and then click "OK".
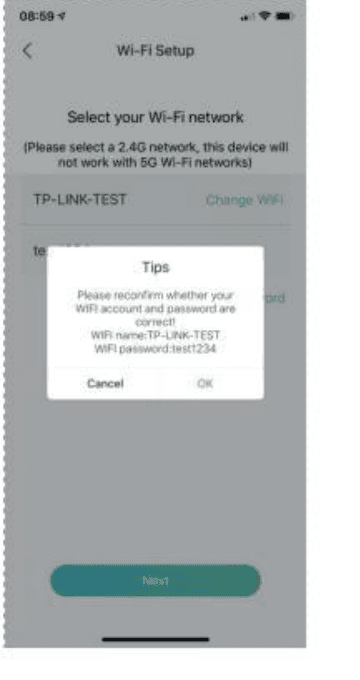
After entering the operation interface above, please click "Next" and you will see the "Scan QR Code" interface. Please remove all film from the lens.

Put the QR code in front of the camera lens about 15cm. The device lens is aimed at the QR code on the phone screen with a distance of 15cm. After the device recognizes the QR code, the camera will make a sound "Boogu". After you hear it, please click "Next".

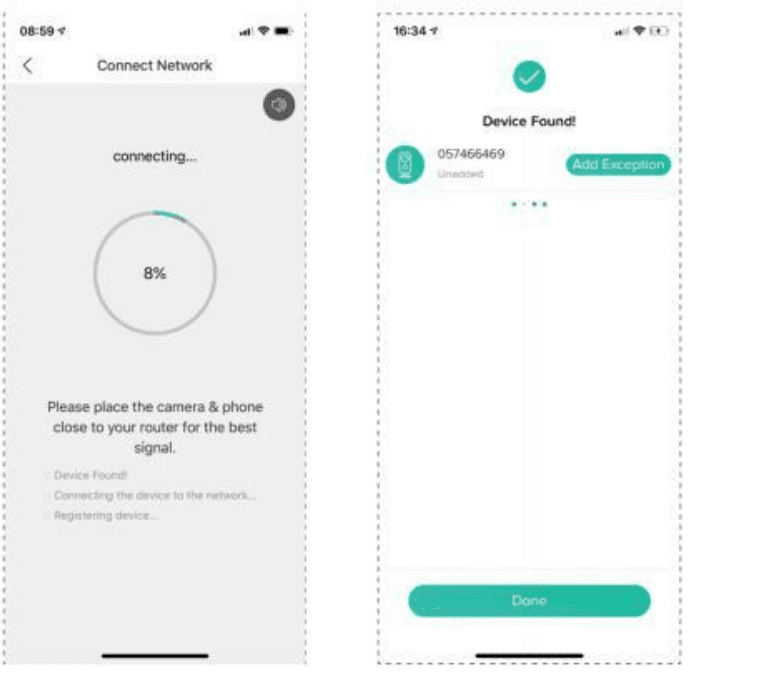
Then, the camera will start connecting Wi-Fi. After the connection finished, it will skip to the "Device Found" page; you could edit the camera name and click "Done", and then go to your device list and start viewing videos.
6. Function Introduction
6.1 App Interface Introduction
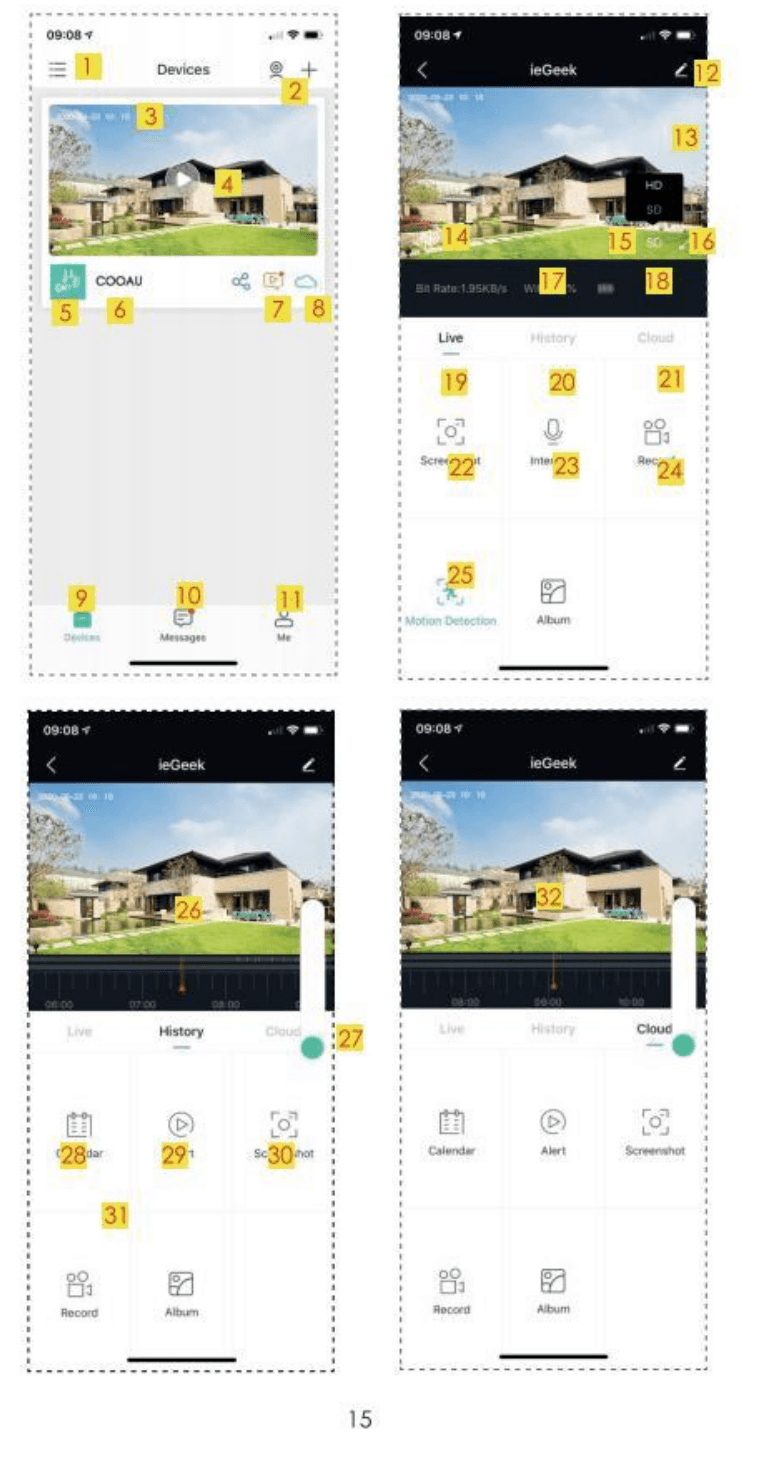
| # | Control | # | Control |
|---|---|---|---|
| 1 | Choose the device display interface | 17 | Bit rate |
| 2 | Add a camera & Multi-screen viewing | 18 | Network signal strength |
| 3 | Camera time | 19 | Preview option |
| 4 | Live view button | 20 | Playback option |
| 5 | Camera type icon | 21 | Related to cloud storage |
| 6 | Camera name | 22 | Screenshot button |
| 7 | Alarm information icon (red dot indicates alarm occurred; click it to view alarm screenshot or video) | 23 | Intercom option, long press it to talk |
| 8 | Cloud storage (7 days cloud storage service for free) | 24 | Record button |
| 9 | My device list | 25 | Motion Detection option, it's on by default (green means activated) |
| 10 | Messages (Alarm messages & System messages) | 26 | Alarm video, click it to play/pause |
| 11 | Personal homepage | 27 | Electronic amplification |
| 12 | Camera settings options, such as SD card, alarm setting, etc. | 28 | Calendar option, click it to select the date |
| 13 | Battery capacity | 29 | Screenshot options |
| 14 | Sound option (Speaker) | 30 | Recording options |
| 15 | SD, HD option | 31 | Alarm point, view all mobile alarm recordings |
| 16 | Full screen option | 32 | Red vertical line means alarm video |
- Receive Notifications — Open it to receive the notifications.
- Device Share — Share the camera with the users who are registered in the same region.
Camera Settings

- Device Information — Check to view "Network Name", "Signal Strength", "Virtual ID", "IP", "Mac Address" and "Timezone".
- Installation Guide — Choose a proper place to install the camera which has high Wi-Fi signal strength.
- Basic Function — (1) Network Indicator: On/Off; (2) Speaker Volume: 0-100 for you to choose; (3) Rotate View; (4) Night Vision: Automatic/On/Off; (5) Power Management: Display remaining battery capacity.
- Power Saving Setting — Setting the shooting interval and maximum shooting time.
- Motion Detection — "Motion Detection" on/off, "Detection sensitivity adjustment" (Level 1-10), "Alarm Interval", "Alarm only when people appear" on/off, "Alert Plan" (set the alarm time).
- Recording Management — Setting recording time; display the total capacity and remaining capacity of SD card; support one-click format SD card in the CloudEdge app.
- Cloud Storage Server — Free 7-day cloud storage experience.
- Device Version — Check the current and the newest version, and support one-click upgrade.
Me Page
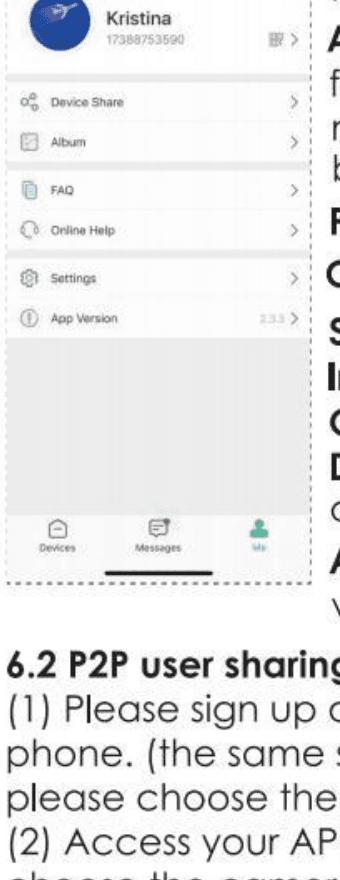
- Device Share — Share your cameras to other users.
- Album — View pictures and videos from recording and screenshot manually; delete pictures and videos batchly.
- FAQ — Common problems and solutions.
- Online Help — Online technical support.
- Setting — In-App Alert Sound: On/off; Clear Cache: Clear the cache in the app; Deactivate Account: Permanently disabled.
- App Version — The current app version.
6.2 P2P user sharing

Note: When you have a sharing, please make sure the app account is registered in the same regions. Otherwise, you won't share successfully.
6.3 Alert Settings
PIR "Motion Detection" is on by default and the default is "Level 8-10", but it is adjustable.
Alert settings steps: "My Device" -> "Device Settings" -> "Motion Detection".
Tips: The detecting distance is 8-13 meters (Level 8-10).


| Sensitivity | Detecting Distance (For moving objects) |
|---|---|
| Level 1-3 (Low) | Up to 4-5 meters |
| Level 4-7 (Med) | Up to 5-8 meters |
| Level 8-10 (High) | Up to 8-13 meters |
Note:
- It is recommended that you set the alarm sensitivity to level 8-10 if having missed or delayed alarm frequently.
- It is advised that you set the alarm sensitivity to level 1-3 if having false alarm frequently.
- It is recommended that you adjust the sensitivity to a lower level. Alarm sensitivity and detecting distance from high level are too far to easier false triggering. In winter, it easily caused false alarms because of bigger temperature range. Also, PIR alarm will be interfered by weather and temperature.
- It is recommended that you adjust the sensitivity to a higher level. In summer, it caused missed or delayed alarms because of smaller temperature range.
6.4 Alarm Push Notification and Playback
A wireless camera with PIR sensor is not designed for 7 × 24 all-day recording, but aims at pushing alarm message notification to app and recording video to Micro SD card or capturing a screenshot to Alicloud (need to pay) when the PIR sensor detected human body motion events. Then, you can playback the motion videos wherever you are via the CloudEdge app.
When PIR is triggered, camera and system actions:
- Alarm Sound in app (please turn on permission for CloudEdge app notification in mobile setting and turn mobile volume on).
- Alarm Message Notification (please enable CloudEdge app notification in mobile setting).
- Alarm snapshot and video will be recorded on Micro SD card (please insert micro SD card) or Alicloud (need to pay).

- Alarm Record — recorded alarm video.
- Alarm Snapshot — captured alarm picture.
- Click it to play alarm — plays the alarm video recording clip.
- Click to preview alarm snapshot — there are 2 frames per second.
7. Battery Management
- The camera has a built-in rechargeable battery, which can be used for 90-120 days in theory, assuming the camera wakes up 10 times per day and watching 10 minutes of video. (Note: The life of the battery depends on the times of the camera's wake up. The more the times of wake-up, the faster the battery capacity is consumed.)
- If the battery capacity is less than 20%, the app will send an alarm message to remind you to charge in time.
- You can charge the camera with a DC 5V 2A power adapter. (Note: The battery is not removable.)
- If your battery capacity is consumed too fast, it is probably because the camera is woken up too frequently. It is recommended to lower down the "Motion Detection" sensitivity or turn it off occasionally.
8. Camera Installation
You can put it on any flat place: Table, Chair, Floor, etc.
How to install with wall mount: Fix the bracket to the wall with screws and wall anchors by using a drill or a screwdriver, and then rotate the camera into the bracket. You can adjust the angle of the camera by loosening and tightening the rotary knob on the bracket.
Tips:
- Please make sure the wall or surface where you want to install the camera is flat. For easier installation, it is suggested to use a drill. Concrete wall may not be suitable for the installation.
- When installing the camera, it's not suggested to make the PIR sensor vertically face the moving object, otherwise it may not detect the motion events. It is suggested to make the angle between the PIR sensor and detected object larger than 10 degrees.
9. How to Reduce False Alarms

To reduce false alarms, please note that:
- Do not install the camera in a position facing any objects with bright lights, including sunshine, bright lamp lights, etc.
- Do not place the camera too close to a place where there are frequently moving vehicles. Based on numerous tests, the recommended distance between the camera and vehicle is 15 meters (55 ft).
- Stay away from the outlets, including air conditioner vents, humidifier outlets, the heat transfer vents of the projectors, etc.
- Do not let the camera face the mirror.
- Keep the camera at least 1 meter away from any wireless devices in order to avoid wireless interference, including Wi-Fi routers and phones.
10. Trouble Shooting
| No. | Description | Solution and Operation |
|---|---|---|
| 1 | Unable to connect | (1) Check your Wi-Fi name and password; (2) Ensure your Wi-Fi is 2.4GHz, not 5GHz; (3) Ensure your camera and phone close to router (30-100cm) |
| 2 | Reset succeed or not | (1) Press and hold the reset button for 5 seconds; (2) Hear "boogu" sound; (3) Red light turns to slow blinking |
| 3 | Change to a new network | (1) Press reset key to factory default setting; (2) Re-connection |
| 4 | Alarm picture without people | (1) The camera takes time to wake up (about 4s); (2) People move too fast; (3) Some objects around 36°C is moving in the picture |
| 5 | No alarm push | Enable CloudEdge app notification in mobile setting |
| 6 | No alarm video record | Please insert SD card |
| 7 | Device offline | Check if the network transferring fluency processes well |
| 8 | Browse video delay | Check the Wi-Fi network; the distance between the camera and the router should not be too far |
| 9 | Short battery life | (1) The camera has been waken up too many times; (2) It should not be installed on the side of the road or exposed to the sun |
| 10 | Can't start camera after replacing battery | (1) Check the battery positive and negative; (2) Check if the battery is normal; (3) Charging is needed to activate the camera when replacing battery |
11. FAQ
1. How to delete the photos and videos?
Select "Me" -- "Pictures & Videos" -- Selected -- Delete.
2. How long do I need to charge the built-in battery for a full charge?
The wireless camera charger supports DC 5V 2A plug. Please charge it more than 10 hours before you use it; it needs FULLY charge before first use. It takes about 6-9 hours to charge fully by DC 5V 2A power adapter.
3. How to talk to camera and listen to the camera?
Hold the intercom key to talk to, and enable the audio key on. Then, you can listen to the camera.
4. How to charge for the security camera?
5. What effect of hot or cold weather on battery life?
It handles temperature range between -13°F and 140°F (-25°C to 60°C). Outside temperature below minus 20 degrees may affect the performance of the battery which may affect the camera work.
6. What is the difference between the red and green lines in the history display?
It will record 30 seconds when the camera detects motion. If the motion lasts up to 30 seconds, it will show red lines in the history display; if the motion lasts up to 10 seconds, it will show 10 seconds red lines and 20 seconds green lines in the history display.
7. How long the battery will last?
It depends on how much traffic you have. Besides, it will consume the batteries' power if you watch live footage or the recorded videos from the SD card. The camera has a built-in rechargeable battery, which can be used for 90-120 days in theory, assuming the camera wakes up 10 times per day and watching 10 minutes of video. (Note: The life of the battery depends on the times of the camera's wake up. The more the times of wake-up, the faster the battery capacity is consumed.)
If the battery capacity is less than 20%, the app will send an alarm message to remind you to charge in time. Please charge it more than 10 hours at the first time you use it. You can plug a USB cable and 5V 2A charger to charge it when the battery is used out.
ieGeek Wire-free Battery Camera User Manual (Built-in Solar Panel)
Product layout, app download and account registration, Wi-Fi pairing, battery charging, installation, PIR motion settings and FAQs for the ieGeek wire-free battery camera with the CloudEdge app.
ieGeek Wire-free Battery Camera User Manual (Folding Stand, Combo Spotlight)
User manual for the ieGeek wire-free battery security camera, covering the camera layout, LED status, app download, Bluetooth and WiFi pairing, charging, installation, PIR motion sensor notes and FAQs.