 CloudEdge App Docs
COOAU ZS-GX2S Battery Camera User Manual
Setup and usage guide for the COOAU ZS-GX2S battery security camera with the CloudEdge app, covering product layout, app installation and registration, adding the camera over Wi-Fi, installation, the app interface, SD card recording, alarm management, battery management and FAQs.
This guide explains how to set up and use the COOAU ZS-GX2S Battery Security Camera with the CloudEdge app.
Need more help? See the Battery Camera FAQs.
1. After-Sale Support
Dear friends,
Thank you very much for supporting COOAU! Please read this manual thoroughly before using this wireless security camera. If you have any issues, please email your order number and the problem to [email protected] or [email protected]. On receiving your message, we will provide a fast solution in 24 hours.
Please do not worry. Actually, many problems can be easily solved by setting, such as Networking Connection Fails, Motion Detection Delay, Solar Panel Charging, False Alarm, Battery Management etc. We promise all the cameras have been carefully checked and packaged before shipping.
We offer a lifetime technical support for your camera, and we are happy to provide all possible support for you. If you have any questions during using, please feel free to contact us. We will try to find a solution for you with our professional camera engineers.
Warm Regards, COOAU Service Team
Note:
- The camera only supports 2.4GHz WiFi. It does not support 5GHz WiFi.
- Before connecting this camera to the WiFi please ensure the Wi-Fi signal strength is to be over than 85%. If the camera is far away from the signal source, it won't be connected successfully for the first time.
- If your router is connected with too many devices, the camera will fail to connect Wi-Fi because of the IP address conflict.
- This wireless camera supports events recording when Wi-Fi disconnected.
2. Product Introduction

- Wifi Antenna
- Lens
- Working Status Light
- PIR Sensor
- Spotlights and IR Lights
- Microphone
- Mounting Bracket
- DC 5V Charging Port
- SD Card Slot
- Power Key
- Speaker
- Charging Indicator Light
- Reset Key
| Part | Function |
|---|---|
| Power Key | Press and hold for 5s for power on / power off the camera. |
| Reset Key | Press and hold for 5s to reset or restore to factory setting. |
| SD Card Slot | Support local SD card storage (up to 128G). |
| Power Light | Red means charging, blue means fully charged. |
| Microphone | Capture sound for your videos. |
| Working Status Light | Solid on red: Network is abnormal. Slow flickering red: Awaiting Wi-Fi connection and start-adding devices. Fast flickering red: Wi-Fi connecting. Solid on blue: Wi-Fi connected successfully, the camera running normally. |
| Speaker | Two-way audio output. |
| Charging Port | Use a 5V/2A charging cable to charge this camera. |
3. APP Installation and Account Registration
3.1 Download the APP
Scan the QR code to download the APP from the APP store (iOS) or Google Play (Android).

Tips: Please grant the following 2 permissions while using this APP for the first time.
- Allow the APP to access mobile cellular data and wireless LAN or it will fail to add IP camera.
- Allow the APP to receive pushed message or the phone will not receive alarm push when motion detection or audible alarm is triggered.

3.2 Register Account
New users need to register by email. The concrete steps are as following:
Note:
- When registering a new account please choose the region which you are actually in and correct country code. (Different registered regions can't share the camera.)
- Please choose to register by e-mail.
4. How to Add a Camera to APP
4.1 Install Micro SD card
Please insert Micro SD card to record videos when motion detected and playback. (Micro SD card is not included; the camera supports up to 128GB Micro SD card).

Note: Please insert the Micro SD card before power on, otherwise, the SD card cannot be detected.
4.2 Power on Camera
Press and hold on the power button for 5s to turn on camera (If it can't be powered on, please plug in DC 5V/2A power adapter to charge the camera for 15min first).

Cannot turn on my camera?
- Charge the camera, and then try to turn on it.
- Press and hold the power key until turning on the camera. (can try many times)
If you tried the above steps, but still no luck, please message your order and problem to [email protected] or [email protected].
4.3 Connect the Camera

Note:
- Put the camera and smart phone 1 to 3 feet (30 to 100cm) away from the router to set Wi-Fi.
- The camera only supports 2.4GHz Wi-Fi. It doesn't support 5GHz WIFI.
4.4 Wi-Fi Connection Steps
Put the QR code in front of the camera lens about 15-25cm. The device lens is aimed at the QR code on the phone screen with a distance of 15-25cm. After the device recognizes the QR code, the camera will make a sound 'Boogu'. After heard it, please click 'next'.

My camera fails to connect Wi-Fi?
- Make sure the connection Wi-Fi of the camera is 2.4GHz. In our experience, the network connection is failed in most cases due to the user connected to 5GHz WiFi.
- Make sure the password correction of the Wi-Fi. (Note: the password of the WiFi cannot include single quote, underline, space and virgule (/).
- Check the number of the devices your router connected. In general, the router has a connection limits. Once the devices that your router connected excess the its max limit numbers, other devices will cannot connect the router.
- Make sure the QR code on the phone screen is normal and the distance between the phone and the camera lens is 15-25cm (5.9-9.8inch) during the scanning process.
- After checking the above information, if the camera cannot connect the Wi-Fi, please try to re-download the APP, reset the camera and restart the router, and then add the camera again.
- If you tried all steps, but still no luck, please message your order and problem to [email protected] or [email protected].
5. Camera Installation
How to install it:

Tips:
- Please make sure the wall or surface where you want to install the camera is flat. For easier installation, it is suggested to use drill. Concrete wall may not suitable for the installation.
- Please do not install the camera at a position that nears heat source, such as Air conditioner outdoor unit and Kitchen smoke outlet.
- Try to avoid installing the product on the side of a lively road. Frequent pedestrians and vehicles will keep waking up the camera, resulting in frequent alarm messages and extremely fast power consumption.
- Please do not install the camera at a position away the router. The product needs a good Wi-Fi signal to works well.
- When installing the camera, it's not suggested to make the PIR sensor vertically face the moving object otherwise, it may not detect the motion events. It is suggested to make the angle between PIR sensor and detected object larger than 15 degree.

Suggestion: the best downward tilt angle of the lens is 30° to obtain the best alarm detection range.
6. Function Introduction
6.1 APP Interface Introduction
Home screen

| # | Function |
|---|---|
| 1 | Multi-device Monitoring — Watch multiple cameras (up to 4) on one screen. |
| 2 | Add a Camera — Add new camera to your account. |
| 3 | List Management — Tap to change this camera list mode. |
| 4 | Camera Status |
| 5 | Battery Power |
| 6 | Whether to hide the current view or not |
| 7 | Enter the Monitor Detail Page |
| 8 | Playback History |
| 9 | Name of the Device |
| 10 | Setting — Notifications, device sharing, alarm messages, help and feedback, detection settings. |
Messages screen

| # | Function |
|---|---|
| 11 | Alarm Messages — Notifications of motion detection history. |
| 12 | Sharing History — Checking the history of shared devices. |
| 13 | System Messages — Checking the history of system notifications. |
Profile screen

| # | Function |
|---|---|
| 14 | Account — Check account details, QR Code, App logout, Reset password. |
| 15 | Family Management — Classification of cameras. |
| 16 | Shared — Sharing history for all cameras in this account. |
| 17 | Album — Checking images/videos saved on your smartphone. |
| 18 | Help & Feedback — Frequently asked questions, feedback on problems. |
| 19 | Settings — Basic setting, application version confirmation, clear buffer, deactivate account. |
Live view

| # | Function |
|---|---|
| 1 | Open the Detailed Settings — You can make various detailed settings for the camera. |
| 2 | Camera Speaker on/off — When turned on, you can hear the sound from the camera side. |
| 3 | Video Clarity Setting — You can select the video/images quality form SD and FHD. |
| 4 | Full Screen Option — Tap to enter full screen view and you can zoom in on some details. |
| 5 | SD Card Video Playback |
| 6 | Cloud Storage Video Playback |
| 7 | Screenshot — You can capture live video as a still image and save on your phone. |
| 8 | Intercom — Press and hold while speaking, you will hear a voice from camera. |
| 9 | Record — You can manually record the video you need at any time. It will save on your phone. |
| 10 | Motion Detection — Set the motion detection on/off. |
| 11 | Light — Click to turn the light off or on. |
| 12 | Siren — Click to turn the alarm off or on. |

| # | Function |
|---|---|
| 13 | Sound and Light Alarms — Turns the sound and light alarm on or off. Three modes: sound and light alarm, light alarm and sound alarm. |
| 14 | Night Vision Modes — Intelligent night vision, Full colour night vision, Black and white night vision. |
| 15 | Album — The screenshots and manually recorded video files that save on your phone. |
History (playback)

| # | Function |
|---|---|
| 1 | Video Timeline — Drag it to select the date on a 24-hour timeline. |
| 2 | Timeline Zoom Button — Tap it and swipe up and down to change the time interval of the timeline. |
| 3 | Calendar — Select and play the recorded video according to the date. |
| 4 | Alert — View alarm message video. |
| 5 | Screenshot — Video snapshot. |
| 6 | Record — First click to start recording, then click again to end recording. |
| 7 | Album — Store screenshots and manual video files. |
Settings

| # | Function |
|---|---|
| 1 | Modify the name of your camera. |
| 2 | Alarm notification received or not. |
| 3 | Share history of this camera. |
| 4 | Device Information — Network Information, Signal Strength, Virtual ID, IP, Mac Address, Time Zone. |
| 5 | Installation Guide — Use 'Network Diagnosis' to find installation locations with stronger wifi signal. |
| 6 | Basic Function — Turn on/off the Network Indicator; Speaker Volume; Screen File; Night Vision; Power Management. |
| 7 | Power Saving Setting — Set the 'Alarm Interval' and the 'Recording Time'. |
| 8 | Motion Detective — Detection Sensitivity; Alarm Interval; Alert Time; Alarm Area; Audio and Light Audio. |
| 9 | Recording Management — Recording Time Setting; SD card capacity checking. |
| 10 | Cloud Storage Service |
| 11 | Firmware version of your camera. |
| 12 | Delete the device from your account. |
6.2 Device share

The steps to share your camera with other users:
Tip: When sharing, please make sure your APP account is registered in the same region. Otherwise, you will not be able to share successfully.
6.3 Night Vision

- Intelligent Vision — The spotlight automatically turns on to provide coloured night vision only when a person is detected at night.
- Full Colour Night Vision — At night, the spotlight automatically turns on to provide colourful night vision, either by watching the monitor in real time via the mobile app or when the camera detects a person.
- Black and White Night Vision — Turns on the sound and light alarm and the spotlight turns on automatically when a person is detected at night. With the sound and light alarm turned off, the spotlight does not automatically turn on when a person is detected at night.
Tip: Whether the spotlight turns on automatically is controlled by the night vision mode and the sound and light alarm mode. The spotlight turns on automatically when one of the conditions of the colour night vision or the sound alarm mode is met. The spotlight does not switch on automatically in black and white night vision and when the light alarm is turned off.
| Spotlight | Turn on the light alarm | Turn off the light alarm |
|---|---|---|
| Intelligent Vision | On | On |
| Full Colour Night Vision | On | On |
| Black and White Night Vision | On | Off |
7. SD Card Record
The product doesn't include SD card. If you need a SD card to store files, please buy it by yourself.
SD card requirements:
Note: Insert the memory card into the SD card slot of the device, and the device will automatically start saving videos.
How to watch the videos in SD card?
- Method 1: Click the "History" or "Video Play" button of the alarm information icon in the APP to enter the video playback interface. Drag the timeline or select the alarm point to find the corresponding time period record.
- Method 2: Insert the SD card into the computer and convert the video format to MP4 via 3rd-party. When the video is MP4 format, you can directly watch it on the computer.
8. Alarm Management
Enter the APP - "Setting" - "Alarm Management" interface.

| Sensitivity | Detecting Distance (For moving objects) |
|---|---|
| Level 1-3 (Low) | Up to 4-5 meters |
| Level 4-7 (Mid) | Up to 5-8 meters |
| Level 8-10 (High) | Up to 8-13 meters |
- Motion Detection — Switching motion detection on or off.
- Detection Sensitivity — Adjust the sensitivity level according to the trigger frequency you require.
- Alarm Working Mode — Power Saving Mode, Performance Mode, Custom Mode.
- Alarm Plan — You can select the alarm time here to avoid excessive interruptions.
- Alarm Area — You can set the alarm zones to be monitored.
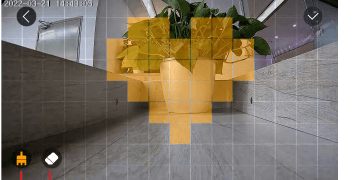
- add a square area
- remove a square area
6. Audio Warning and Strobe Light
- Audio Warning — If motion or a humanoid object is detected, the camera will sound an audible alarm. (You could adjust the volume.)
- White Light Warning — If motion or a humanoid object is detected, the camera will sound a light warning.
- Audio Warning and Strobe Light — If motion or a humanoid object is detected, the camera will sound an audio alarm with a light.
Warm Tip: When you encounter the following problems in using this camera, you can adjust the motion detection sensitivity to solve them.
Note:
- It is recommended that the alarm sensitivity be set to level 8-10 if missed or delayed alarms occur frequently.
- It is recommended that the alarm sensitivity be set to level 1-3 if false alarms occur frequently.
- It is recommended that you adjust the sensitivity to lower level. Alarm sensitivity and detecting distance from high level are too far to easier from weather and false triggering. In winter, it easily caused false alarms because of bigger temperature range. Also, PIR alarm will be interference from weather and temperature.
- It is recommended that you adjust the sensitivity to higher level. In summer, it caused missed of delayed alarms because of smaller temperature range.
- If you notice the poor performance of motion detection in the night environment try to turn off "Night Detection".
Alarm Working Mode

In Custom Mode you can configure:
- Human Detection — You can choose to turn this on to only detect humans, filter other motion detections, and you can also choose the time period for detection.
- Recording Time — Select the length of time recorded each time it is triggered.
- Alarm Interval — Set the alarm interval here if you need.
9. Battery Management
9.1 Charging the camera
It is recommended to use a 5V/2A power adapter for charging. Please use the charging cable in the package to charge this camera.
Note: If a 5V/2A power adapter is not available, other sizes of 5V power heads can also be charged.
How to judge whether the charging is successful?
The device's charging indicator light is red, which means it is charging. A blue light means that charging is complete. It will take approximately 10 hours or more to fully charge.
What should I do if the charge fails?
- Determine whether the power adapter is good, try another one.
- Determine whether the charging cable is in good condition, if not, please try another one.
- The charging indicator may be defective, please check the charging condition in the phone APP.
- Determine whether the charging cable of the device is in good contact with the charging port.
- The device has a low temperature charging protection module, please don't charge the device at low temperatures.
- Contact customer service: [email protected] or [email protected].
9.2 Battery life
If the device does not detect a moving object the device will enter sleep mode, reducing the power consumption of the device. If the device detects a moving object it quickly wakes up and starts within 1 second and takes screenshot with recorded video.
Warm tip: When the temperature is below -20°C, the battery may enter self-protection mode, which caused the camera automatically be shut down. But if the temperature rises, the battery will automatically return to normal state. At the low temperatures, if you need to charge this camera, please place it on home several hours first. In room temperature, the self-protection mode of the battery will automatically be shut off to charge this camera safely.
Why the battery life of my device is poor?
- Please check whether the number of alarms is too frequent. Because the working time of the device determines the battery life. The more frequent PIR wake-ups, the faster the battery consume due to the longer working time. It is recommended to appropriately lower the motion detection sensitivity of the device and set the alarm interval and alarm time plan. (Note: Outdoor air conditioning units, moving cars and the passing pedestrians will cause frequent alarms. Please adjust the angle of the device to avoid these objects.)
- In cold weather, the battery capacity will be reduced, which will affect the endurance of the device.
Contact customer service: [email protected] or [email protected].
10. FAQs
For more detailed FAQs, please log in to the APP, search in "Me"-"FAQ"-"Help Document"-"Battery Camera". You can also visit the Battery Camera FAQs.
The device prompts offline?
- Check whether the equipment is in the power-on state, and observe whether the working light of the equipment is on normally.
- Check whether the Wi-Fi network is in good condition and restart the router.
- If the device is located far away from the router, which results in the inability to obtain a good Wi-Fi signal, it is recommended to move the router to a closer place or add a Wi-Fi amplifier to improve the Wi-Fi performance of the home.
- Delete the camera from your account and add it again after resetting the device. Check whether the device firmware and application program are the latest version.
Update router or VW-R password?
Delete the camera from your account. After resetting the device, use the new Wi-Fi and password to add it again.
Can't play historical video?
- Check the status of the SD card in "Settings" to ensure that the SD card has been successfully recognized.
- Reinsert the SD card.
- In the application, format the SD card.
- Try another new SD card.
Alarm push frequently?
- In the app, lower the sensitivity of the motion detection alarm.
- Check whether there are objects that interfere with and trigger the PIR sensor in the field of view of the device, such as the outdoor unit of the air conditioner, driving cars, passing pedestrians, etc. The angle of the device can be adjusted appropriately to avoid these easily disturbing objects.
- Turn on "human motion detection" and use humanoid algorithm to filter useless alarms.
The phone cannot receive the alarm push?
- Turn on all the push permissions of the application in the system settings of your mobile phone.
- Make sure that the device's motion detection function is successfully turned on.
- Restart the phone, and clear the cache on Android phones.
- Check whether the network is good.
COOAU ZS-GQ1 Battery Security Camera
Setup, app pairing, installation, feature overview, SD-card recording, alarm management and battery care for the COOAU ZS-GQ1 wireless battery camera.
DEATTI Smart Battery Camera
Setup and user guide for the DEATTI Smart Battery Camera, covering product layout, app pairing, charging, live features, motion detection and camera sharing in the CloudEdge app.