 CloudEdge App Docs
Ankway X5-P6 Video Doorbell User Manual
Setup and usage guide for the Ankway X5 / P6 video doorbell and wireless chime with the CloudEdge app, covering the product overview, charging, Wi-Fi pairing, the chime, installation, and troubleshooting.
This guide explains how to set up and use the Ankway X5 / P6 video doorbell and its wireless chime with the CloudEdge app, including the product overview, charging, Wi-Fi pairing, the wireless chime, installation, and troubleshooting.
Need more help? See the Doorbell FAQs. After-sales support: ankway.com/pages/warranty — [email protected]
1. Product Overview
Get to know your video doorbell
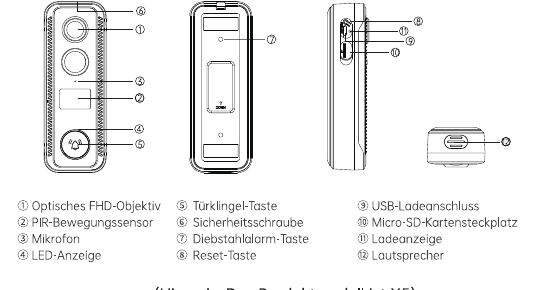
- ① Optical FHD lens
- ② PIR motion sensor
- ③ Microphone
- ④ LED indicator
- ⑤ Doorbell button
- ⑥ Security screw
- ⑦ Anti-theft alarm button
- ⑧ Reset button
- ⑨ USB charging port
- ⑩ Micro SD card slot
- ⑪ Charge indicator
- ⑫ Speaker
Note: This product model is the X5.
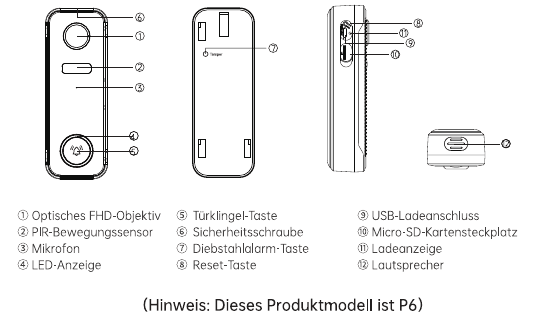
- ① Optical FHD lens
- ② PIR motion sensor
- ③ Microphone
- ④ LED indicator
- ⑤ Doorbell button
- ⑥ Security screw
- ⑦ Anti-theft alarm button
- ⑧ Reset button
- ⑨ USB charging port
- ⑩ Micro SD card slot
- ⑪ Charge indicator
- ⑫ Speaker
Note: This product model is the P6.
Component descriptions
| Component | Description |
|---|---|
| Doorbell button | Press briefly for more than 1 second to turn the device on; press and hold for more than 5 seconds to turn the device off. |
| Reset button | Press and hold RESET for 5 seconds to reset the device. When the reset is successful, you will hear a "Bugu" tone from the device. |
| Micro SD card slot | Supports local Micro SD card storage (up to a maximum of 128 GB). |
| Charge indicator | Red: charging / Blue: fully charged. |
| LED indicator | Glows red: the device is abnormal. Slow red flashing: ready for Wi-Fi pairing. Fast red flashing: Wi-Fi connection established. Glows blue: Wi-Fi connection successful. |
| Microphone | Records sound for your videos. |
| PIR sensor | Can detect moving objects up to 10 m (35 ft) away. |
| Speaker | Two-way audio output. |
| USB charging port | Use a USB cable or a 5V/2A USB charger (not included as standard) to charge the video doorbell. |
2. Get to Know Your Wireless Chime
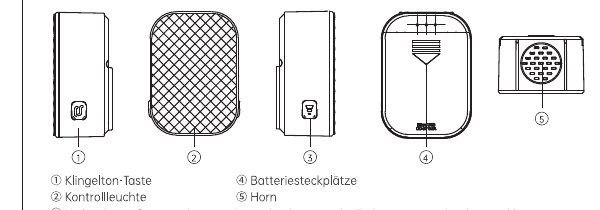
- ① Ringtone button
- ② Indicator light
- ③ Pairing / volume button — Press and hold to pair the doorbell, and press briefly to change the volume (5 volume adjustment levels).
- ④ Battery slots
- ⑤ Horn
3. App Download and Device Setup
App installation
Search the app stores for "CloudEdge", or scan the QR code below to download the app.
Device setup
Tap "Add device".
Select "Smart Doorbell" and then tap "Smart Video Doorbell".
Press the doorbell button briefly for about 1 second to turn the device on.
Tap "Next".
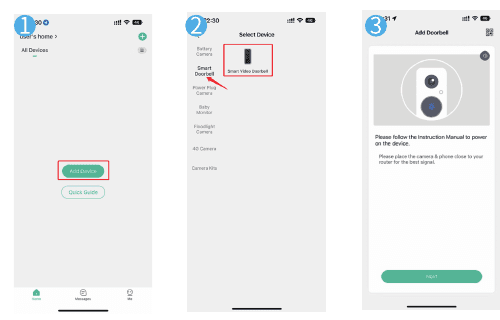
Start setting up your doorbell by following the instructions in the app.
Tips:
- Please place the video doorbell within range of a good Wi-Fi signal.
- Make sure your phone connects to a 2.4 GHz Wi-Fi network with the correct password.
- Make sure the doorbell is on and its indicator LED is flashing red. If it is not, press and hold the RESET button for 5 seconds.
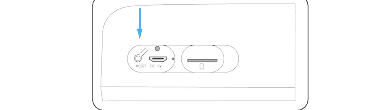
LED status
| LED STATUS | INDICATION |
|---|---|
| Solid red | The device is abnormal |
| Red flashing (once/sec) | Ready for Wi-Fi setup |
| Red flashing (twice/sec) | Wi-Fi connection established |
| Solid blue | The device is online |
| Blue flashing (once/sec) | Doorbell camera live view |
| Blue flashing (twice/sec) | Firmware update |
4. Connecting to the Wireless Chime
Press and hold the pairing / volume button; the indicator light flashes blue, which means the wireless chime is ready to pair.
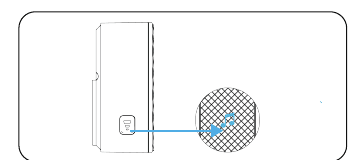
Press the video doorbell button briefly to establish the connection. The chime will sing, which means the connection was successful.
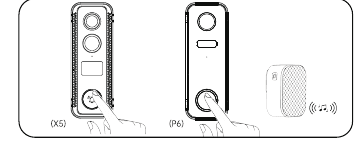
5. Chime Settings
Press the pairing / volume button briefly to change the volume.
Press the ringtone button briefly to select your favorite.
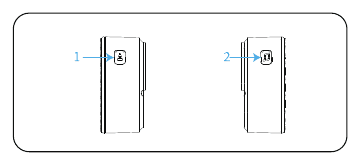
Tips: Press and hold the pairing / volume button to make the chime ready to pair, or to disconnect the chime from a connected video doorbell.
6. Install Your Video Doorbell
Remove the mounting bracket from the video doorbell.
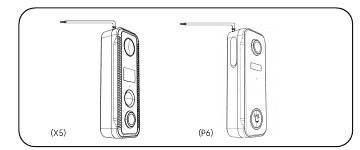
Mark the screw holes using the doorbell bracket.
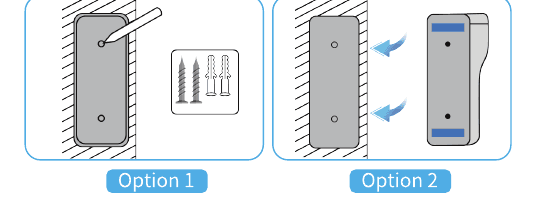
- Option 1 — Install the doorbell with screws and tools.
- Option 2 — Use the adhesive stickers to attach the doorbell to flat surfaces.
Mount the device in the fixed bracket.
Tighten the security screw on the underside of the bracket.
Done! Press the doorbell button to carry out a test.
Please use a 5V/2A USB cable (included) or a 5V/2A USB charger (not included) to charge the video doorbell. (A full charge takes about 8–12 hours.)
When the batteries are charging, the red light next to the USB port glows; when the batteries are fully charged, the blue light next to the USB port glows.
Tips:
- Due to shipping safety regulations, the built-in battery is not fully charged and the device is switched off.
- Please charge the device FULLY before first use.
7. Troubleshooting
1. The app cannot be registered successfully
- Please check whether your phone's network is working normally.
- Please activate the software service agreement and the privacy policy.
- Please check whether the confirmation code is in your spam mail.
- Please use Wi-Fi for registration if the mobile network cannot register. If the mobile network and the Wi-Fi cannot reach the server address, please check whether other software is working normally.
- Allow the app to access your location and all permissions during installation. The system will automatically assign you the best server.
- If the above solutions still do not work, we recommend uninstalling and reinstalling the app. The current location and all permissions are granted during installation.
2. Cannot connect to the network
① Cannot connect to Wi-Fi:
- Please enable DHCP on the router.
- Please make sure the camera is not on the blacklist in the router's MAC settings.
- Switch off the 5 GHz Wi-Fi on the router (note: please contact the router manufacturer if the 5 GHz Wi-Fi cannot be switched off).
- After connecting to the 2.4 GHz Wi-Fi, check whether your phone can access the internet.
- Make sure your mobile device's network is on the same network router as the camera.
- Once the network is working normally again, reset the camera and re-establish the connection.
② Wi-Fi password issues:
- Check whether the camera's Wi-Fi password matches the Wi-Fi password of the connected router.
- Check whether the entered Wi-Fi password contains spaces or special characters (@, #, %, &).
③ The 5 GHz Wi-Fi is separate and cannot connect to Wi-Fi:
- Switch off the 5 GHz network on the router and keep the 2.4 GHz network.
- Disconnect the router and restart the camera.
- The Wi-Fi name must not contain any 5 GHz wording.
3. No pop-up notification for motion detection alarms
- Enable the permission setting in your mobile device's system settings so the app can receive push notifications.
- Some Android phones cannot receive push notifications for alarms.
- Please enable motion detection in the app.
- SMS and email reminders are currently not supported.
4. Motion detection notifications appear frequently
- If the motion detection sensitivity is too high, light changes can also trigger an alarm.
- Reduce the alarm sensitivity (a lower value is recommended).
5. Cloud storage and SD card storage?
- You can choose to use a local SD card or the cloud to save your videos. This product does not include an SD card. If you need an SD card to archive your files, please buy one yourself. The SD card must support a capacity of 8–128 GB and the FAT32 format. A Class 10 SD card is recommended.
- You can also use the basic cloud storage (free for a 7-day cycle, with no subscription fee) or choose a subscription based on your needs. This is optional.
6. After inserting the SD card, "damaged" is displayed
- Disconnect the power before inserting the SD card. Connect the power supply to start after the card has been inserted.
- The SD card must be formatted on a computer before you use it.
7. How can I share the device?
This function can be reached via "Device sharing".
- First, your family must install the app, register a new account, log in with the new account, and search for the new account's QR code in the app.
- Open your device, log in to your "CloudEdge" account, go to the settings page and tap "Device sharing", then tap "Add" and finally "Scan QR code". Scan the QR code of the new account you want to share with using your phone's camera.
8. FCC Compliance Statement
This device complies with Part 15 of the FCC Rules. Operation is subject to the following two conditions:
- This device may not cause harmful interference.
- This device must accept any interference received, including interference that may cause undesired operation.
Warning: Changes or modifications not expressly approved by the party responsible for compliance could void the user's authority to operate the equipment.
Note: This equipment has been tested and found to comply with the limits for a Class B digital device, pursuant to Part 15 of the FCC Rules. These limits are designed to provide reasonable protection against harmful interference in a residential installation. This equipment generates, uses, and can radiate radio frequency energy and, if not installed and used in accordance with the instructions, may cause harmful interference to radio communications. However, there is no guarantee that interference will not occur in a particular installation. If this equipment does cause harmful interference to radio or television reception, which can be determined by turning the equipment off and on, the user is encouraged to try to correct the interference by one or more of the following measures:
- Reorient or relocate the receiving antenna.
- Increase the separation between the equipment and receiver.
- Connect the equipment into an outlet on a circuit different from that to which the receiver is connected.
- Consult the dealer or an experienced radio / TV technician for help.
9. Warranty
- 12-month warranty
- Lifelong technical customer service
Warranty details: ankway.com/pages/warranty — [email protected]
User Manual
Product user manuals for CloudEdge-compatible cameras, doorbells, and baby monitors, organized by product type.
BOIFUN Bell J1 Wireless Video Doorbell
User manual for the BOIFUN Bell J1 wireless video doorbell — hardware overview, app setup, Wi-Fi pairing, live view, playback, voice messages, sharing, chime pairing, installation, specifications and FAQs.