 CloudEdge App Docs
Smart Video Doorbell (1080P Full-HD)
Quick start guide for the 100% wire-free Smart Video Doorbell and indoor chime — covers what's in the box, battery, Wi-Fi setup with the CloudEdge app, live view, voice messages, installation, chime pairing and specifications.
This quick start guide explains how to set up and use the 1080P Full-HD Smart Video Doorbell and its indoor chime with the CloudEdge app.
Need more help? See the Doorbell FAQs.
Thanks for purchasing and using our product. Please read this quick start guide before using, and keep it for future reference. Menu contents are subject to change without notice in accordance with our policy of continuous product improvement.
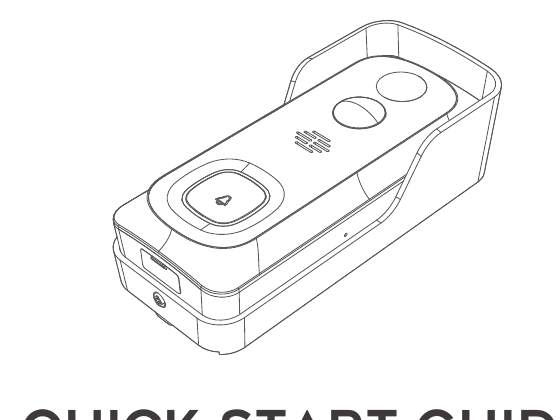
1. What's in the Box
Please consult the checklist below for all the components.

- Video Doorbell
- USB Cable
- User Guide
- Screw & Tools
- Indoor Chime
- Double-sided Tape
2. Meet the Doorbell
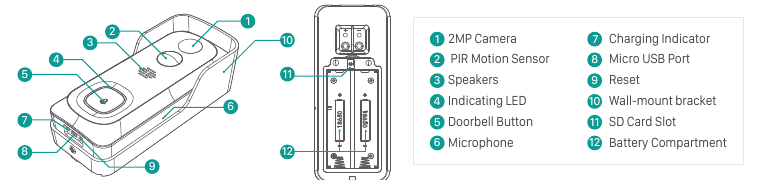
- 1 — 2MP Camera
- 2 — PIR Motion Sensor
- 3 — Speakers
- 4 — Indicating LED
- 5 — Doorbell Button
- 6 — Microphone
- 7 — Charging Indicator
- 8 — Micro USB Port
- 9 — Reset
- 10 — Wall-mount bracket
- 11 — SD Card Slot
- 12 — Battery Compartment
3. Meet the Chime

- 1 — Speakers
- 2 — Reset
- 3 — LED Indicator
- 4 — USB Port (Type-A/M)
4. Battery Installation
The batteries are pre-installed in the doorbell. If you have taken out the batteries, please note the electrodes when installing batteries. Please insert the batteries with positive poles upward!
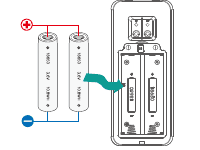
NOTE: Improper battery installation will cause damage to the internal components and may result in serious injury.
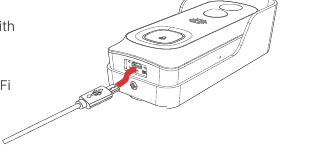
5. Battery Charging
The batteries inside the doorbell are not fully charged in accordance with transportation safety regulations.
Please charge the batteries with a USB compatible wall charger (not included) and the provided USB cable for about 8~10 hours prior to Wi-Fi configuration and installation.
6. Download the App
Download and install the CloudEdge app from Google Play™ or the App Store™. The App is also available by scanning the QR codes on the right, using your QR code scanner in your smart phone.
NOTE: Google Play™ is a trademark of Google Inc. App Store™ is a service mark of Apple Inc.
7. Wi-Fi Set Up
Before you start the Wi-Fi configuration, please note below:
- The doorbell works with 2.4 GHz Wi-Fi, but not with 5 GHz Wi-Fi.
- Avoid using special characters or symbols like
)(@~!#$%^&*..., either in your Wi-Fi name or password. - Perform the configuration near your Wi-Fi router.
Launch the CloudEdge app and register an account with your mobile phone number or email ID. Then start the Wi-Fi configuration, following below guiding steps.
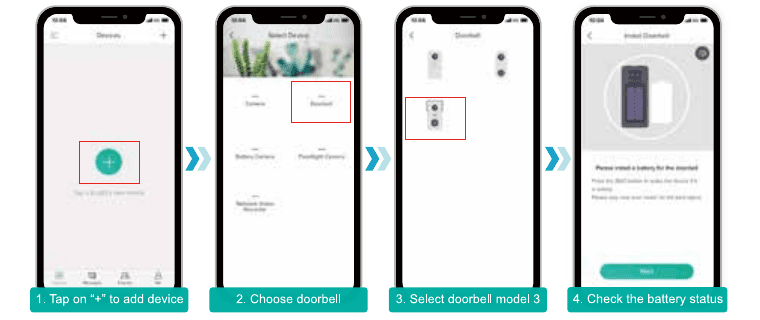
Tap on "+" to add device.
Choose doorbell.
Select doorbell model 3.
Check the battery status.
Reset the doorbell.
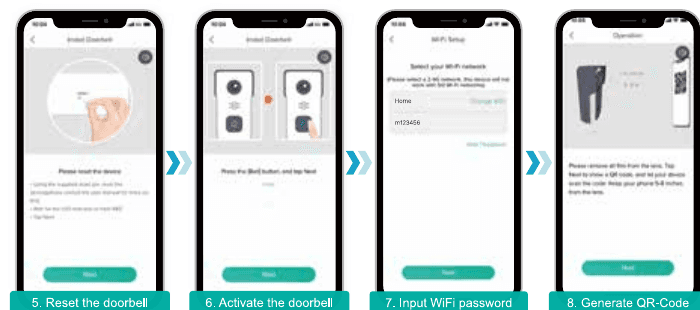
Activate the doorbell.
Input Wi-Fi password.
Generate QR-Code.
Wait for Wi-Fi connection.
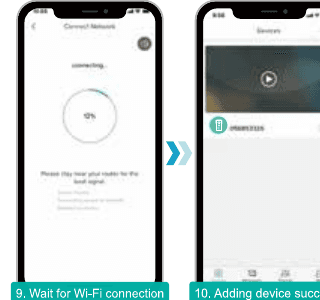
Adding device succeeds.
8. Run a Test
After setup, tap on the live view window in the app for a test. Then take your doorbell outside to the installation spot and run a test there. Make sure the installation spot is covered by strong 2.4 GHz Wi-Fi signal.
NOTE: If the video quality from the doorbell outside is not as good as it was indoors, you may need to move your router closer to your installation spot, or invest in an Wi-Fi extender.
9. Live View Interface
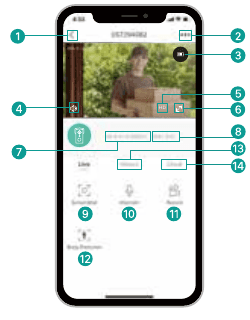
- 1 — Quit live viewing
- 2 — Setting menu
- 3 — Battery status
- 4 — Volume on/off
- 5 — HD/SD switch
- 6 — Full screen view
- 7 — Stream bit rate
- 8 — Wi-Fi signal status
- 9 — Screenshot button
- 10 — Speak to the scene
- 11 — Record on the phone
- 12 — Body detection on/off
- 13 — Notification history
- 14 — Cloud storage service
10. Leave a Voice Message
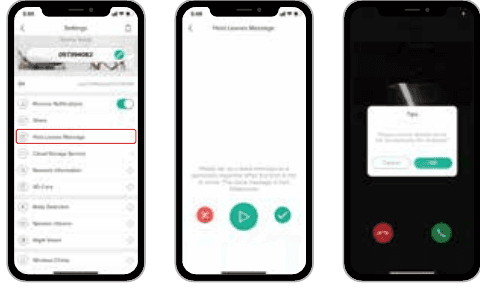
You can leave a maximum 30-second voice message on the on-board memory of your doorbell, so as to quickly respond your visitor by a tap on your phone when you are not convenient to answer the doorbell call. It can be done even without a Micro-SD card.
STEPS: Setting -> Host Leaves Message -> Record your message -> Hang off doorbell call and play the pre-recorded voice message.
11. Installation
Select Location
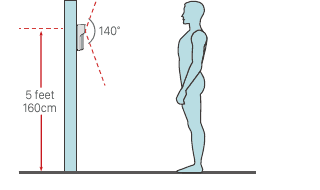
Your doorbell has 140-degree view angle and 120-degree human detection range.
It is suggested to mount your doorbell at least 5 feet (160 cm) above the ground for the best angle of view and motion detection performance.
Mount Your Doorbell
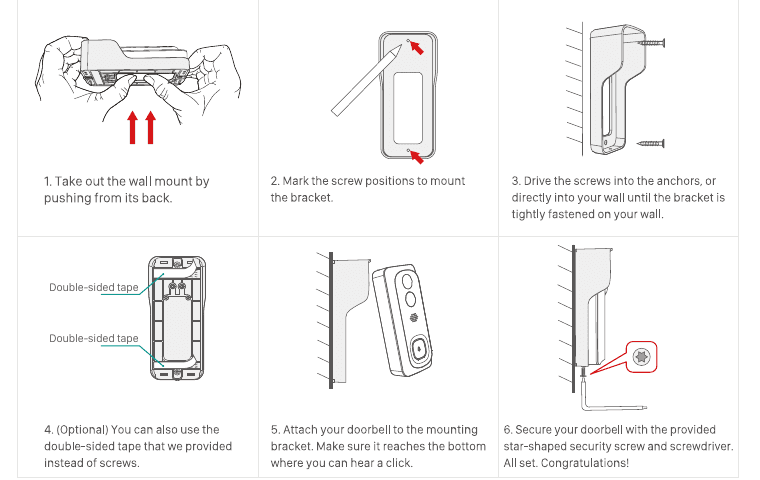
Take out the wall mount by pushing from its back.
Mark the screw positions to mount the bracket.
Drive the screws into the anchors, or directly into your wall until the bracket is tightly fastened on your wall.
(Optional) You can also use the double-sided tape that we provided instead of screws.
Attach your doorbell to the mounting bracket. Make sure it reaches the bottom where you can hear a click.
Secure your doorbell with the provided star-shaped security screw and screwdriver. All set. Congratulations!
12. Connect the Chime
Supply Power to the Chime
The chime can be powered by an USB compatible phone charger (DC5V 1A). You can also plug the chime to the USB port on your PC/notebook to supply power.
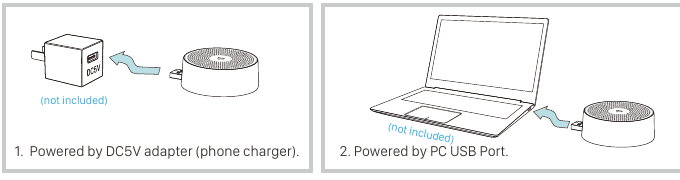
- 1 — Powered by DC5V adapter (phone charger).
- 2 — Powered by PC USB Port.
Pair with Doorbell
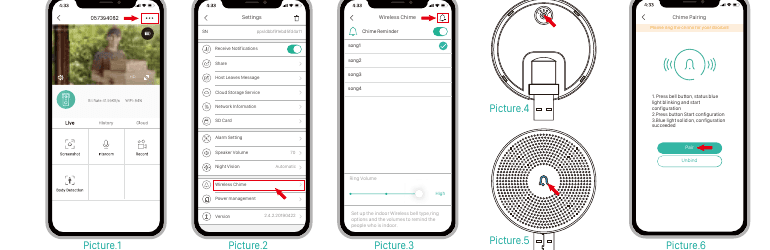
Tap on "..." and enter into Settings, select Wireless Chime. Tap on the bell icon to go to the pairing page.
Short click on the reset button behind the chime, and the LED indicator flashes blue, indicating the device is in pairing mode.
Tap "Pair" in the APP, and the doorbell will send a pairing signal to the chime. Pairing succeeds and the indicator on the Chime will be in solid blue. Then you can push the doorbell button to test the result.
Select Ringtone
Enter into Settings -> Wireless Chime, there are 4 ringtones available (See to Picture 3).
Volume Control
Enter into Settings -> Wireless Chime, and you can control the volume level for the chime (See to Picture 3).
Unbind
- Press and hold reset button on the chime for about 5 seconds till the indicator flashes blue twice, and the chime will be restored to factory default.
- You can also tap on "unbind" (See to Picture 6) in the APP to release the connection between doorbells and wireless chimes.
13. Key Features
- Remote view & control — The doorbell will be in "sleep mode" to save power, and can be activated remotely from the CloudEdge App to view and control.
- Full duplex audio — The doorbell support 2-way audio intercom. You can see, hear and speak to your visitor even when you are not on the go.
- Prerecorded quick response — A max. 30-second voice message can be prerecorded into the doorbell, which enables you to quickly reply your visitor with the voice message when you are not convenient to answer the call.
- PIR human detection — With PIR motion sensor build-in, your doorbell detects human movements in front of it and sends you motion alerts and snapshots prior to the visitor's knock. And it would prevent intrusion/burglary before they actually happen.
- Low battery alert — Embedded with power management module, your doorbell can tell you the battery consumption status, showing the estimated usage time and sending you low-battery alerts when it needs a recharge.
- Local & Cloud storage — Insert a Micro-SD card (Max. support 128GB) or activate the cloud storage service to record your video clips.
14. Specification
Video Doorbell
| Category | Item | Value |
|---|---|---|
| Video & Audio | Image Sensor | 1/2.7" CMOS (2.0MP) |
| OS | Hisilicon Lite-OS | |
| Resolution | 1920 × 1080 px | |
| Stream | HD/SD dual stream | |
| Infrared LED | High power IR LED with ICR | |
| Lense | 1.7mm/F2.0 | |
| Angle of view | 140° | |
| Min. illumin. | Color: 0.01 Lux; B&W: 0.001 Lux | |
| WDR | Digital WDR | |
| Audio | 2-way audio with noise cancellation | |
| Storage | Storage Type | Micro SD Card (Max 128G) |
| Cloud storage | Support | |
| Recording | Triggered by PIR motion sensor | |
| Network | Wifi Frequency | 2.4 GHz ~ 2.4835 GHz |
| Standards | IEEE 802.11 b/g/n | |
| Live View Speed | Within 3 ~ 4 Sec | |
| APP | App Name | CloudEdge |
| OS | iOS, Android | |
| Remote View | Within 2~4 sec | |
| Notification | Push notification within 2~4 sec | |
| General | Working Temp. & Humidity | -20℃ ~ 50℃; <90% (No condensation) |
| Power Source | Lithium 18650 Battery (3.5V, 3000mAh) × 2 | |
| Standby Current | 300µA | |
| Working Current | 250mA | |
| Standby Time | 4 ~ 6 Months | |
| Working Time | 2 ~ 3 Months (20 times wake up per day) | |
| Battery Charging | DC5V 1A~2A (Micro USB Port) | |
| Firmware Upgrade | OTA (on the air) | |
| Dimension (mm) | 61 × 41 × 135 | |
| Weight (g) | 235 |
Indoor Chime
| Item | Value |
|---|---|
| Power source | DC 5V 1A |
| Power port | USB (Type-A) |
| Consumption | 0.2W |
| Ringtones | 4 ringtongs optional |
| Volume | Max 100dB |
| Volume control | Low (mute), middle, high |
| Connection type | Radio frequency |
| Frequency | 433MHz-868MHz |
| Place of use | indoor |
| LED | Flashing blue: pairing mode / Solid blue: power on/pairing succeeded / Flash blue twice: reset to factory default |
| Working Temp. | -30℃ ~ 70℃ |
| Humidity | < 90%, no condensation |
| Dimension (mm) | Ø60 × 24 |
| Weight (g) | 33 |
FCC Warning
This device complies with part 15 of the FCC Rules. Operation is subject to the following two conditions: (1) this device may not cause harmful interference, and (2) this device must accept any interference received, including interference that may cause undesired operation. Any changes or modifications not expressly approved by the party responsible for compliance could void the user's authority to operate the equipment.
NOTE: This equipment has been tested and found to comply with the limits for a Class B digital device, pursuant to Part 15 of the FCC Rules. These limits are designed to provide reasonable protection against harmful interference in a residential installation. This equipment generates, uses and can radiate radio frequency energy and, if not installed and used in accordance with the instructions, may cause harmful interference to radio communications.
However, there is no guarantee that interference will not occur in a particular installation. If this equipment does cause harmful interference to radio or television reception, which can be determined by turning the equipment off and on, the user is encouraged to try to correct the interference by one or more of the following measures:
- Reorient or relocate the receiving antenna.
- Increase the separation between the equipment and receiver.
- Connect the equipment into an outlet on a circuit different from that to which the receiver is connected.
- Consult the dealer or an experienced radio/TV technician for help.
To maintain compliance with FCC's RF Exposure guidelines, this equipment should be installed and operated with minimum distance between 20cm the radiator your body: Use only the supplied antenna.
SAMZUY 2K (Wired) Video Doorbell
Quick start guide for the SAMZUY 2K wired video doorbell, covering setup, Wi-Fi configuration, live view, recording, chime pairing, retro-fit and hardwire installation, and troubleshooting.
tmezon Wireless Smart Doorbell
User manual for the tmezon Wireless Smart Video Doorbell - covering specifications, charging, WiFi setup with the CloudEdge app, installation, tamper alert, chime pairing, troubleshooting and device sharing.