 CloudEdge App Docs
XTU J10 Video Doorbell
User manual for the XTU J10 3MP battery-powered video doorbell camera, covering setup, charging, chime pairing, installation, accessories, and troubleshooting.
The XTU J10 is a 3MP battery-powered video doorbell camera with a wireless indoor chime, managed through the CloudEdge app.
Need help? Problems are often solved by changing a single setting. If your doorbell does not work as expected, check the Troubleshooting section below, or browse the Doorbell FAQs.
1. Meet the doorbell

- Camera
- PIR Motion Sensor
- Microphone
- Doorbell Button
- LED Indicator
- Speaker (backside)
- Security Screw
- Li-ion Battery (built-in)

- Charging Indicator
- Reset Key
- Type C Port
- Micro-SD Memory Card (optional)
- Micro-SD Card Slot
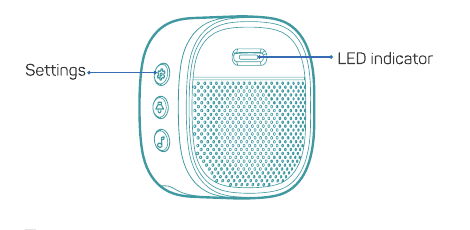
2. Meet the chime
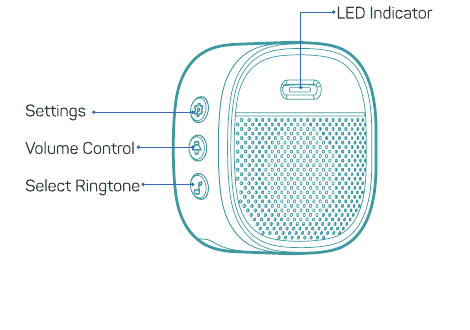
- LED Indicator
- Settings
- Volume Control
- Select Ringtone
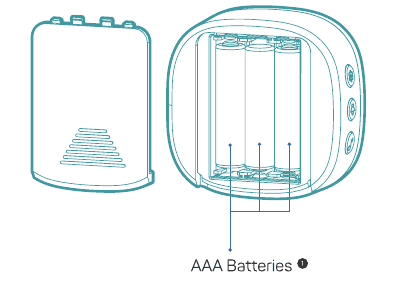
The chime is powered by AAA batteries.
Please mind the battery polarities when installing.
3. Charge your doorbell
Prior to the doorbell installation, please charge up your doorbell for about 8–10 hours until the charging LED turns BLUE from RED.
| LED status | Indication |
|---|---|
| Solid red | Battery charging |
| Solid blue | Fully charged |
Compatible charger (not provided): USB Type-C mobile phone charger (DC 5V — 1A–2A).

4. Get the APP and login
Search "CloudEdge" in the app stores, or scan the QR codes below, to download the app for iOS and Android.

Make sure your phone connects to a 2.4 GHz Wi-Fi, and Bluetooth is enabled.
Run CloudEdge on your phone and create a user account with your email ID and log in.
5. Set up doorbell
Please charge your doorbell prior to setting up.
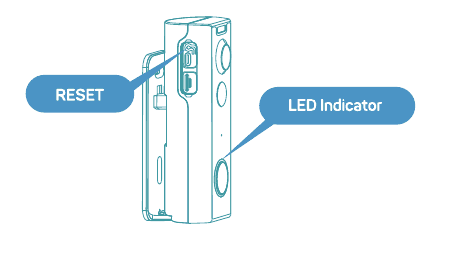
Press your doorbell button to activate the device, and you will see the LED indicator flashes red (once per second). If not, press and hold reset button for 5 seconds to restore factory defaults.
Bluetooth Connection — follow the in-app flow below to add the doorbell.
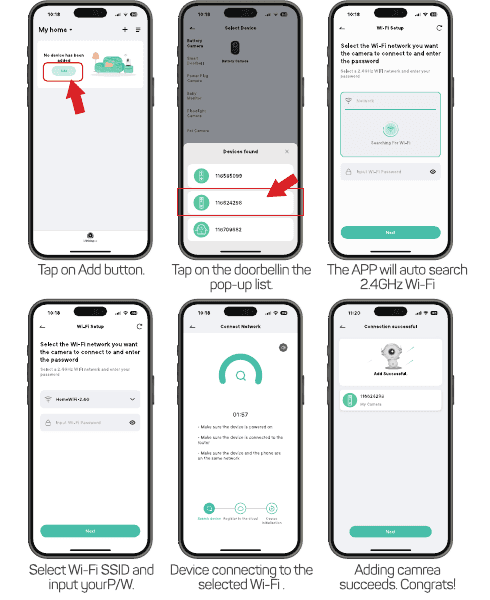
- Tap on the Add button.
- Tap on the doorbell in the pop-up list.
- The app will auto search the 2.4 GHz Wi-Fi.
- Select Wi-Fi SSID and input your P/W.
- Device connecting to the selected Wi-Fi.
- Adding camera succeeds. Congrats!
6. App Instructions
Start setting up your doorbell following the in-app instructions.
7. Pair with your indoor chime
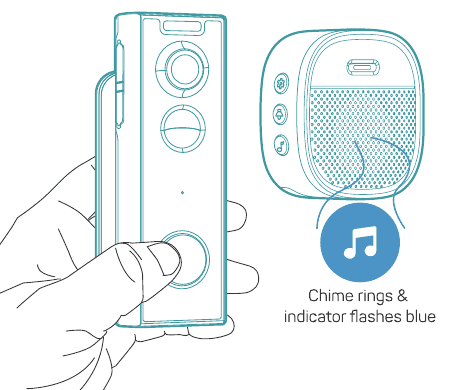
Click the SETTING button on the chime, and the chime will be in pairing mode for 20 seconds, with its red LED flashing.
Press the doorbell button to send a pairing signal, and your chime will sound to react, together with its blue LED flashing. Chime pairing succeeds.
Chime settings
 Settings — Click to enter/quit pairing mode; press & hold for 5 seconds to restore factory defaults.
 Volume control button — Click to control volume: level 1: 110 dB; level 2: 100 dB; level 3: 90 dB; level 4: 80 dB.
 Ringtone selection — Click to change ringtone (4 ringtones available).
8. Install Your doorbell
Determine the installation spot
The doorbell mount is flexible with 5 view angle options.
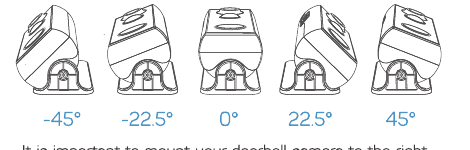
It is important to mount your doorbell camera to the right place where you can get a perfect view of your door front and improve its motion detection performance.
Recommended installation angle. Mount the doorbell about 4 feet (120 cm) high.
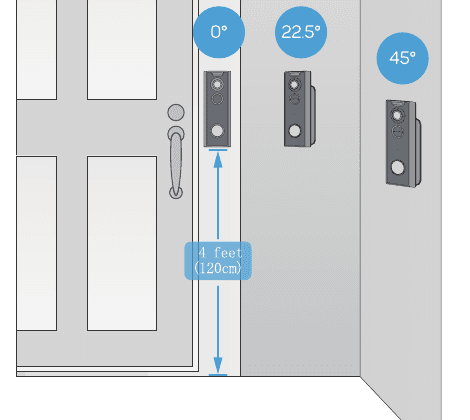
Installation steps
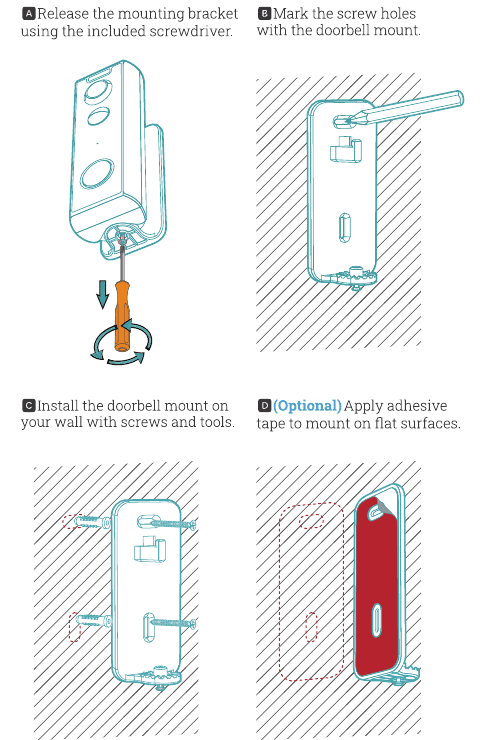
- A — Release the mounting bracket using the included screwdriver.
- B — Mark the screw holes with the doorbell mount.
- C — Install the doorbell mount on your wall with screws and tools.
- D (Optional) — Apply adhesive tape to mount on flat surfaces.
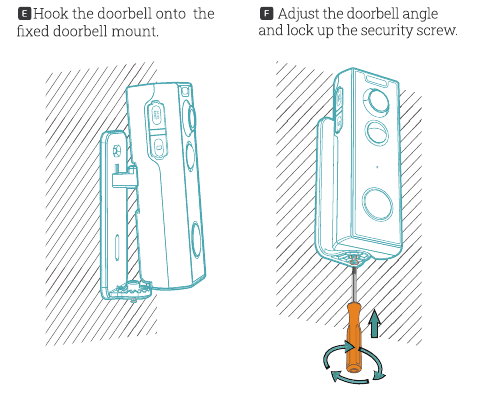
- E — Hook the doorbell onto the fixed doorbell mount.
- F — Adjust the doorbell angle and lock up the security screw.
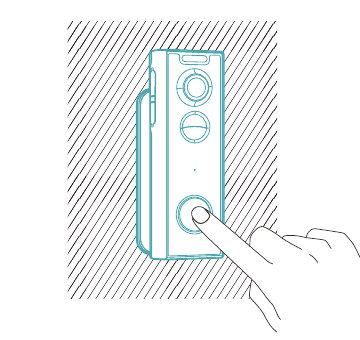
- G — All set, congratulations! Now you can press the doorbell button to try it out.
9. Related accessories
The following accessories are sold separately.

- Extra Chime
- Memory Card
If you want to know more about accessories, please contact us via Email or WhatsApp using the QR codes in the manual.
10. Trouble Shooting
Q1: Is the video doorbell powered by battery?
Yes, there is a Li-ion battery built-in. Thanks to the low power consumption technology, a full charge lasts for more than 2 to 3 months in our lab test environment (Lab test condition: 10 events per day, 15 seconds video recording per event).
Q2: Does it support legacy hardwire power source?
No, it doesn't. If you need longer battery endurance, suggest that adding a solar battery charger for your doorbell, if only there is sunshine in your doorbell location. You can contact our after-sale service to know where to buy.

Q3: Does it work with existing mechanical chime?
No. The doorbell comes with a battery powered wireless chime to notify people when your visitor presses the doorbell button. And our wireless chime is 100% wireless, you can place it almost everywhere you like. The transmission distance in open space is more than 100 meters (328 feet).
Q4: How many wireless chimes can be added to the doorbell?
You can add several wireless chimes to work with your video doorbell. And one chime can be paired with up to 8 video doorbells.
Q5: Does it support customized Motion Detection Zones?
Yes it does. You can customize the detection zone in the doorbell settings.
Q6: Does the doorbell support cloud storage?
Your doorbell supports local video storage by TF card. And you can also activate the cloud storage service in the app, try the 6 seconds cloud recording service.
Q7: Does it support Alexa or Google home?
The doorbell supports Alexa and Google home. You can set it according to your needs.
Still need help? Visit the Doorbell FAQs or contact XTU customer support at [email protected].
Video Doorbell and Wireless Chime Quick Start Guide
Set up the CloudEdge Video Doorbell and Wireless Chime — product overview, app download, device and chime pairing, installation, recharging, and troubleshooting.
XTU Video Doorbell User Manual
Setup and usage guide for the XTU 2K Video Doorbell with the CloudEdge app, covering charging, Wi-Fi pairing, indoor chime, installation, and the anti-tamper alarm.