 CloudEdge App Docs
BOIFUN Video Doorbell
Complete user manual for the BOIFUN smart video doorbell, covering battery charging, app setup with the CloudEdge app, live view, playback, voice messages, device sharing, chime pairing, installation, specifications and troubleshooting.
This guide explains how to set up and use the BOIFUN Smart Video Doorbell with the CloudEdge app.
Need more help? See the Doorbell FAQs. For any questions or suggestions, you can also message us through Amazon or email [email protected].
1. After-Sale Support
Thank you for purchasing our BOIFUN smart video doorbell. We provide a 24-month warranty. If you have any problem or suggestion, please feel free to contact us by Amazon message or send an email to our official mailbox ([email protected]). We will offer you the best service.
Note:
- The smart video doorbell only supports 2.4 GHz Wi-Fi; it is not compatible with 5 GHz Wi-Fi.
- Pay attention to the positive and negative poles of the battery when installing and removing it to avoid explosions.
- The battery model is 18650.
- Make sure the Wi-Fi signal strength is over 75%. If the smart video doorbell is far from the signal source, it will not connect successfully on the first attempt.
- If your router is connected with too many devices, the smart video doorbell will fail to connect to Wi-Fi because of an IP address conflict.
- This smart video doorbell is not compatible with a PC browser or PC software.
- This smart video doorbell supports event recording when Wi-Fi is disconnected.
- Video playback only works in the CloudEdge app. It is not compatible with third-party players.
- Snapshot and recording files are saved on the phone. Snapshot files of events are saved in the cloud. Event recording files are saved on the Micro SD card.
- Battery power is consumed if you watch live images or recorded videos from the SD card.
2. Packing List
Refer to the checklist below for all components.
- Video Doorbell
- USB Cable
- User Guide
- Screws & Tools
- Double-Sided Tape
3. Meet the Doorbell

| # | Component | # | Component |
|---|---|---|---|
| 1 | 3MP Camera | 9 | Security screw hole |
| 2 | Motion sensor | 10 | Microphone |
| 3 | Speaker | 11 | Power contacts |
| 4 | Doorbell button | 12 | Cable terminals |
| 5 | LED indicator | 13 | Micro SD card slot |
| 6 | Charging indicator | 14 | Built-in 18650 battery |
| 7 | Micro USB port | 15 | Security screw |
| 8 | Micro reset | 16 | Mounting screw holes |
4. Meet the Chime
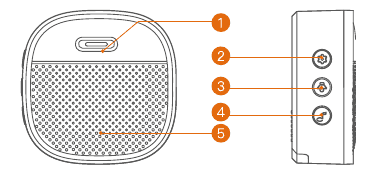
| # | Component |
|---|---|
| 1 | LED indicator |
| 2 | Reset |
| 3 | Volume |
| 4 | Ring tone |
| 5 | Speakers |
5. Charging the Battery
The batteries inside the doorbell are not fully charged in accordance with transport safety standards. Charge the batteries with a USB-compatible wall charger (not included) and the supplied USB cable for approximately 8–10 hours before installation.
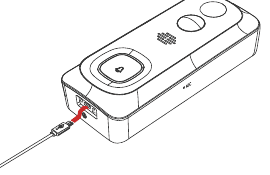
Battery management: Battery life depends on how often the doorbell is triggered. Here are some simple settings to avoid unnecessary power loss:
6. Download the App
Download and install the "CloudEdge" app from Google Play™ or the App Store™. The app is also available by scanning the QR codes using the QR code scanner on your smartphone.
Google Play™ is a trademark of Google Inc. App Store™ is a service mark of Apple Inc.
7. Configure Wi-Fi
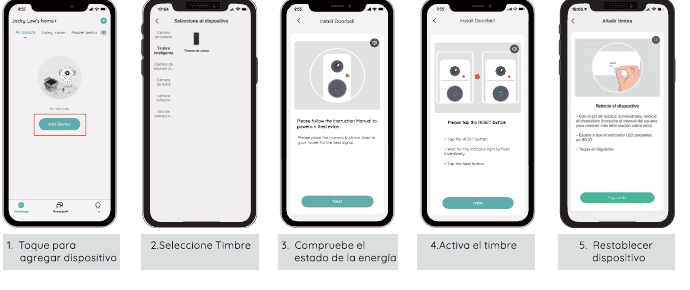
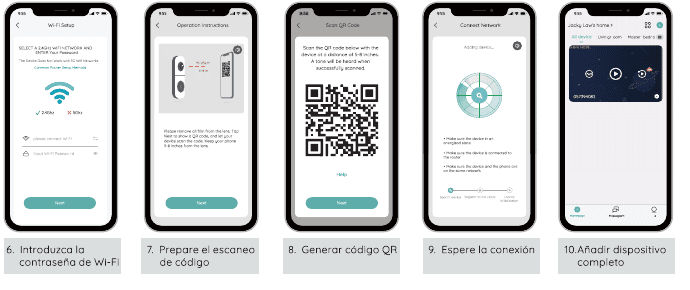
Setup Steps
Setup tips:
- Make sure the device is within a range of 10 meters or 30 feet of your router.
- Verify that your router is active and working, and perform the setup near your Wi-Fi router.
- Verify that your device is away from any device that causes interference (such as microwaves, baby monitors or other electronic devices).
- If you have separate network names for the 2.4 GHz and 5 GHz bands, make sure to be connected to a 2.4 GHz network.
- Avoid using special characters or symbols such as
@ ~ ! # $% ^ & * ...in your Wi-Fi name or password.
If your problems are not solved, feel free to send an email to [email protected].
8. Run a Test
After setup, tap the live view window in the app to run a test. Then take the doorbell to the door at the installation location and run a test there. Make sure the installation location is covered by a strong 2.4 GHz Wi-Fi signal.
Note: If the video quality of the doorbell outdoors is not as good as indoors, you may need to move the router closer to the installation location or invest in a Wi-Fi extender.
9. Live View
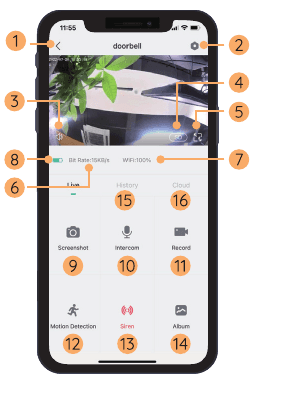
| # | Function | # | Function |
|---|---|---|---|
| 1 | Exit Live View | 9 | Screenshot button |
| 2 | Settings menu | 10 | Talk to the visitor |
| 3 | Volume on/off | 11 | Record on the phone |
| 4 | HD / SD switch | 12 | Motion detection on/off |
| 5 | Full-screen view | 13 | Siren |
| 6 | Bit rate | 14 | Photo album |
| 7 | Wi-Fi signal status | 15 | Video playback |
| 8 | Battery status | 16 | Cloud storage service |
Note: Live view will not trigger video recording.
10. Playback
If the Micro SD card is installed correctly, you can play back the video clips taken after motion is detected or a visitor rings. (Live view will not trigger device recording.) You can also back up video clips to the cloud, only if you have activated the cloud storage service (a free 7-day trial is available).
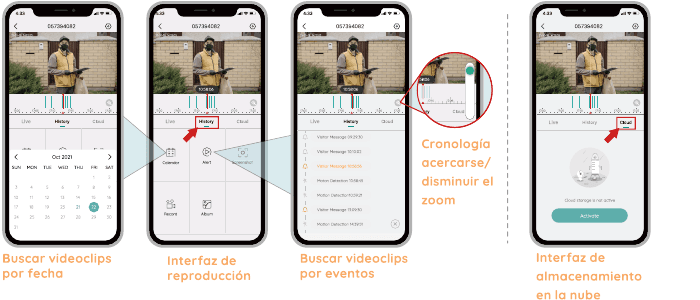
- Search video clips by date
- Playback interface
- Search video clips by events
- Cloud storage interface
- The timeline can be zoomed in or out.
11. Leave Voice Messages
You can pre-record a maximum of 3 voice messages (max. 10 seconds each) in the doorbell, which lets you quickly respond to your visitors when it is not convenient to answer the doorbell call.
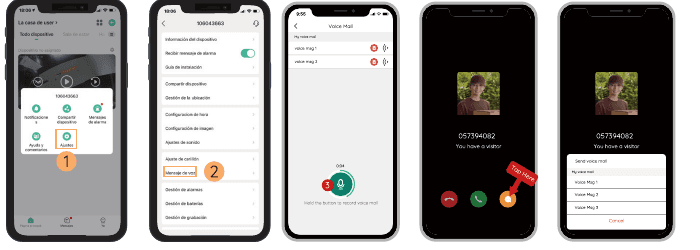
Steps
12. Share Your Device
Share by Account Search
Steps: Settings → Device Share → Tap "Add" → Tap "Account" → Enter the account ID → Confirm the sharing.
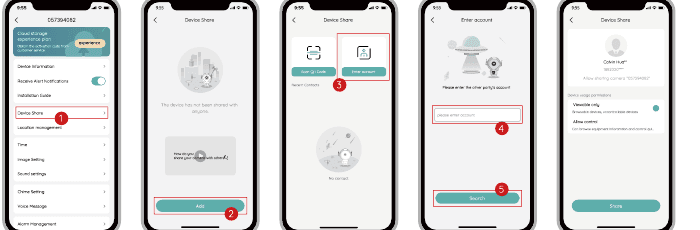
Share by Scanning a QR Code
New users can show their QR code to the administrator to share the device by scanning the QR code.
Find your QR code: Open the CloudEdge app → Tap Me → "Username" → "My QR Code" → Let the administrator scan your QR code.

Note:
- Guide your family members to download and install the CloudEdge app and register an account before sharing the device.
- There is no limit to the number of users who share one device.
- Only the administrator has access to the settings menu. Other users can only view and play back live.
- All users will receive doorbell calls and alarm notifications.
- Many users can access the doorbell simultaneously, for live view or playback.
13. Connect the Chime
1) Power On the Doorbell
The chime runs on 3 AAA 1.5 V batteries.

2) Click the Reset Button
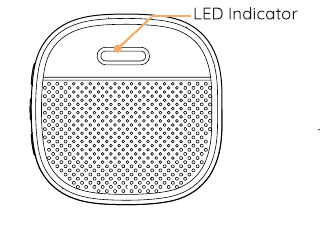
Press the RESET button on the wireless chime only once and you will see the LED indicator flashing blue, which indicates that the chime is in pairing mode.
3) Press the Doorbell Button
Press the doorbell button and the chime will sound to react. Pairing is performed correctly and the chime indicator will light up solid blue.

4) Chime Settings
You can enter the chime settings page following the setup steps below, to mute the chime reminder, select ring tones, adjust the chime volume or unlink the connection with the chime.

Note:
- Your doorbell communicates with the chime through radio frequency, not Wi-Fi. You can even pair them before setting up the doorbell.
- You can add many chimes to one doorbell and vice versa.
- Press and hold the RESET button on the chime for 5 seconds until the indicator flashes blue 3 times; you can also release the connection between the chime and its connected doorbell.
14. Installation
Select Location
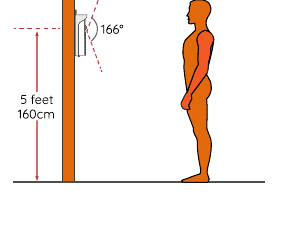
Your doorbell has a 166-degree viewing angle and a 120-degree human detection range.
It is suggested to mount the doorbell at least 5 feet (160 cm) above the ground for the best viewing angle and motion detection performance.
Connect Your Doorbell (Optional)
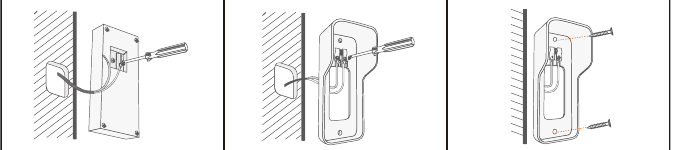
The doorbell works with 12 V ~ 24 V AC and 12 V DC hardwired power sources. Either of the wires can be connected to any terminal. The wire order does not matter.
- When you connect the doorbell, do it under the guidance of professionals.
- The doorbell works with a 12 V – 24 V AC and 12 V DC power source. Either of the wires can be connected to any terminal. The connection order does not matter.
- If your doorbell works on batteries only, you may need to charge it from time to time. Battery life tested in the laboratory: 12 months on standby, 6 months of regular use (triggered 20 times a day). The actual battery life may differ due to a different trigger frequency.
Wired Installation

Wireless Installation

15. Specifications
Video Doorbell
Video & Audio
| Item | Value |
|---|---|
| Image sensor | 1/2.7" CMOS (2.0MP) |
| OS | Lite-OS |
| Resolution | 2304 × 1296 px |
| Stream | Dual stream HD / SD |
| Infrared LED | High-power IR LED with ICR |
| Lens | 1.7mm / F2.0 |
| Point of view | 166° |
| Min. illumination | Color: 0.01 Lux; Black and white: 0.001 Lux |
| WDR | Digital WDR |
| Audio | Two-way audio with noise cancellation |
Storage
| Item | Value |
|---|---|
| Storage type | Micro SD card (Max 128G) |
| Cloud storage | Supported |
| Recording | Triggered by the PIR motion sensor |
Network
| Item | Value |
|---|---|
| Wi-Fi frequency | 2.4 GHz ~ 2.4835 GHz |
| Standards | IEEE 802.11 b/g/n |
| Live view speed | Within 3 ~ 4 seconds |
Software
| Item | Value |
|---|---|
| App name | CloudEdge |
| OS | iOS, Android |
| Remote view | Within 2 ~ 4 seconds |
| Notification | Push notification in 2 ~ 4 seconds |
General
| Item | Value |
|---|---|
| Working temp. & humidity | -20°C ~ 50°C; <90% (non-condensing) |
| Power source | Lithium 18650 battery (3.5V, 3350mAh) × 2 / AC 12 V – 24 V power / DC 12 V hardwire power |
| Standby current | 300μA |
| Working current | 250mA |
| Standby time | 4 ~ 6 months |
| Working time | 2 ~ 3 months (20 wake-ups per day) |
| Battery charging | DC5V 1A ~ 2A (Micro USB port) |
| Firmware update | OTA (over the air) |
| Dimension (mm) | 61 × 41 × 144 |
| Weight (grams) | 145 + 90 (battery weight) |
Indoor Chime
General
| Item | Value |
|---|---|
| Power source | AAA 1.5 V × 3 units |
| Consumption | 0.4W |
| Ring tones | 4 optional ringtones |
| Volume | Max 100dB |
| Volume control | Low (mute), medium, high |
| Connection type | Radio frequency |
| Frequency | 433MHz-868MHz |
| Place of use | Indoor |
| LED | Blue flashing: pairing mode Solid blue: powered on / pairing succeeded Blue flash twice: factory reset by default |
| Temp. | -10°C ~ 70°C |
| Humidity | < 90%, non-condensing |
| Dimension (mm) | 65 × 65 × 27mm |
| Weight (grams) | 55 |
16. Troubleshooting
Q1: Why couldn't I configure Wi-Fi for the doorbell?
A1:
- The device only works with 2.4 GHz Wi-Fi, but is not compatible with 5 GHz Wi-Fi.
- The Wi-Fi network is not good — try to keep the camera close to the Wi-Fi router when configuring it.
- The Wi-Fi password is incorrect. Check whether there are special characters in the password, or whether the network is specially encrypted.
Q2: How to improve battery life performance?
A2:
- Set the recording time to normally 20–30s, which is enough for daily needs.
- It is recommended to lower the sensitivity of "Motion Detection" or enable the "Human Motion Detection" function.
- When the doorbell faces the main road, it is recommended to adjust the doorbell angle to avoid unnecessary triggering.
- Make sure the Wi-Fi signal strength is over 75%. If it is below 75%, the doorbell will trigger continuously. Install the camera closer to the router or add a Wi-Fi extender to improve the home Wi-Fi performance.
Q3: How can I tell if I have 2.4G or 5G Wi-Fi?
A3: Check the user manual of your router or call your network operator for help.
Q4: Does it have to be on the same Wi-Fi to view the camera, or is it over the Internet from anywhere?
A4: You can view the camera from anywhere, if your camera is well connected to the Internet.
Q5: Are any of the recordings saved in the cloud? Or are they saved mainly on the built-in SD card?
A5: It supports SD card recording, as well as cloud storage. You can enable the cloud storage service in the app.
Q6: What happens when the SD is full?
A6: When the memory card is full, the camera automatically deletes the oldest images.
Q7: Does it work with Google Home or Alexa?
A7: We are sorry, this model is not compatible with Google Home or Alexa.
Q8: Why does it lose the Wi-Fi connection?
A8: Check the network connection of your phone and the Wi-Fi router. If the network signal strength is below 75%, the doorbell will trigger continuously. Install the camera closer to the router or add a Wi-Fi extender to improve the home Wi-Fi performance.
Q9: Can motion detection be disabled?
A9: Yes, of course. Recording is triggered by detected motion. You can configure the sensitivity or disable motion detection in the settings menu.
Q10: Did we receive chargers for the batteries?
A10: The battery charger is not included. Please charge the batteries with a USB-compatible charger (DC5V 1A ~ 2A) for approximately 8–10 hours.
Q11: Can we have 2 or more doorbells in the same residence?
A11: Yes, you can add more than one device in the same residence.
Q12: If I have other questions, what can I do?
A12: If you encounter any other problem, send your order and problem to [email protected].
BOIFUN Bell J1 Wireless Video Doorbell
User manual for the BOIFUN Bell J1 wireless video doorbell — hardware overview, app setup, Wi-Fi pairing, live view, playback, voice messages, sharing, chime pairing, installation, specifications and FAQs.
CloudEdge Video Doorbell and Wireless Chime
Quick start guide for the CloudEdge Video Doorbell and Wireless Chime — what's included, product overview, app setup, chime pairing, installation, recharging, and troubleshooting.