 CloudEdge App Docs
ieGeek Wireless Video Doorbell
Quick start guide for the ieGeek Wireless Video Doorbell and indoor chime: box contents, charging, app setup, Wi-Fi pairing, chime pairing, installation and troubleshooting.
This guide covers the ieGeek Wireless Video Doorbell and its indoor chime, set up through the ieGeek Cam app (the CloudEdge app is also supported).
Need more help? See the Doorbell FAQs. For sales or after-sales questions, email [email protected].
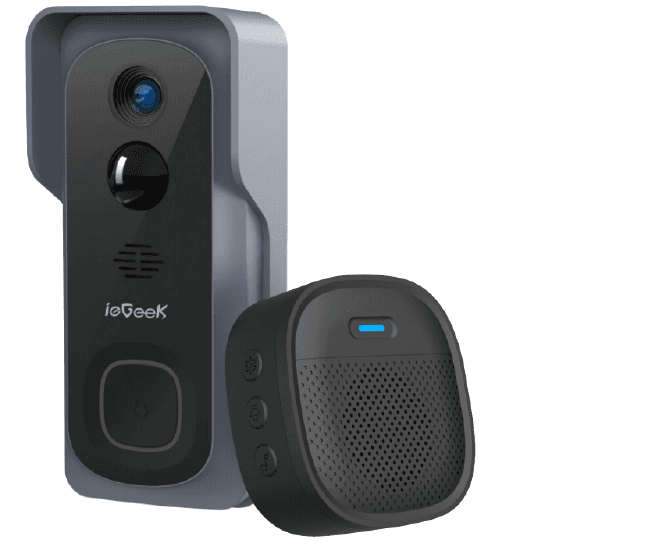
1. What's in the Box
Please consult the below checklist for all the components.

- Video Doorbell (with Bracket)
- Indoor Chime
- Charging Cable
- Screws & Tools
- User Guide
- Double-sided Tape
2. Meet the Doorbell
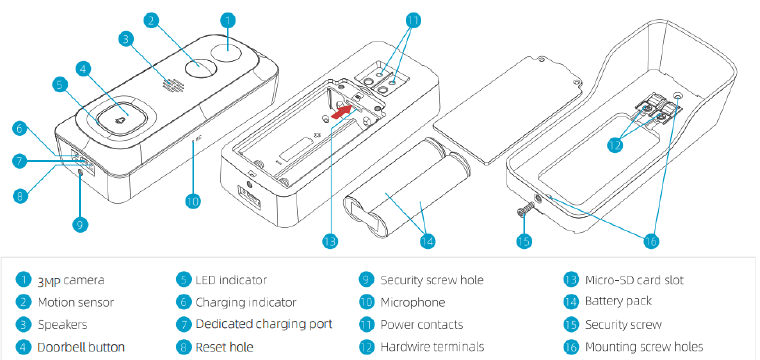
- Lens
- PIR Motion Sensor
- Microphone
- Doorbell Button (Power Button)
- LED Indicator
- Speaker
- Unlock hole
- Unlock Pin
- Reset Button
- Charging Port
- Charging Indicator
- Micro-SD Card Slot
- Doorbell Bracket
The doorbell has a Li-ion battery built in. When you receive the product, the doorbell and bracket are integrated.
3. Meet the Chime
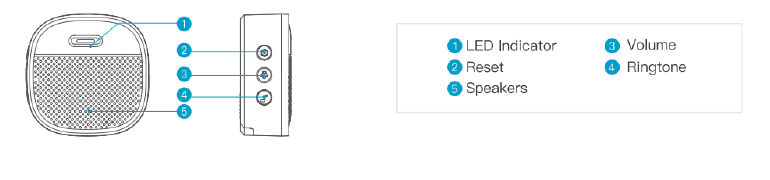
- LED Indicator
- Setting
- Volume Control
- Select Ringtone
- AAA Batteries
| Button | Operation |
|---|---|
| Setting | Click to enter/quit pairing mode; press and hold for 5 seconds to restore factory defaults. |
| Volume Control | Click to control volume: level 1: 110 dB; level 2: 100 dB; level 3: 90 dB; level 4: 80 dB. |
| Select Ringtone | Click to change ringtone (4 ringtones available). |
4. Charge Your Doorbell
| LED Status | Indication |
|---|---|
| Solid red | Battery charging |
| Solid blue | Fully charged |
Compatible charger (not included): USB compatible mobile phone charger (DC 5V 1A-2A).
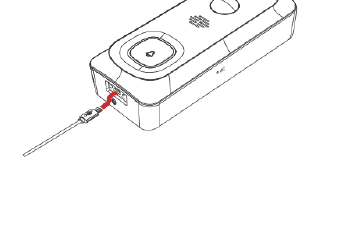
Battery Life: 1-2 months. Under laboratory environments, the wireless doorbell works 2 months with 20 triggers a day. Battery life depends on temperature, PIR trigger frequency and battery aging factors.
5. App Download
Search 'ieGeek Cam' in the App Store or scan the QR code in the printed guide to download the app. (The 'CloudEdge' app is also supported.)
- Multi-Device Connection: You can add multiple devices on the ieGeek Cam app for easy management.
- Device Sharing: You can share the camera screen with other users by scanning a QR code or entering other accounts. Path: Settings → Device sharing → Follow the app guidance.
Notes:
- The same account does not support simultaneous login on different devices.
- Only the main account can adjust the camera settings; the shared account cannot modify the settings.
6. Set Up Doorbell
6.1 Install Micro SD Card (Not included)
- Use the included unlocking pin tool to insert into the small hole on the bottom.
- Remove the doorbell from the bracket.
- Insert the Micro SD card into the card slot on the left side of the doorbell.
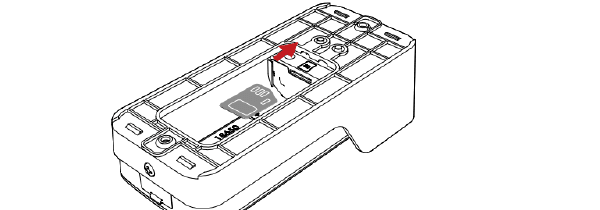
Notes for Micro SD Card:
- Please insert the Micro SD card before powering on, otherwise the Micro SD card cannot be detected.
- The ieGeek doorbell supports Micro SD card up to 128GB.
- Requirement: Class 10 reading and writing speed and FAT32 file format (formatted before use).
6.2 Connect the Doorbell to Wi-Fi
Press the doorbell button to activate it, and you will see the LED indicator flash red (once per second). If not, press and hold the reset button for 5 seconds to restore factory defaults.
Method 1: Bluetooth Set Up
- On the Homepage, tap "Add" or "+" in the upper right corner, tap "Add Device".
- If the cellphone Bluetooth doesn't turn on, the app will show a pop-up; please allow it to turn on Bluetooth.
- After Bluetooth turns on, the app will automatically search for devices that are on and not bound. Select the device you want to connect to in the search list.
Method 2: Scan the QR Code
- On the Homepage, tap "Add" or "+" in the upper right corner, tap "Add Device".
- Choose Smart Doorbell (2.4G Wifi) and follow the in-app instruction.
Tips:
- Please operate settings near your Wi-Fi router.
- Make sure your phone is connected to 2.4GHz Wi-Fi.
- Make sure the doorbell is turned on, and the LED indicator is flashing red. If not, press and hold RESET for 5 seconds.
- Make sure the Wi-Fi signal is good, and the Wi-Fi password is correct.
| LED Status | Indication |
|---|---|
| Solid red | Device is abnormal |
| Flash red (once/sec) | Ready for Wi-Fi configuration |
| Flash red (twice/sec) | Connecting to Wi-Fi |
| Solid blue | Device is online |
| Flash blue (once/sec) | Live-viewing doorbell cam |
| Flash blue (twice/sec) | Firmware upgrading |
7. Pair with Your Indoor Chime
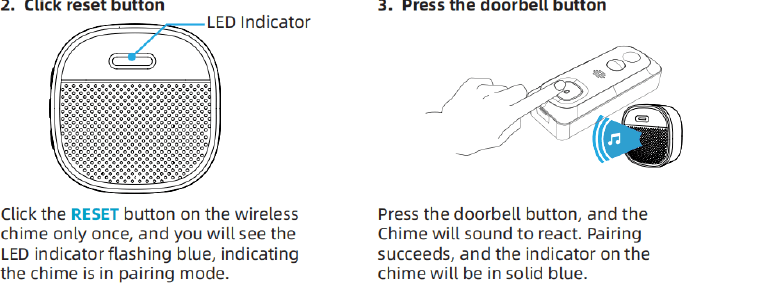
When you receive the product, the chime and the doorbell are connected by default. If you find the chime is not connected to the doorbell, you can connect it manually as follows:
- Click the SETTING button on the chime, and the chime will be in pairing mode for 20 seconds, with its red LED flashing.
- Press the doorbell button to send a pairing signal, and your chime will sound to react, together with its blue LED flashing. Chime pairing succeeds.
8. Install Your Doorbell
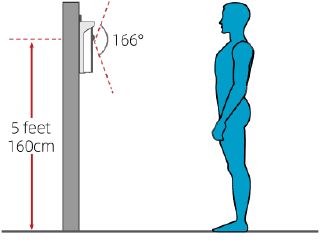
Select a Location
It is suggested to mount the doorbell at least 4 feet (120 cm) above the ground for optimal angle of view and best motion detection performance.
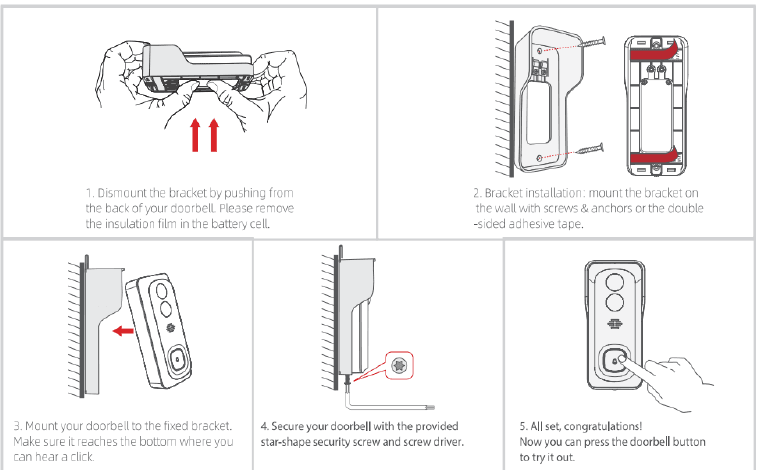
Mount Your Doorbell
9. Trouble Shooting
Q1: Is the video doorbell powered by battery? A1: Yes, there is a Li-ion battery built-in. Thanks to the low power consumption technology, a full charge lasts for about 2 months in our lab test environment (lab test condition: 10 events per day, 15 seconds video recording per event). When the temperature is too low, the power consumption rate will increase.
Q2: Does it support legacy hardwire power source? A2: No, it doesn't.
Q3: Does the doorbell support 5GHz Wi-Fi? A3: No, it only supports 2.4GHz Wi-Fi.
Q4: How many wireless chimes can be added to the doorbell? A4: You can add several wireless chimes to work with your video doorbell.
Q5: Does it support customized Motion Detection Zones? A5: Yes it does. You can customize the detection zone in the doorbell settings.
Q6: Does the doorbell support cloud storage? A6: Your doorbell supports local video storage by Micro SD card. You can also activate the free cloud storage service in the app. Free cloud storage supports 6s video recording and the storage time is seven days. Set path: Setting → Cloud Storage Service → Basic Cloud Storage → Scroll to the bottom of the page → Tap to on.
Q7: How to install the Micro SD card? A7: Use the included pin to insert into the small hole at the bottom of the doorbell to remove the doorbell from the bracket. The SD card slot is on the left side. (The doorbell and the bracket are integrated when you receive it.)
ieGeek Bell J10 Video Doorbell
Quick start guide for the ieGeek Bell J10 wireless video doorbell, covering box contents, charging, Wi-Fi setup, indoor chime pairing, installation, and troubleshooting.
ieGeek Wireless Video Doorbell Quick Start Guide
Box contents, doorbell and chime layout, charging, app setup, Wi-Fi pairing, chime pairing, installation and troubleshooting for the ieGeek Wireless Video Doorbell with the CloudEdge app.