 CloudEdge App Docs
Victure VD300 Video Doorbell
User manual for the Victure VD300 battery-powered video doorbell with hardwired installation kit, covering package contents, SD card and battery setup, charging, CloudEdge app pairing, chime kit wiring, mounting, and daily use.
This guide covers the Victure VD300 video doorbell (with hardwired installation kit), set up and managed through the CloudEdge app.
Need more help? See the Doorbell FAQs or contact Victure support at [email protected] to extend your warranty to 24 months. Lifetime professional tech support is provided by Victure.
1. Package Content

- (1) VD300 Doorbell
- (2) Mounting Bracket
- (3) Hardwired Installation Kit
- (4) USB Cable
- (5) Batteries
- (6) Double-sided Tape
- (7) Reset Pin & Security Screw
- (8) Screws
- (9) Screwdriver
- (10) User Manual
Details for Hardwired Installation Kit

- (1) Chime Kit
- (2) Wire Extensions
- (3) Double-sided Tape
- (4) Wire Nut
- (5) 2 Metal Parts and 2 Screws
2. Meet the Doorbell

- (1) Camera
- (2) PIR motion Sensor
- (3) Speakers
- (4) Status Indicator
- (5) Doorbell Button
- (6) Microphone
- (7) Charging Indicator
- (8) Micro USB Port
- (9) Reset Hole
- (10) Hard-wired Power Port
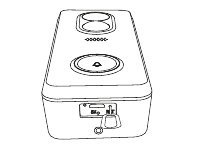
- (11) SD Card Slot
- (12) Battery Compartment
3. Preparation
Insert the SD card
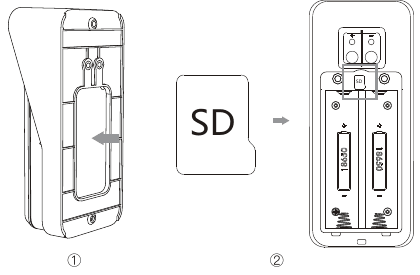
Take out the mounting bracket by pushing from the back of the doorbell.
Unscrew the battery compartment lid with the supplied screwdriver.
Insert the Micro SD card to the SD card slot.
Tip: Doorbell supports class 10 micro SD card from 8G to 128G. Please format the SD card with 'FAT32' format before use. Insert the SD card without powering the camera.
Insert the battery
Place the new battery in the battery compartment with correct polarity, and tighten the lid of the battery compartment securely with screws.
Tip: Please make sure the lid of the battery compartment is tightened with screws, so that there won't be any water leakage issue.
Charge your Victure doorbell

Charge the doorbell before installation using the provided USB cable. The small charging indicator next to the USB port will glow blue once fully charged.
If you can't wait to play with your doorbell, go ahead and set it up. But, we recommend fully charging it for about 8-10 hours before installation.
Tip: The battery life of a doorbell system is affected by the amount of activation (such as traffic or population density of the neighborhood).
4. In-app Setup
Download the App

The CloudEdge app will walk you through setting up and manage your Victure Video Doorbell. Please search 'CloudEdge' in the Apple Store or Google Play. You could also download the app by scanning the QR code to download the app.
Grab Your Wi-Fi Password for 2.4GHz Network. It's required for the in-app setup. Write it down so it's handy when you need it.
Set up your VD300 near your router
Tip:
- Doorbell currently supports 2.4 GHz Wi-Fi network only (5G is not supported).
- Wi-Fi password does not include special characters such as @% and *.
- Please move your Wi-Fi router closer to your door or invest in a Wi-Fi extender for stronger Wi-Fi signal and better video quality.
Steps
Register or Log in with Existing Account.
In the CloudEdge app, please register a new account with your email address or log in with an existing account.
Tip: You will need the verification code for your email address during the account registration process. If you could not find the code in your email inbox, please check your spam folder or another tab of your email. You could also try to use a new email.
Add doorbell
Please tap the '+' icon to add the device. When prompted, select 'doorbell' and choose VD300 doorbell.

Reset the doorbell and tear off the protective film
When switching or connecting to a new network for the doorbell, please perform a hard reset on your doorbell by inserting the reset pin into the Reset Hole of the doorbell and hold for 5 seconds to reset the doorbell and pair with the cell phone. You will hear a sound, and the status indicator turns to be flash red when the reset is done.
Tear off the protective film from the doorbell's shell and follow the in-app instruction to pair the doorbell with the app.
Doorbell status indicator guide
| Action | Light Ring |
|---|---|
| Pairing mode | Slow blinking red |
| Connecting to Wi-Fi | Fast blinking red |
| Doorbell Error or Network Error | Solid red |
| Doorbell Wi-Fi connected and function properly | Solid Blue |
Tip:
- Please adjust the angle and the distance between the doorbell and the cell phone slowly to make sure the doorbell is paired successfully.
- If you could not pair the doorbell with your app, please check whether your network is 2.4GHz and the make sure the network signal is strong.
Try it out!
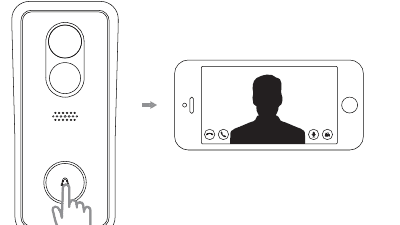
After setup, push the button on the front of your Victure Doorbell to see video from the camera in the CloudEdge app.
Tip:
- The camera should be connected with your phone via Wi-Fi for the first time. After that, you could see the video in the app with the cellular data.
- If video quality is not as good outdoors as it was indoors, you may need to move your router closer to your door or invest in a Wi-Fi extender. Email our warranty team to learn more about it.
5. Hardwired Installation
How it works
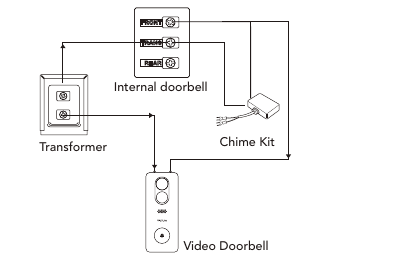
Perform the in-app setup for your Victure's video doorbell. For more details, please check the user manual or follow the in-app instruction for your Victure's video doorbell about pairing the doorbell with the app.
Note: Please choose 'No' in the app for the mechanical doorbell option if you do NOT connect the doorbell with the mechanical doorbell system. The wrong selection in the app for the mechanical doorbell may cause damage to the doorbell.
Wiring the Chime Kit
Turn off the circuit breaker for your internal doorbell.
Wiring your doorbell to an internal doorbell is optional. If you do so, make sure your existing doorbell wires are working, then shut off power at the breaker before connecting your existing doorbell wires to the small wire terminals inside the mounting bracket. Ring your doorbell again to confirm it is now off.
Remove the cover from your internal doorbell.
Loosen the internal doorbell's front terminal (usually labeled as "FRONT", "F", "1", or "C1") and transformer (usually labeled as "TRANS", "T", "AC", or "0") terminal screws on your internal doorbell. Connect one wire from the Chime Kit to the "Front" terminal, and the other wire to the "Transformer" terminal, leaving the existing doorbell wires in place. Then, re-tighten the screws. It doesn't matter which Chime Kit wire goes to each terminal.

TIP: Wire of the chime kit can connect to either "Trans" or "Front" terminal as the electric current is alternating current.
Position the Chime Kit within your internal doorbell, away from any moving parts. Use the double-sided tape to fix the Chime Kit in place, if desired.
Replace the cover on your internal doorbell.
Mark the install location
If you already have a junction box at the place where you're installing your Victure's video doorbell, skip the next couple of steps and screw it directly into that junction box. If you don't have a junction box, trace the outline of the supplied template, then cut a rectangular hole in your wall to make room for the mounting bracket.
Note: Please turn OFF the circuitbreaker for your internal doorbell!

Tips: If you are installing your Victure doorbell in a house with siding or in a house where the door is atop a set of stairs, please purchase the additional wedge mount to angle your doorbell down. The recommended mounting height is 4 feet (120 cm).
Install the mounting bracket
Accessories shown in these steps will be included in the doorbell package, if not labeled.
Take out the mounting bracket by pushing the doorbell from its back.

Mark the place to install the screws.
Insert anchors (optional).
Tip: If you're installing on the hard surface such as stucco, brick, or concrete, mark the drill holes. Use the bit to drill holes in your wall and insert the anchors. If you're installing on wood, skip this step and throw the anchors in that drawer of stuff you never use.
Connect the metal parts and the wires with mounting bracket
Connect the wires coming out of your wall to the screws on the back of your Victure doorbell. Either wire can connect to either screw. The order doesn't matter.
Attach the Wire Extensions (optional)
If you have trouble connecting the wires coming out of your wall to the back of your doorbell, please use the wire extensions and wire nuts (both included in this hardwired accessory kit) for it.

Feed all the wires (and the wire nuts, if you used them) into your wall and secure your mounting bracket on the wall using two screws. Please drive the screws into the anchors or directly into the wall until they're flush with mounting bracket and the bracket is flat against the wall.
Attach the doorbell and secure with the security screw.
Tip: If you would like to take out the doorbell, please make ensure to unscrew the security screw and take out the doorbell from the lower part of the doorbell.
6. Using your Doorbell
In the CloudEdge app, tap your Victure doorbell to view its settings. Here you could configure your doorbell to meet your needs.

- Intercom — speak to visitors and hear what they have to say.
- Body Detection — enable to actively detect the movement with PIR sensor.
- Screenshot/Record — Take a live Screenshot or Video when you would like to catch the moment.
- History — where you could replay the recordings and check the alarms with timeline playback.
- Automatic Power-Saving Mode — when the doorbell does not detect anything for a long time. You could re-activate and control the doorbell remotely with your CloudEdge app.
Switch these functions on or off on this screen.
Answering your doorbell

- Live Stream
- Device Name
- Speaker — enable to hear visitor's sound.
- Microphone — enable to speak to the visitor. Please turn off this function for higher volume of the visitor's sound.
Settings

- Device Share — let family or friends answer live events and view recordings by adding the user account as a friend and selecting the user to share. (The shared user needs to approve your friend's request in the message section before you could share the device.)
- Host Leaves Message — quick prerecorded response if you are busy and refuse to answer the call.
- Cloud Storage Service — an extra subscription fee will be charged if you would like to store the recordings in the cloud.
- SD Card — format the SD card before use. This doorbell features the loop recording technique for the SD card.
- Alarm Setting — adjust the sensitivity of the motion sensor for the detection range.
- Speaker Volume — adjust the volume of the visitor's sound. For higher visitor's sound volume, you could mute the microphone function.
- Night Vision — view the crisp images no matter day or night. The external light source will be recommended for better night vision quality.
- Wireless Chime — pair with our optional chime. Contact our warranty team for the discount of this accessory.
7. Troubleshooting
Q: I've installed my doorbell, but it won't turn on?
A: Please ensure that the doorbell has enough power. If you power the doorbell with wires, please make sure to connect power kit properly, and the connected power is 12V-24V AC. If all the things have been checked, but you're still not getting enough power, you may need to bypass your internal doorbell.
Q: I cannot connect the doorbell to my Wi-Fi network?
A: Tips
- Doorbell currently supports 2.4 GHz Wi-Fi network only (5G is not supported). Make sure the Wi-Fi network is not an unencrypted (open) network.
- Wi-Fi password does not include special characters such as @% and *.
- Move your Wi-Fi router closer to the door or invest in a Wi-Fi extender for a stronger Wi-Fi signal.
- Test your Wi-Fi network with other devices such as your phone or smart TV to make sure it is operating properly.
- Reset the doorbell before pairing with the app. Make sure the doorbell is in pairing mode. Follow the on-screen pairing instructions carefully and don't skip any steps.
- Check whether your Wi-Fi router is using MAC filtering. If you cannot disable MAC filtering, you will need to add the doorbell's MAC address to the router's white-list of allowed devices. You can find the doorbell's MAC address printed on a label at the back of the device.
8. Need Help?
For questions, support, or warranty claims, contact us at the address below or visit govicture.com. Please include your Amazon order number and product model number.
Email: [email protected]
9. FCC Certification Information
Warning: Changes or modifications to this unit not expressly approved by the party responsible for compliance could void the user's authority to operate the equipment.
This device complies with part 15 of the FCC Rules. Operation is subject to the following two conditions: (1) This device may not cause harmful interference, and (2) this device must accept any interference received, including interference that may cause undesired operation.
This equipment has been tested and found to comply with the limits for a Class B digital device, pursuant to part 15 of the FCC Rules. These limits are designed to provide reasonable protection against harmful interference in a residential installation. This equipment generates, uses and can radiate radio frequency energy and, if not installed and used in accordance with the instructions, may cause harmful interference to radio communications. However, there is no guarantee that interference will not occur in a particular installation. If this equipment does cause harmful interference to radio or television reception, which can be determined by turning the equipment off and on, the user is encouraged to try to correct the interference by one or more of the following measures:
- Reorient or relocate the receiving antenna.
- Increase the separation between the equipment and receiver.
- Connect the equipment into an outlet on a circuit different from that to which the receiver is connected.
- Consult the dealer or an experienced radio/TV technician for help.
RF exposure compliance statement: This device has been evaluated to meet the general RF exposure requirement, it can be used in portable exposure condition without restriction.
tmezon Wireless Smart Doorbell
User manual for the tmezon Wireless Smart Video Doorbell - covering specifications, charging, WiFi setup with the CloudEdge app, installation, tamper alert, chime pairing, troubleshooting and device sharing.
100% Wire-free Video Doorbell & Chime
Quick start guide for the 100% wire-free video doorbell (Model Bell J7) and wireless chime (Model Chime06), covering charging, chime power, app setup, LED states, chime pairing, installation, tamper alert, and specifications.