 CloudEdge App Docs
Video Doorbell and Wireless Chime Quick Start Guide
Set up the CloudEdge Video Doorbell and Wireless Chime — product overview, app download, device and chime pairing, installation, recharging, and troubleshooting.
This guide covers the setup of the Video Doorbell and Wireless Chime with the CloudEdge app, including pairing, installation, recharging, and troubleshooting.
Need more help? See the Doorbell FAQs for answers to common questions.
1. Product Overview
Meet Our Video Doorbell
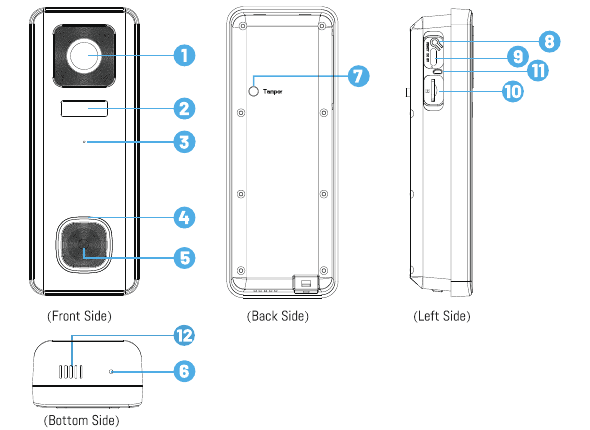
- 1. FHD Optical Lens
- 2. PIR Motion sensor
- 3. Microphone
- 4. LED Indicator
- 5. Doorbell Button
- 6. Security Lock
- 7. Anti-theft Alarm Button
- 8. Reset key
- 9. USB charge port
- 10. Micro SD card slot
- 11. Charging indicator
- 12. Speaker
| Component | Description |
|---|---|
| Doorbell Button | Short press for more than 1 second to power on the device; Long press for more than 5 seconds to power off the device. |
| Reset Key | Press and hold RESET for 5 seconds to reset the device. You will hear 'Bugu' sound from the device if reset successfully. |
| Micro SD Card Slot | Support local micro SD card storage (maximum up to 128G). |
| Charging Indicator | Red: charging. Blue: fully charged. |
| LED Indicator | Solid on red: Device is abnormal. Flashing red slowly: Ready for Wi-Fi connection. Flashing red quickly: Wi-Fi connecting. Solid on blue: Wi-Fi connected Successfully. |
| Microphone | Capture sound for your videos. |
| PIR Sensor | Can detect moving objects up to 50FT away. |
| Speaker | Two-way audio output. |
| USB charge port | Use USB cable or use 5V/2A USB charger (not as standard) to charge the video doorbell. |
Meet Our Chime
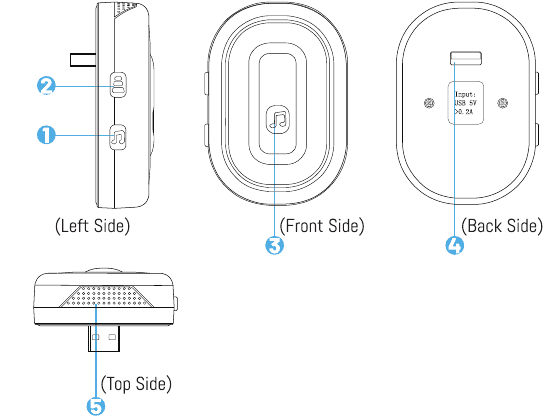
- 1. Ringtone button
- 2. Connection/volume button — long press to link the doorbell, and short press to change the volume (5 levels of volume adjustments)
- 3. LED Indicator
- 4. USB Charge Port
- 5. Horn
2. APP Download and Device Setup
APP Installation
- Method 1: Download the 'CloudEdge' APP from the APP Store (iOS devices) or Google Play (Android devices).
- Method 2: Scan the QR code below to download the app.
Please ALLOW the below two permissions when using the APP at the first time.
- Allow 'CloudEdge' to access mobile cellular data and WLAN, otherwise you will not be able to add devices.
- Allow 'CloudEdge' to receive messages, otherwise the phone will not receive push notifications when motion sensor is triggered or doorbell button is pressed.
Account Registration
Step 1: Open the App, tap "Sign up now" to register. If you do already have an account, tap "Log In" to log in.
Step 2: Enter your email address or phone number (email address is recommended), and check the privacy agreement. Then enter the nick name and password.
- Please tap "Agree" the "User Agreement and Privacy Policy".
- If the verification code times out, please try again later.
- If you cannot find the verification code in your email, please check the spam.
Device Setup
Tap 'Add Device'.
Select 'Smart Doorbell' and tap 'Smart Video Doorbell'.
Short press the Doorbell Button for about 1 second to power on the device.
Tap 'Next'.
Please long press and hold the Reset Key to reset the device, and wait till the LED indicator to flash RED, tap 'Next'. (If you cannot find the Reset Key, please refer to the Tips (3) below.)
Select your 2.4Ghz wifi network, and enter the wifi passwords correctly. (If your wifi network is the combined network of the 2.4Ghz and 5GHz network, please refer to Tips (4) below.)
Prepare for the QR Code scanning.
Use the doorbell's camera to scan the QR code shown on your phone screen (not the QR code in this user manual).
Wait for the connection.
Connection successful!
Put the camera.
Tips:
- Please set up the video doorbell in the range of the good wifi signal. It is recommended to place the video doorbell close to the wifi router while setup.
- Please short press the Doorbell Button for more than 1 second to power on the device.
Tip 3) Finding and using the Reset Key
Please use a card pin or the pen point to press and hold the Reset Key to reset the device, you should hear a sound 'Bugu' from the device, which means the device is reset successfully, and please wait till the LED indicator to flash RED. To find the Reset Key, please remove the mounting bracket from the device, open the silicon cover on the left side of the device, and you will find the Reset Key.
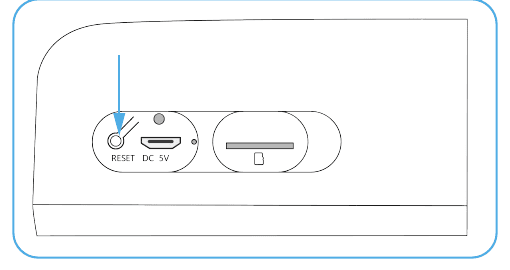
Tip 4) Splitting a combined 2.4Ghz / 5Ghz network
Please be noted that our device only supports 2.4Ghz wifi network. Please select the 2.4Ghz wifi network on Step 6. If your wifi network is a combined network of the 2.4Ghz and the 5Ghz networks, please change it into two separate networks. Here are the steps for your convenience on how to change the combined network into two separated networks.
Go to the router's 'Wireless network settings' page.
Find the 2.4Ghz settings page, change the Wi-Fi name (SSID) to 'xx-24G', and save the settings.
Find the 5Ghz settings page, change the Wi-Fi name (SSID) to 'XX-5G', and save the settings.
After the name is changed, you can find 'XX-24G' and 'XX-5G' respectively in the Wi-Fi search page of the phone.
3. Wireless Chime Connection
Power on the chime
Please insert the USB charging port of the chime into the corresponding USB socket or USB charger. (Power up by DC 5.0V from the USB.)
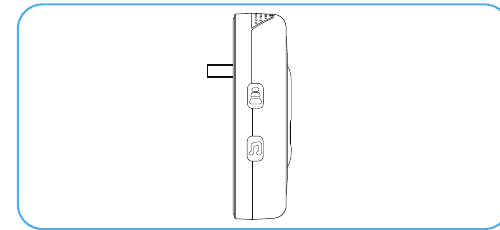
Pair with your indoor chime
Long press the Connection/Volume Button for 4 seconds, and the LED indicator lights up and sound "Di", which means that the chime is ready to link.
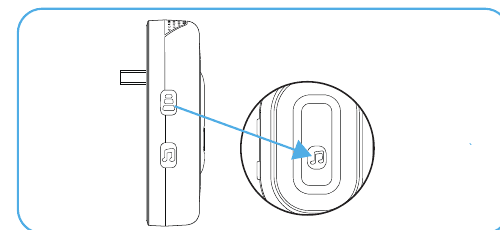
Within 5 seconds after you completed the previous step, please short press the button of the video doorbell to link. The chime will flash and sing, which means that the connection is successful. (Please place the video doorbell close to the chime before setting up their connection.)
Chime settings
- To change the volume of the chime, please short press the Connection/Volume Button to change the volume.
- To change the ringtone of the chime, please short press the ringtone button of the indoor chime to select your likes. After that, re-pair the indoor chime with the doorbell (please refer to the pairing steps above to complete the pairing).

Tips:
- You can link unlimited chimes to one video doorbell, and vice versa.
- Long press the Connection/Volume button to get the chime ready to link or get the chime disconnected with the connected video doorbell.
4. Install the Video Doorbell
Take off the mounting bracket from the video doorbell.
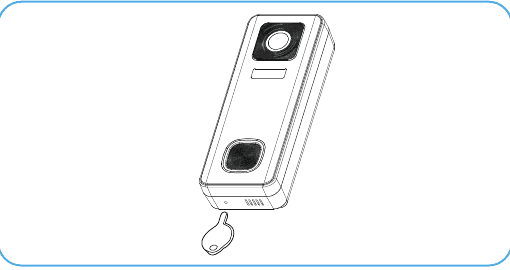
Mount the bracket on the wall:
- Option 1: Mark the screw holes and mount the bracket on your wall using the provided screws.
- Option 2: Using the adhesive stickers, which are very sturdy. Please be noted that the adhesive stickers take approximately 1 hour to reach half of their maximum bond strength and 72 hours to reach the final bond strength.
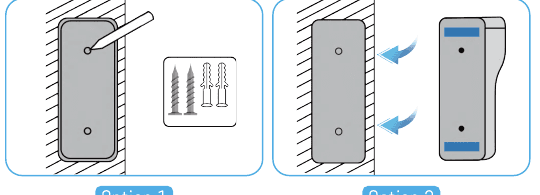
Mount the device into the fixed bracket.
Tighten the security screw at the bottom of the bracket.
All set! Press the doorbell button to have a test.
5. Recharge the Video Doorbell
Please use a 5V/2A USB cable (included) or a 5V/2A USB charger (not included) to charge the video doorbell. (A full charge takes about 8-12 hours.)
When the batteries are being charged, the red light that next to the USB port is on; and when the batteries are fully charged, the blue light that next to the USB port is on.
Tips:
- The built-in battery is not fully charged and the device is powered off due to the shipping safety regulations.
- Please FULLY CHARGE the device before first use.
6. Troubleshooting
1. APP can't be registered successfully
- Please check if the network of the mobile phone is normal.
- Please tick the software service agreement and privacy policy.
- Please check if the verification code is in the spam mail.
- Please use WIFI to register if mobile network cannot be registered. If the mobile network and WIFI prompts cannot obtain the server address, please check if other software can be used normally.
- During installation, please allow the app to obtain your location and all permissions, the system will automatically arrange the best server.
- If above solutions still can't be effective, we recommend you to uninstall and install the app again, the current location and all permissions are allowed during the installation.
2. Unable to connect to the network
1) Unable to connect to WiFi:
- Please enable the DHCP of the router.
- Please make sure the camera is not in the blacklist in MAC settings of the router.
- Turn off the 5GHz WiFi in the router (Note: Please contact the router manufacturer if you can't turn off the 5Ghz WiFi).
- After connecting to the 2.4GHz WiFi, please check your mobile phone if it can access the Internet.
- Make sure the network of your mobile devices are under the same network router of the camera.
- After the network is normal, reset the camera and reconnect.
2) WiFi password reason:
- Check the WiFi password connected of the camera same as the WiFi password of the connected router.
- Check if the entered WiFi password has space or special characters (@,#,%,&).
3) Disconnected 5Ghz WiFi, unable to connect to WiFi:
- Turn off the 5Ghz network and keep the 2.4Ghz network.
- Disconnect the router and then restart the camera.
- WiFi name should not contains words like '5Ghz'.
3. No pop-up message for motion detection alarm
- Enable permission setting in the system settings of mobile device to allow APP to receive message push notification.
- Some Android phones cannot receive the alarm push information.
- Please turn on the motion detection in APP.
- SMS and email reminders are not supported at this time.
4. Motion detection messages prompt frequently
- If motion detection sensitivity is too high, light changes also can cause alarm.
- Reduce sensitivity of alarms (recommended low level).
5. Cloud Storage and SD Card Storage?
- You can choose either use local SD card or cloud to save the videos. This product does not include an SD card. If you need an SD card to store your files, please purchase it by yourself. It's required that the SD card supports 8-128G capacity and FAT32 format. The standard Class 10 SD card is recommended.
- You can also use the cloud storage (free for 7 days), but subscription fee is required. It's optional.
6. After inserting SD, it displays damaged
- Before inserting the SD card, disconnect the power. Connect the power to start after plugging in the card.
- The SD card must be formatted on the computer before using the SD card.
7. How to share the device?
This function can be achieved via "Device Share".
Firstly your family needs to install the app, sign up a new account, login in the new account, and from the APP please find the QR code of the new account.
Open your device, login in your "CloudEdge" account, go to the setting page and tap "Device Share", tap "Add" and tap "Scan QR Code". Use your phone's camera to scan the QR code of the new account that you want to share with.
ieGeek Video Doorbell
User manual for the ieGeek wireless battery video doorbell with indoor chime, covering box contents, device overview, charging, app setup, Wi-Fi configuration, chime pairing, installation, and troubleshooting.
XTU J10 Video Doorbell
User manual for the XTU J10 3MP battery-powered video doorbell camera, covering setup, charging, chime pairing, installation, accessories, and troubleshooting.