 CloudEdge App Docs
COOAU BELL J6 PLUS Video Doorbell
Complete user manual for the COOAU BELL J6 PLUS wireless video doorbell, covering setup with the CloudEdge app, live view, recording, chime pairing, installation and troubleshooting.
This guide explains how to set up and use the COOAU BELL J6 PLUS Video Doorbell with the CloudEdge app.

Need more help? See the Doorbell FAQs. For any questions, you can also email [email protected].
1. After-Sale Support
Dear customer,
Thank you very much for supporting COOAU!
Please read this manual thoroughly before using this wireless video doorbell camera. If you have any issues, please email your order number and the problem to [email protected]. On receiving your message, we will provide a fast solution in 24 hours.
Actually, many problems can be easily solved by setting, such as Networking Connection Fails, Motion Detection Delay, Installation and Charging, False Alarm, Battery Management etc. We promise all the cameras have been carefully checked and packaged before shipping.
We offer the lifetime technical support for your doorbell, and are happy to provide all possible support for you. If you have any questions or ambiguities during using, please feel free to contact us. We will try to find a good solution with our professional camera engineers.
Best Regards,
COOAU Service Team
Note:
- The doorbell only supports 2.4GHz WiFi. It does not support 5GHz WiFi.
- Before connecting this doorbell to the WiFi, please ensure the Wi-Fi signal strength is to be over than 85%. If the doorbell is far away from the signal source, it won't be connected successfully for the first time.
- If your router is connected with too many devices, the doorbell will fail to connect Wi-Fi because of the IP address conflict.
2. What's in the Box
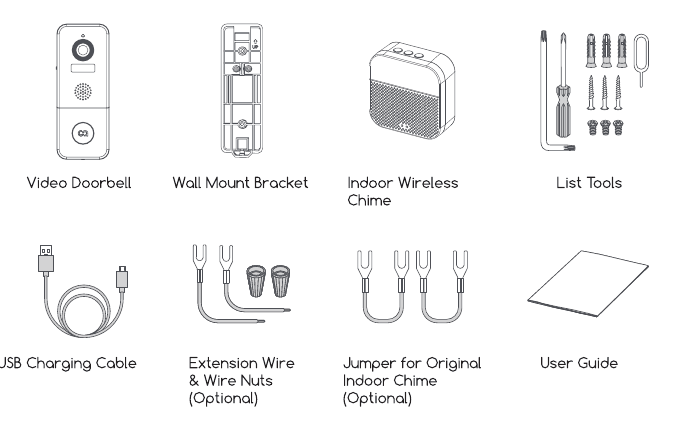
- Video Doorbell
- Wall Mount Bracket
- Indoor Wireless Chime
- List Tools
- USB Charging Cable
- Extension Wire & Wire Nuts (Optional)
- Jumper for Original Indoor Chime (Optional)
- User Guide
3. Meet the Doorbell
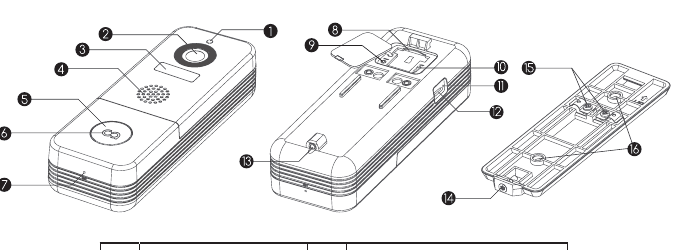
| # | Component | # | Component |
|---|---|---|---|
| 1 | Photoresistor Lens | 9 | Reset Button |
| 2 | Camera | 10 | On/Off Switch |
| 3 | PIR Motion Sensor | 11 | Charging Indicator |
| 4 | Speaker | 12 | Micro USB Port |
| 5 | Doorbell Button | 13 | Security Screw Hole |
| 6 | LED Indicator | 14 | Security Screw |
| 7 | Microphone | 15 | Hardwire Terminals |
| 8 | Memory Card Slot | 16 | Wall Mount Screw Holes |
4. Meet the Chime

| # | Component | # | Component |
|---|---|---|---|
| 1 | Ringtone Selection | 5 | Blue LED Indicator |
| 2 | Volume Control | 6 | Battery Compartment |
| 3 | Setting (Pair / Reset) | 7 | Micro USB Power Port |
| 4 | Red LED Indicator | 8 | AA Battery x 3 |
Button Function Explanation
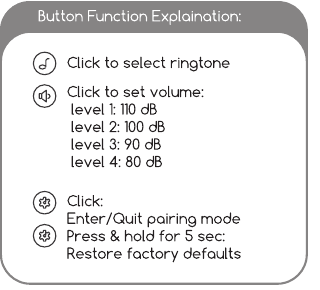
- Ringtone Selection — Click to select ringtone.
- Volume Control — Click to set volume: level 1: 110 dB, level 2: 100 dB, level 3: 90 dB, level 4: 80 dB.
- Setting — Click: Enter/Quit pairing mode. Press & hold for 5 sec: Restore factory defaults.
5. Set Up Your Doorbell

Turn on the doorbell by the on/off switch on the rear of the doorbell. Press and hold "RESET" for 5 seconds to restore factory default. The indicator on the doorbell will flash red, indicating your doorbell is ready for Wi-Fi configuration.
Download and install the App to your smartphone. Launch the App and register an account with your mobile phone number or email ID. The doorbell works with the CloudEdge app (available for iOS & Android).
Operate the configuration near your Wi-Fi router.
Start the Wi-Fi configuration following the in-App instructions or referring to below tutorial steps.
App Configuration Steps

- Tap "+" to add device
- Select Doorbell
- Check power status
- Activate the doorbell

- Reset device
- Input Wi-Fi password — Select your 2.4G Wi-Fi network. (This device will not work with 5G Wi-Fi networks.)
- Prepare Code Scanning
- Generate QR Code

- Wait for connection
- Device Added
When generating the QR code, scan the QR code below with the device at a distance of 5-8 inches. A tone will be heard when successfully scanned. Please place the camera and phone close to your router for the best signal.
LED Indicator Explanation

| LED State | Meaning |
|---|---|
| Solid Red | Device is abnormal. |
| Flashing Red Slowly | Ready for WiFi configuration. |
| Flashing Red Quickly | Device is connecting to WiFi. |
| Solid Blue | Successfully connected to WiFi network. |
| Flashing Blue Quickly | Firmware is upgrading. |
| Nothing | Stand by mode / Power off. |
6. Live View
Tap the play button on the Home page devices to watch live view from your doorbell.

| # | Function | # | Function |
|---|---|---|---|
| 1 | Quit live viewing | 9 | Battery status |
| 2 | Setting menu | 10 | Screenshot button |
| 3 | Date & time watermark | 11 | Intercom key |
| 4 | Audio on/off | 12 | Record on the phone |
| 5 | FHD/SD switch | 13 | Motion detection on/off |
| 6 | Full screen display | 14 | Photo/video album |
| 7 | Stream bit rate | 15 | History playback |
| 8 | Wi-Fi signal status | 16 | Cloud storage service |
Note: Live viewing will not trigger device recording.
7. Settings
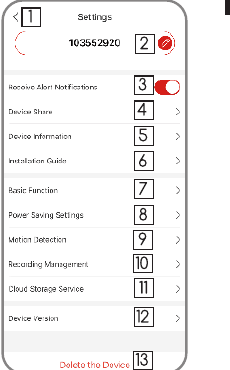
| # | Setting | # | Setting |
|---|---|---|---|
| 1 | Back to live view | 8 | Power saving settings |
| 2 | Edit device name | 9 | Motion detection settings |
| 3 | Receive/block alert notifications | 10 | Recording management |
| 4 | Share device with other users | 11 | Cloud storage setting |
| 5 | Device information | 12 | Device version |
| 6 | Installation guide | 13 | Delete the device |
| 7 | Basic function |
8. Recording
If the Micro-SD card is properly installed, you can playback the video clips taken after motion events or visitor calls. (Live viewing will not trigger device recording.) You can also back up video clips to the cloud, only if you have activated the cloud storage service (Charge after a 7-Days-Free trial).

- Search video by date
- Search video by events
- Timeline zoom in / zoom out
- Cloud storage interface — Activate to enable cloud recording.
9. History Playback
Tap "History" to play the video clips recorded in the MicroSD card.
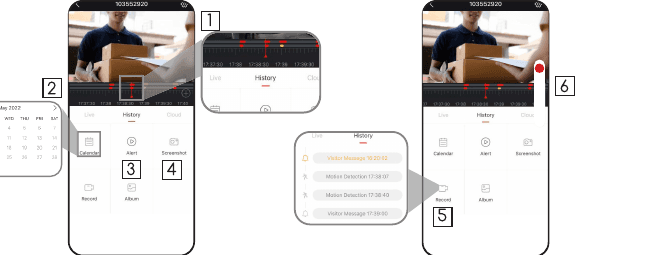
- Time Line: Slide the timeline to the left or right to locate video recordings according to time period. The red bar above stands for video length. The yellow dot stands for the alarm point when someone has pressed the doorbell button. The red dot stands for the alarm point when a motion has been detected.
- Calendar: Check video history by date. The numbers in green stand for the dates that have video recordings.
- Screenshot: Tap to capture a photo and save to Me -> Pictures & Videos, where you can share it to others.
- Record: Tap to start recording a video, tap again to end and save to Me -> Pictures & Videos, where you share the video clips to others.
- Alarm: Tap the listed alarm records to quickly locate and display each alarm video. The bell icon stands for visitor call events; the running-figure icon stands for motion detection recordings.
- Timeline Zoom: Slide upward to zoom in the timeline and downward to zoom out.
10. Connect the Chime
1. Supply power to the chime
The chime can be powered by 3 units of AA batteries (Provided) or a DC5V-1A power adapter.

Click reset button — Click on RESET only once, and you will see the chime indicator flashing red, indicating that the chime is in pairing mode.
Press the doorbell button — Press the doorbell button, and the chime will sound, together with its blue LED flashing. Chime pairing succeeds, congrats.

Note:
- Your doorbell communicates with the chime via Radio Frequency, but not WiFi.
- You can assign different chimes as needed.
- Press and hold RESET button on the chime for 5 seconds till the red indicator flashes 3 times, so as to release the connection between the chime and its connected doorbell.
11. Installation
Your doorbell comes with a rechargeable battery pack built-in, and it also works with existing 12V-24V AC hardwire power source. It enables you to make use of your legacy doorbell wiring for retro-fit installation.
Note: For retro-fit installation, you need to bypass your indoor mechanical chime so as to provide sufficient power for the new video doorbell.
11.1 Retro-fit installation (Optional)
To replace your existing doorbell and mechanical chime, please follow below installation steps:
Shut off the master circuit breaker in your house.
Bypass your indoor chime with provided jumper.
In most cases, the existing doorbell circuit looks similar to the image below. Remove the cover of the indoor chime and loosen the "FRONT" and "TRANS" terminal screws. Use the provided jumper to connect the two terminals, and replace the chime cover.

Select a location for your video doorbell.
Determine the mounting position of the doorbell. Check if you can reuse the existing holes on the wall. If not, drill new holes to mount your video doorbell. It is suggested to mount the doorbell at least 4 feet (120 cm) above the ground for optimal angle of view and best motion detection performance.

Replace your existing doorbell.
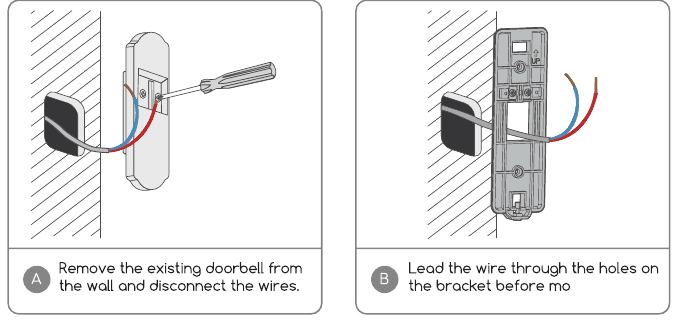
- A — Remove the existing doorbell from the wall and disconnect the wires.
- B — Lead the wire through the holes on the bracket before mounting.
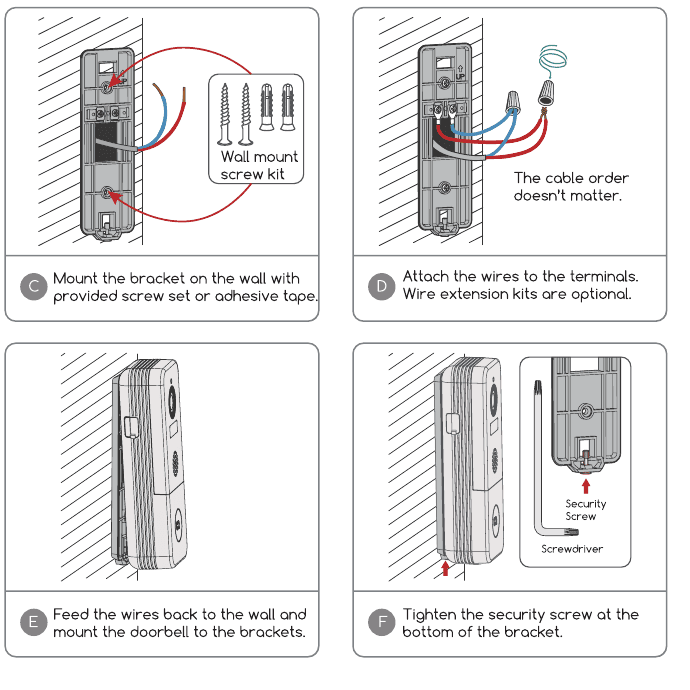
- C — Mount the bracket on the wall with provided screw set or adhesive tape.
- D — Attach the wires to the terminals. Wire extension kits are optional. The cable order doesn't matter.
- E — Feed the wires back to the wall and mount the doorbell to the brackets.
- F — Tighten the security screw at the bottom of the bracket.
Restore power at the breaker, and your doorbell is ready for use.
11.2 Wireless installation

- A — Release the bracket from the doorbell with the provided tool.
- B — Mark the screw holes and mount the bracket on your wall with screws.
- C — Adhesive tape is provided to mount the bracket on flat surfaces. (Optional)
- D — Attach the doorbell to the fixed mounting bracket.

- E — Tighten the security screw at the bottom of the bracket.
- F — All set! Press the doorbell button to run a test.
12. Troubleshooting
Q1: Is the video doorbell powered by battery?
A1: Yes, there is a 10,000mAh big Li-ion battery pack built-in. Thanks to the low power consumption technology, a full charge lasts for more than 3 months in our lab test environment. (20 events per day, 15 seconds video recording per event)
Q2: How to connect the hardwire to the doorbell? Does the cable order matter?
A2: Your doorbell works with both DC 12V and AC 12V - 24V hardwire power source. There are 2 hardwire terminal screws on the bracket, and you can connect each wire to each power terminal screw. The cable order doesn't matter.
Q3: I found a Micro USB port on the left side, what's it for?
A3: Yes, this is the power charging port. You may need to charge your doorbell once in a while.
Q4: What's the Wi-Fi range of the video doorbell?
A4: The video doorbell works with any 2.4GHz wireless Wi-Fi router, mesh system or modems. In outfield test, it works well in most 3000sqft houses. The Wi-Fi range may vary because of different WiFi transmit power, transmission distance and wall blocks in between.
Q5: I installed my video doorbell, but the video or audio quality is poor, why?
A5: In live view interface, WiFi status will be listed. It is suggested to ensure the Wi-Fi status be more than 70%, so as to get your doorbell work as expected. If you think your problem is caused by low Wi-Fi signal strength, try moving your Wi-Fi router closer, or add one Wi-Fi Booster to extend your Wi-Fi range.
Q6: Does the video doorbell work with existing indoor mechanical chime?
A6: No. The doorbell comes with an battery powered wireless chime to notify people when your visitor presses the doorbell button. If you have an existing indoor chime, please use the provided jumper to bypass the existing chime, so as to provide sufficient power to the new video doorbell. And our wireless chime is 100% wireless, you can place it almost everywhere you like. The transmission distance in open space is more than 100 meters (328 feet).
Q7: How many wireless chimes can be paired with one video doorbell?
A7: You can add as many wireless chimes as your wish on one video doorbell.
Q8: Does motion detection sensitivity settable?
A8: Yes it does. There are 5 level of sensitivity status optional in doorbell settings.
Q9: How does the video doorbell detect the motions? Can motion detection be disabled?
A9: The doorbell camera detects motion through the latest PIR motion sensor, it will further undergo a human-shape detection to reduce false alarm rate. You can adjust the motion detection sensitivity, schedule alarm intervals and disable motion detection accordingly due to various user scenarios.
Q10: I installed a 16GB memory card, how many days of event recordings does it keep?
A10: The video bit rate is around 100KB/s. If you have 10 event recordings per day, and each of the video clips lasts for 20 seconds, a 16GB memory card is capable of keeping 24-Month's video recordings.
Q11: Does the doorbell support cloud storage?
A11: Your doorbell supports local video storage by Micro SD card as well as cloud storage. You can activate the cloud storage service in the App. There is a 7-day free cloud recording trial service.
CloudEdge Video Doorbell User Manual
Set up, charge, pair and install the CloudEdge battery-powered Video Doorbell and its wireless chime, with LED status, volume settings, anti-tamper alarm and troubleshooting.
EUKI J10 Video Doorbell
User manual for the EUKI J10 1080P battery-powered video doorbell camera, including setup, chime pairing, installation, and troubleshooting.