 CloudEdge App Docs
P10 Smart Wire-Free Dual Camera Video Doorbell
Complete user manual for the P10 wire-free dual-camera video doorbell, covering charging, app setup, wireless chime pairing, installation and troubleshooting with the CloudEdge app.
This guide explains how to set up and use the P10 Smart Wire-Free Dual Camera Video Doorbell with the CloudEdge app.
Need more help? See the Doorbell FAQs. For any questions, you can also email [email protected].
1. Meet the Doorbell

- Camera
- PIR Motion Sensor
- Photosensitive
- Microphone
- Doorbell Button
- LED Indicator
- Camera
- LED Indicator
- Li-ion Battery Built-in

- Charging Indicator
- Removal hole / Unlock Pin
- Reset Button
- USB-C Port
- Micro-SD Card Slot
2. Meet the Chime

- LED Indicator
- USB Charge Port
- Ringtone button
- Connection/volume button — long press to link the doorbell, and short press to change the volume (5 levels of volume adjustments)
- Horn
3. Charge Your Doorbell
Prior to the doorbell installation, please charge up your doorbell for about 8-10 hours till the charging LED turns BLUE from RED.
| LED STATUS | INDICATION |
|---|---|
| Solid red | Battery charging |
| Solid blue | Fully charged |
Compatible charger (not provided): USB type C mobile phone charger (DC 5V⎓1A~2A)

4. App Download
Search 'CloudEdge' in the App stores or scan the QR code below to download the App.

5. Set Up Doorbell
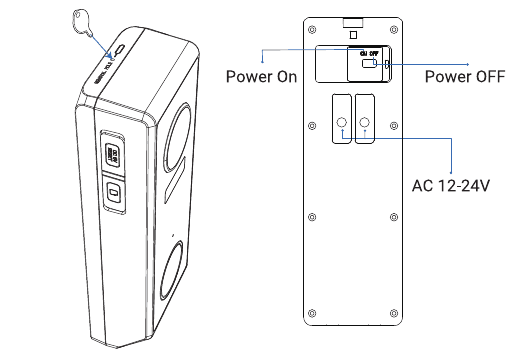
Use the provided pin to gently press into the small removal hole at the top of the doorbell to remove the backplate. Next, open the cover for the power switch, and turn the switch to the 'ON' position to power the doorbell on.
Start setting up your doorbell following the in-app instructions.
Tips
- Please operate the setup near your Wi-Fi router.
- Make sure your phone is connecting to a 2.4GHz Wi-Fi.
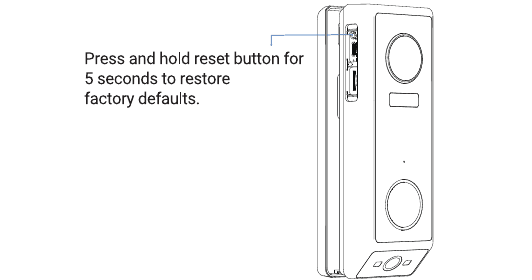
- Make sure the doorbell is turned on, and its indicator LED is flashing red. If not, press and hold RESET for 5 seconds.
- Ensure the Wi-Fi signal is good, and the Wi-Fi password is correct.
| LED STATUS | INDICATION |
|---|---|
| Solid red | Device is abnormal. |
| Flash red (once/sec) | Ready for Wi-Fi configuration. |
| Flash red (twice/sec) | Connecting to Wi-Fi |
| Solid blue | Device is online |
| Flash blue (once/sec) | Live-viewing doorbell cam |
| Flash blue (twice/sec) | Firmware upgrading |
6. Pair with Your Indoor Chime
Power on the chime
Please insert the USB charging port of the chime into the corresponding USB socket or USB charger. (Power up by DC 5.0V from the USB.)

Long press the Connection/Volume Button for 4 seconds, and the LED indicator lights up and sounds "Di", which means that the chime is ready to link.
Within 5 seconds after you completed step 2, please short press the button of the video doorbell to link. The chime will flash and sing, which means that the connection is successful. (Please place the video doorbell close to the chime before setting up their connection.)

Chime settings
 To change the volume of the chime, please short press the Connection/Volume Button to change the volume.
 To change the ringtone of the chime, please short press the ringtone button of the indoor chime to select your likes. After that, re-pair the indoor chime with the doorbell (please refer to steps 2 and 3 in 'Pair with your indoor chime' to complete the pairing).
Tips
- You can link unlimited chimes to one video doorbell, and vice versa.
- Long press the Connection/Volume button to get the chime ready to link or get the chime disconnected with the connected video doorbell.
7. Install Your Doorbell
Select location for your doorbell.
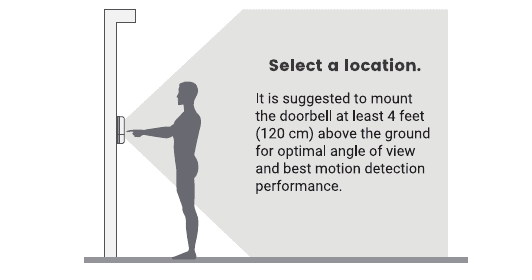
It is suggested to mount the doorbell at least 4 feet (120 cm) above the ground for optimal angle of view and best motion detection performance.
Mount your doorbell.
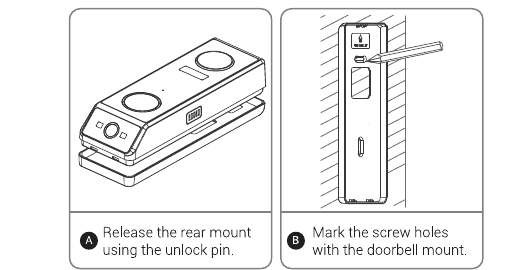
- A. Release the rear mount using the unlock pin.
- B. Mark the screw holes with the doorbell mount.
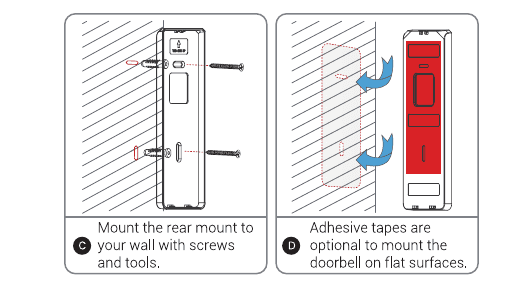
- C. Mount the rear mount to your wall with screws and tools.
- D. Adhesive tapes are optional to mount the doorbell on flat surfaces.
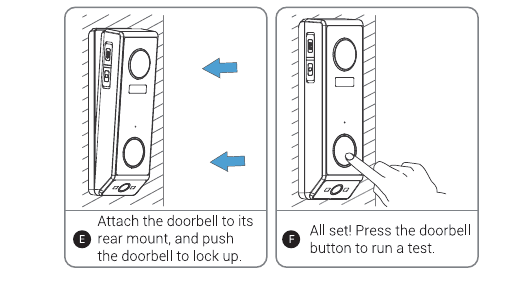
- E. Attach the doorbell to its rear mount, and push the doorbell to lock up.
- F. All set! Press the doorbell button to run a test.
8. Troubleshooting
Q1: Is the video doorbell powered by battery?
A1: Yes, there is a Li-ion battery built-in. Thanks to the low power consumption technology, a full charge lasts for more than 2 to 3 months in our lab test environment (Lab test condition: 10 events per day, 15 seconds video recording per event).
Q2: Can the PIR sensor sensitivity of this doorbell be adjusted?
A2: Yes, you can adjust the PIR sensing sensitivity according to your needs. In order to reduce the trouble caused by false alarms, it is recommended that you adjust the PIR sensitivity according to the actual situation after installation.
Q3: Does it work with existing mechanical chime?
A3: No. The doorbell comes with a battery powered wireless chime to notify people when your visitor presses the doorbell button. And our wireless chime is 100% wireless, you can place it almost everywhere you like. The transmission distance in open space is more than 100 meters (328 feet).
Q4: How many wireless chimes can be added to the doorbell?
A4: You can add several wireless chimes to work with your video doorbell. And one chime can be paired with up to 8 video doorbells.
Q5: Does it support customized Motion Detection Zones?
A5: Yes it does. You can customize the detection zone in the doorbell settings.
Q6: Does the doorbell support cloud storage?
A6: Your doorbell supports local video storage by TF card. And you can also activate the cloud storage service in the App so as to back up video clips into the cloud server. There is a 7-day-free cloud recording trial service.
Q7: Does it support Alexa or Google home?
A7: The doorbell supports Alexa and Google home. You can set it according to your needs.
ieGeek Wireless Video Doorbell Quick Start Guide
Box contents, doorbell and chime layout, charging, app setup, Wi-Fi pairing, chime pairing, installation and troubleshooting for the ieGeek Wireless Video Doorbell with the CloudEdge app.
SAMZUY 2K (Wired) Video Doorbell
Quick start guide for the SAMZUY 2K wired video doorbell, covering setup, Wi-Fi configuration, live view, recording, chime pairing, retro-fit and hardwire installation, and troubleshooting.